Table of Contents
A journey into online A&S during a pandemic

This is my fourth Athenaeum the first two in person and the last year, on bentwood, online. Along the way I have learned a lot about how I do A&S and how I interact with people. Each year has been different and each year has been a rewarding experience. Prior to this I have shared a lot of my research and information on my woodworking, particularly bentwood boxs. This year, while I will touch on bentwood, think small, my focus was primarily on teaching and learning how to do so in a virtual world.

The past year has seen the SCA embrace the possibilities of virtual communications in every facet of the society. Online classes, courts, tournaments, if we do it in the in person SCA, it has been done in the online SCA. For some of us that acctually provided a silver lining. For those who do an art that does not lend itself well to travelling, being able to bring the class into the workshop is a new experience. In my case, as a woodworker who utilizes modern tools, it gave me a chance to aim classes at a wider and different audience than I would have previously.
One of the things I have seen over time is people express interest in starting into woodworking and asking what tools they need to buy. This will usually get a laundry list of tools lobbed their way to go out and purchase. When I started it was the approach I tried. I went to the store with money in hand and bought everything I thought I would need and I could afford. Within five years I did not own any of those tools anymore. Not knowing what i was making or the needs of the project led to a lot of wasted money on tools that were either not suited to my needs, not powerful enough, or completely irrelevant to the projects I was doing. There has to be a better way.
Getting Started online
When Baroness Disa i Birkilundi began hosting online classes and posting them to her youtube site, EarlySweden I taught a few classes on several different subjects, mostly classes I had done before. I adapted my tent painting class to online and taught that. After the tent painting I did a class on historical and camp seating, a look at different types of chairs that could be found in the SCA at events. If you know me at all you know I had to do a class on Bentwood boxes.
During all of this I was looking at other classes and comments people were making and seeing an exciting trend, people were asking about getting started in woodworking. Being in the Pacific Northwest and the SCA it always puzzles me how few woodworkers there are. We recreate a time when wooden objects were part of life. From your tent poles, to your camp furniture, to your eating and drinking utensils, wood was everywhere. But in todays modern middle ages, it is bulky. The tools and knowledge to work it can be expensive, or difficult to acquire. Many of us who have been working with wood for years have had times to build large collections of tools that look daunting to newcomers. But we all started somewhere.
Woodworking 101 – The six board box and saws
My idea was to create a series of classes aimed at specific projects and then cover a central step that was needed for that project. In my first woodworking 101, the six board box, the focus was on saws. I chose a project that required as few tools as possible, namely a saw, and discussed as many different types of saws as I could think of and some of the pros and cons of those saws for the project. By starting with readily available lumber from the big supply stores, and a variety of different paths to take to reach a common end goal my hope was to encourage people to make a box with either tools they already had, or with only needing to buy one tool.

Woodworking 101 – The breakdown bench and chisels
For the next class in the series I selected a break down bench based on a 15th century design. The class referenced back to the first class and required a saw, but also added the need for a chisel to make thru mortice and tenon joints. We covered different types of chisels and what the were used for as well as how to do a mortice and tenon and some of the different types of mortice and tenon joints as well as where they were useful. Again, keeping with readily available lumber to cut down on the steps.

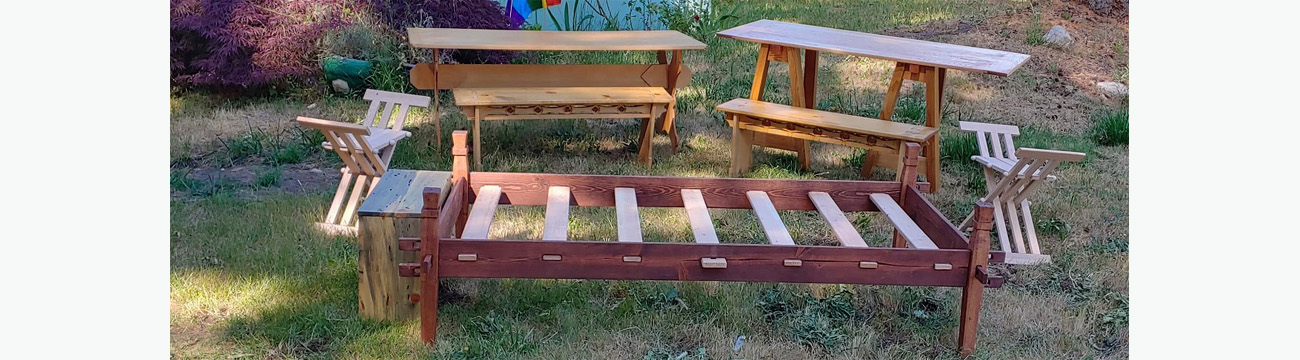
Woodworking 101 – The gokstad bed
For the third class I went bigger. Many times people equate larger size with large difficulty. This class we took on the gokstad bed. A bed is one of the biggest things most people will ever attempt for SCA use. The gokstad bed has a lot of parts but is really nothing more than a series of mortice and tenon joints and mostly straight cuts. We introduced several new tools in this class, such as the marking gauge and a tapering jig for table saws. We also talked about templets for easy reproductions of multiple identical parts and focused on tusk tenons for breakdown furniture.

Woodworking 101 – Hinges and finishes
Part four was a little different. I didn’t introduce a new tool per say, nor did I have a project. Instead we focused on finishing the projects already done with a class on hinges and finishes. There are a lot of different finishes available today and just as many questions as to which is the right one. We talked about stains, oils, wax, and paint and when they were appropriate. We also looked at some different hinges and types of nails, all the little details that make a project really stand out. I also got to try my hand a bit at forging my own hinges as seen here.

Woodworking 101 – The trestle table and hand planes
When it came time for part five I decided to start to up the complexity a little bit and went for one of the other large projects in the SCA camp. A table, specifically a 15th century trestle table. This ended up being part one of the project and we only looked at the trestle itself. For this class I introduced hand planes. Jack planes, smoothing planes, block planes, wooden planes and metal body planes. What they have in common and what is different. When it comes to the finish of a project the surface left by a well tuned plane is beautiful and not something easy to achieve any other way. We looked at mortice and tenon to join the pieces together and added in pegged tenons to the list.

Woodworking 101 – The folding stool and drills
Class six went a bit smaller in scale and went back to introducing new tools, in this case we talked about drills and bits. Drill press, cordless drills, braces, augers, gimlets, and spoon bits, we covered a lot. This class was on the folding stool or fauldstool. The folding stool is smaller, uses less wood than previous projects but requires a good deal more precision. Having multiple moving parts requires all the parts align and move smoothly. The drill press is ideal for this project but there are other ways as well such as alignment jigs and if you are lucky enough to have a really steady hand.

Woodworking 101 – The breadboard end table top
For class seven we went back to the finish the trestle table and addressed construction a bread board end table top. This was more about new techniques than new tools. We addressed wood movement with sessional changes and how to compensate for it, the use of drawboring to pull joints tight as well as times not to glue, and joining multiple pieces of wood to create larger pieces than we can find in the stores. This was one of my favorite of the classes, I loved how well the top turned out and it was a project I had put off for some time.

Woodworking 101 – The viking age chests
The eighth class I did in this series, so far, was to address some viewer suggestions. Class eight was Viking age chests. The chests used in the Viking era were very similar to those used elsewhere in the world and are build very like the six board box already covered, where they differed was in the angling of the sides. Most chests associated with the Norse had sloped sides and that required introducing angled cuts and the use of the bevel gauge.

Woodworking 101 – Folding Tables
The final class to date was a bit of a divergent one. Most classes were focused on finding historical examples to show but this class was a bit different. Not everyone has the space for the big projects, or cares as much about being historical. For many, medievalish and just not obviously wrong is good enough and I wanted to reach out to those people as well. The Folding table class had several things of note going on. One, as I mentioned, it was a departure from the historical examples, and two it showed me how tired I was getting of online teaching and the lack of feedback from the viewers.

Through out the course of these classes I did my best to cover a variety of tools and how to use them, provided places to look for inspiration and along the way gave something of a road map for having a well furnished encampment. I also learned a lot.
Teaching online is not easy. I am a pretty massive introvert and I get nervous just about every time I teach and am up in front of people. Being online I am not in front of people, just me talking to the computer and I miss the feedback. When you teach in person you get feedback from your audience, someone looks confused so you go into more depth on an explanation, or a question is asked and you get a dialog that can help ground you in the class or helps you roll into a new point to make. When you teach online you are constantly poring out the energy to be looking for those social cues that you never get and at the end it can leave you drained, empty, and feeling unfulfilled as a teacher.
This from an introvert.
I have also taken a number of online classes and find it is much the same for me from the other side. There is a disengagement inherent in electronic communication and the lag that we experience that I don’t think will see digital becoming the norm when we have a choice. But the possibilities it offers us is truely amazing.
Thank you for your interest and I hope to see more people making things with wood. It can be daunting but it is a fantastic experience and not as tough as you might think. The hardest part is taking the first step, and maybe deciding on what finish you like best. Or maybe figuring out your favorite lumber. Of course deciding your favorite tool to use can be tough too, and it can vary project to project. And then of course……..
Your video series is great and your work is absolutely gorgeous!
Thank you. It is definately a labor of love. I hope to add more to the videos soon, I needed to take a break and look for other ideas to bring to people.
Thank you for this. I had seen some of your classes around but didn’t realize the specifics of them and now I’m making a point to save them as woodworking has always held an interest for me, but as mentioned I didn’t know where to start or what tools to get. I look forward to being able to watch these when I have some more time! Also thank you for your honesty about being an introvert and teaching online. I understand the lack of feedback aspect and how hard it can be to continue on when faced with the void of space between you and your audience. I really appreciate your exhibit – well done!
Thank you, I am endlessly surprised at how few people in the SCA work with wood considering its relative ease to access materials and tools. I love to talk shop and would be more than happy to answer any questions you may have, feel free to look me up online or at events.
Well done! ESCA with online education and discussions has been life changing for me and I am grateful to people like you who have stepped outside their comfort zones and created a body of work to be shared and enjoyed. Thank you and continue too.
Thank you, online classes proved to be a challenge in ways I did not expect. I have had a number of discussions about how online sca in the future could be used to supplement and improve in person events. We as a whole got a lot of great content and a forced maturing of a tool we used rarely before.
I love the concept behind your Woodworking 101 classes. I especially appreciated that you aimed to help people make effective choices in tool acquisition. So often I see new craftspersons buying tools that are going to go unused or be frustrating to use – I love that you wanted to help people avoid that waste of money and energy.
I really enjoyed your classes and relate to the weirdness of teaching to the camera. I would love to chat about your thoughts on this learning process. Thank you for creating such helpful learning content for SCAdians. I have no doubt we will see some snazzy encampments thanks to your efforts. Well done.
Inga
I am always happy to chat with you Your Grace, your insight has been very helpful when we have talked before. The number of people who ask for a complete list of tools to buy always bothered me and I wanted to put out a different mindset and encourage more people to give woodworking a try and not be intimidated.
You’ve produced a remarkable body of work under difficult conditions, and displayed considerable insight in working with, and solving, problems. I am looking forward to a good conversation, should you wish.
I always enjoy conversations with you and love to hear any insites you have.
You may not have received much feedback from your on-line classes, but please don’t equate that to the impact your classes have made. I expect we will see a lot more wooden furniture out there next year because of you! Well done, my friend.
Thank you for the vote of confidence.