


Table of Contents
Introduction
I began working with Colored Clay because I was enamored of the bright colors, my interest in Chinese ceramics, and the love of a challenge in my craft. After almost a year of working with it, I wanted to share my results in Athenaeum, but had little documentation, so continued to research the technique. I used Google translate to investigate every term I could find including Chinese Characters. As I searched, I discovered the term for this technique translates to “Twisted Placenta.” I began to comprehend that I had only skimmed the very surface of the art, and there was meaning behind the vessels rooted in Confucianism and which, as a Westerner, I was far from understanding. Further, I realized, because of the philosophy associated, I was treading a thin line between respect and cultural appropriation. The Japanese term “Nerikomi” is well known in the ceramic community, but I decided as a matter of respect for the culture I would use the Chinese term “Twisted Placenta” and continue trying to understand it.
My fascination began when I wanted to use up bits of expensive, colored porcelain that I had purchased years previously in order to make colored beads. But after re-hydrating the clay, using it on the wheel, and seeing the results, I was hooked on its brightly colored beauty. I was familiar with English “Agateware,” which was an Eighteenth Century technique, so I began to look further to see if it had also been made in earlier eras. I discovered that combining different colors of clay together to create designs within the clay itself, rather than the more typical surface design, can be found as early as the Tang Dynasty (619-907C.E.). Its production continued from Tang through the Song (960-1279) and Yuan Dynasties (1271-1378), then disappeared. The inspiration of colored clays mixed together is thought to have come from Roman marbled glass ware, which came to China through the Silk Road, when Chinese Potters sought to imitate its beauty.
I have been a potter for years and to begin, I was primarily interested in this colored clay as it is thrown on the wheel. However, as I continued to research and noticed details, the majority of the ancient Chinese colored clay photos I saw could not have been thrown on a wheel and appeared to be built by hand using patterned clay shaped by molds to make the forms. I have done some slab work but had never worked with molds.
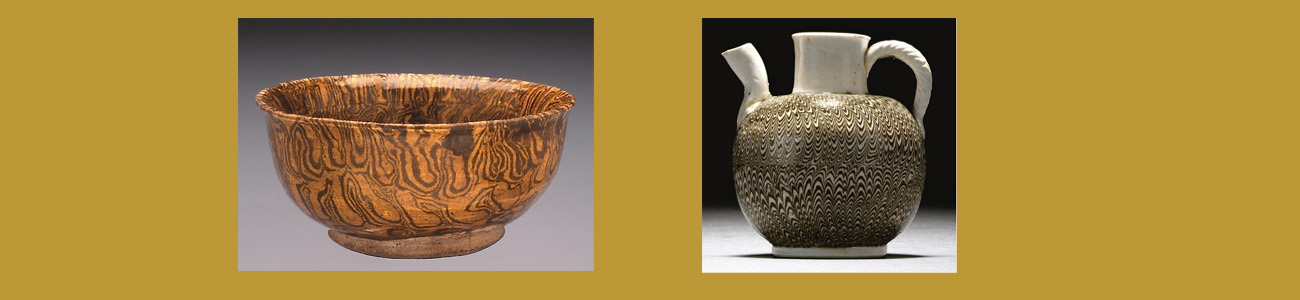
Notice the pattern on this Tang Dynasty cup. Although each element is not exactly reproduced, a pattern is still apparent, and the design shapes stay on the horizontal plane. Handle and foot were added separately.

Whereas this colored clay cup was thrown on the wheel. As pots are thrown on the wheel, clay is pulled up by the potter as the wheel rotates, which creates striations of color which move vertically and at a diagonal. Keeping even an informal pattern in the clay is not possible.

Construction
The Twisted Placenta pots were made from two colors of clay rather than the multiple, brightly-colored clays with which I began. The Tang pots were white and red-brown earthenware clays. Song Dynasty pots were white and black stoneware or porcelain. However, with either clay type, in order to get the layered pots to stay in one piece, the ancient potters had to find two naturally-occurring clays of different colors with the same percent of shrinkage. Or they may have added red iron oxide to the same white clay during the Tang era, and with Song pottery they may have added a combination of red iron oxide and manganese. All clay shrinks when dried and then more shrinkage occurs when it is fired as the chemically-bound water leaves the clay body. In general, shrinkage from wet to fired clay runs between 8% and 12%. This would cause two clays of different chemical composition to split off from each other due to the coefficient of expansion.

Unglazed base of my plate, where I used red iron oxide for the colored pattern. This shows a similar color to the Tang plate 
Mostly unglazed base of a Tang Dynasty plate
My Experiences
Making these Twisted Placenta pots was the greatest ceramic challenge I had attempted in years. Many beautiful pots had to be discarded because of serious flaws. I might have ceased my attempts had I not been hemmed in by the COVID-19 pandemic lockdown, with extra time to experiment. In addition, with my son, daughter-in-law and grandchild in lockdown in China, I felt doing Chinese style ceramics to be a connection with them, and we had Zoom conversations about translating terms from English to Mandarin, and historical situations that affected the culture.
Tools and Materials
White clay, small buckets/tubs, red iron oxide powder or brown Mason Stains, black Mason stain #6600, or naturally occurring clays of white and red-brown with similar shrinkage, sturdy mixing utensil, paddle, rolling pin, canvas squares, working surface, dust mask, metal rib, general ceramic tools, plastic sacks, fabric squares, paper towels, plaster slabs, measuring sticks, bowl & plate molds, mold release, ruler, triangle.
Steps Used to Color the Clay
- Dry out white clay completely, then rehydrate to pudding consistency, or take a slurry from a slurry bucket.
- Mix between 3 & 5 % red iron oxide or Brown or black Mason stain by weight into clay. Mix with a sturdy utensil until color is even. This takes a lot of mixing.
- Pour colored slurry onto a canvas square covering a plaster slab.
- Let dry until usable, then wedge.
Steps Used to Make the Design
- Work on a clean surface, or a clean piece of plastic, or fabric.
- Roll out a slab of clay. I begin with the white because less time is taken to clean up between layers. Red iron oxide is quite messy to work with.
- Use wood gauges for measuring the thickness of the slabs evenly.
- Cut the slab into a large rectangle.
- Roll out the second color on another surface and cut into the same size rectangle as the first.
- Place the second color on top of the first. Roll the laminated clay out flatter.
- Cut the slab in half, put the second 2 colors atop the first two. Trim so they are even.
- Whenever two pieces of colored clay are placed on top of one another, slip and score.
- Repeat steps 5-8 as many times as is desired to get the thinness of clay layer desired.
- After the blocks/logs are made, wrap well in plastic and let them sit. A month or longer is not too long for them to age. This helps the moisture even out through the clay log, and make the colors adhere.
Modern Colored Clay artists call these clay logs “canes” after millefiori glass art.

Designs Seen in Twisted Placenta
SPIRALS: Roll the block of lines into a long cylindrical log – it will look like cinnamon roll dough – or slap it into a long rectangular block. The positive aspects of the rectangular block is how clay cookies fit together with tessellation.

Tang Dynasty vase. Spirals were distorted out of shape when pushed into the mold. 
Spiral logs 
My small plate of spirals.
2. CURVE PATTERN: Push strip of clay up and pull down into ‘U’ shapes.

Tang Bowl with ‘U’ pattern design. 
Unfired clay with ‘U’ pattern 
My version of the “U” design, completed.
3. WEAVE: Cut the block of lines into rectangles, place each rectangle at approximately 90 degree angles from the others

Song Dynasty bowl. 
Unfired clay in similar layout to the Song Bowl. 
My version of the ‘Woven’ pattern, completed.
4. CHRYSANTHEMUM: I recently discovered Modern Master Chai Zhanzhu, who rediscovered and taught himself to replicate this ancient style. Before seeing his process, I was unable to understand how it was made. It is indeed complicated. Cut small triangular shapes vertically, rather than horizontally, from the block. Gently twist then press them together so clay layers curve. Press triangular shapes together to make a circle. After the circle is formed add a disk of clay in the center hole.


Tang, small Ewer Chrysanthemum Design. 
My primitive Chrysanthemum slab. 
The slab over a slump mold. 
My “Chrysanthemum” patterned plate. Completed.

Chrysanthemum shards 
Song plate showing center added to Chrysanthemum circle.
Putting the Designs Together
- Measure and mark the clay logs into 1/3” sections. Using a wire, cut into medallions or shapes desired. They will look like little cookie rolls.
- Slip and score around the outside of each medallion.
- Press the medallions next to each other as firmly as possible without losing the design. There will be some distortion.
- If there are empty holes between medallions, fill with bits of clay.
- After enough are made to cover the mold chosen, place a piece of plastic or fabric over the slab and roll out with rolling pin.
- Lift cover to see if any holes remain. If they do, patch with clay, attempt to match colors.
- Flip slab over and repeat. Repeat as many times as needed to get the slab the thickness desired.
- Cover both sides of slab well with plastic and sit aside to rest a day or so. Clay has a ‘memory’ and will shrink back to its original shape a bit.
- Remove cover, press slab into or over mold, fit mold, paddle, trim excess clay to even the pot edges.

Unfired slabs of clay draped over molds 
Oval tray, completed.
9. Twisted Tire/Twisted Placenta, twist two colored clays together and press over a mold. My newest discovery. Photos of Song Twisted Placenta are so sophisticated and precise, this may take me years to duplicate to my satisfaction.
Finishing
- If using a hump mold, apply the foot and handle now, or attach a white lip, if desired, I throw these attachments on the pots.
- Put a piece of paper towel over clay. Wrap plastic tightly around the clay. Set aside.
- Change the paper towel to a dry one every day for three or more days. (I dry out an re-use paper towels.) Re-wrap with dry plastic each time.
- Check the clay once a day or more to see if the walls of the pot will stand independently if the mold is removed.
- Remove from the mold as soon as possible to avoid cracking, continue to re-wrap in dry plastic.
- If using a slump mold, apply a foot, handle, and white lip when mold is removed, if they are desired.
- Trim the edge/lip evenly. (This can be done earlier in the process.)
- After about a week, wrap the plastic more loosely around the pot. Keep changing wet plastic to dry.
- Check the pot every day until the pot is too dry to be manipulated by the fingernail.
- When the pot is bone dry, the top layer of the clay will be smudged & smeared. Scrape off the entire top layer carefully with a metal rib. The design will be noticeably brighter.

Adding a foot ring to a bowl still on the mold. 
Scraping off layer of muddied clay to show the clear design. 
Song bowl with white rim added to the Twisted Placenta base. 
My plate with white rim added to the Twisted Placenta.
11. Handle carefully so as not to re-smear. If it does smear, scrape again with the rib. 12. Glaze and fire as usual.
Molds were used in Ancient China as this stoneware hump mold attests.

Song clay mold and pot made from the mold 
Commercial mold form upper right, the rest I made from clay.
I started out with commercially made hump mold shapes, then made my own. There are no commercial molds in the shape of the Tang Twisted cups and bowls that I admire. Modern molds are most often made of Plaster. But I chose to make them of clay like those of the traditional Chinese; mine are ugly but serviceable.
Glazing
The Tang Twisted Placenta pots were generally earthenware, fired in kilns at about 1400 degrees F. Most examples were covered with a lead glaze, which turned transparent amber to light brown as a result of lead glaze uniting with the iron oxide in the clay. Unfired red iron oxide is a handsome red-brown color, but after firing it turns a shade of brown-black. This is consistent with Medieval Western European glaze colors. There are a few images of Tang ware that appear to be stoneware. Possibly they were mislabeled, made late in the era, or from a different kiln. The kiln I studied most was the Danyang kiln in Hunan Province.

Ceramic Nerikomi pillow, glazed with Green Lead glaze. 
Tang Nerikomi plate. Glazed with clear lead glaze. 
Bowl glazed with copper-lead. I suspect the copper leached out by acidic conditions. 
Tang plate 
My Glaze experiments, 1st try 
Glaze test tiles on my Twisted Placenta background
I have found a few cups that are glazed transparent green. Copper Oxide was used as a low-fired green colorant in the Sancai tomb sculptures of the Tang era. Because my clay is a “porcelain-like” stoneware clay, I fire it at high temperatures in order for the clay body to mature and become waterproof. Lead glazes are problematic for health as well as ineffective at high fired temperatures, so I use a transparent feldaspathic glaze, which I make.
During the Song Dynasty, there are examples of Twisted Placenta pots more sophisticated both in shape and glaze which are labeled as stoneware. The glossy neck of this Song pot is more typical of high fired stoneware or porcelain glaze. This vase would have had to be made with a mold of multiple pieces. If the photo is enlarged, it appears that several sections of the patterned clay slabs were used.


Song unglazed bowl 
Black and white bowl #1 
Black & white bowl #2 
Black and white bowl #1, exterior shot
Challenges
I have been working in ceramics long enough that I seldom have pieces from my production that crack. Thus, having so much cracking occur when I began this project was disconcerting. Each Twisted Placenta pot takes considerably more time and effort putting together the component parts than any other ceramic style. So, when every pot I made in the first five months was fatally flawed and had to be discarded, I went from casually looking for solutions to frantically looking for solutions. Advice I was given by Modern Western Ceramicists was mixed and often contradictory. I was comforted when found information about Master Chai wrote that he cried in frustration when teaching himself the technique. Been there, Master. He also said 90% of work is destroyed during the process or has to be destroyed because of flaws. I continued working and found that for me, to help the success of the vessels:
- Climate is an issue. I began this journey in the Summer of 2020. Even though I worked indoors the hot dry atmosphere and the wind, had a deleterious effect on clay drying evenly.
- Each individual “cookie” had to be robustly scored on all sides.
- Compression always helps pots stay together. After they were put together in slabs, I paddled them as vigorously as I could without distorting the clay.
- Tools need to be sharp.
- Many of the historic pots were very small. I should have started small and increased in size as I progressed.
- And the worst for me was needing more patience. This meant that it required over a month or more for the constructed vessel to dry slowly and completely enough to be fired in the kiln. This seemed an excruciatingly long time for someone (me) who was so excited to see how it would turn out.
- There is a place craftspeople reach of the craft “magically” coming together successfully for no apparent reason. I have had this experience with other ceramic forms I had difficulty with. All I can say is “practice.” The hands sometimes know more than analytical reasoning.
- These solutions improved the success rate of the pot, although I still have way too many pots crack at all stages of creation. It’s a problem I do not have with my other pottery.
- I also discovered that cracks and breaks cannot be patched. Don’t even bother.
Historical Context
The Tang Dynasty is considered a “Golden Age”, of Chinese Art. In ceramics, technical and aesthetic developments and improvements included perfecting porcelain clays, advancing celadons and other glazes. In addition, magnificent tomb ceramics with three colored glazes, Sancai 三彩, were created and perfected during this time. Sung and Yuan Dynasties continued to refine and export their ceramic shapes. They innovated ceramics which no other cultures came close to achieving for over 1000 years. With the importance of the advancement of porcelain, and the other ceramic techniques in China, perhaps it is not a surprise that layered colored clay appears to be a side note if mentioned at all in most museums and books about Chinese ceramics.
There were fewer Twisted Placenta pieces created, because the pots crack easily while being constructed and while being fired. According to the Shenjang Culture webpage, the yield of Twisted Placenta is low because of the time-consuming nature and the high destruction rate, while the demand for fine ceramics increased. To further the economic prosperity of the Song Dynasty, output of ceramics that could be produced more rapidly and reliably increased, while Twisted Placenta production waned and was gradually lost. It was an economic decision. During the 1930s, an archeological expedition found kilns and thousands of pottery shards in Dangyang of Hunan province. It was an active kiln during the Song Dynasty, yet only 70 complete pots were found, many of which were plundered by the British and during WWII, the Japanese. There are other kilns, but the Danyang kiln had significant production. There was also a sad amount of destruction of Chinese historical art by Mao’s Red Guard during the Cultural Revolution, although I haven’t read specifically how Twisted Placenta Porcelain was affected.
“Twisted Placenta” – the Gentleman’s Porcelain
The term ‘Twisted Placenta” when referring to the colored clay in patterns is difficult for an untrained Westerner to understand. There may also be a translation confusion. I also found it called “Embryo,” and “fetus” which is easier for me to follow when I consider that the interior is the same as the exterior. One site says, “Porcelain pattern is born from the embryo, which is interlinked with the outside and the inside. It can not be duplicated. It is called ‘woven porcelains’ because it has the same characteristics throughout the clay and is also known as ‘gentleman in the porcelains’.” Also, “The decoration is born from the womb, the surface is the same as the inside, the inside and outside are connected, the one.” And, “The production principle is to use different tones of green mud to make mud, roll mud of different tones into plates, overlap each other, and then knead, slice, splice, fit, extrude, make moulding, then glaze firing.”
These sites also consider Twisted Placenta appealing to the Gentleman. In Confucianism, a Gentleman is considered “Man at his best” who displays both learning and merit. Twisted placenta culture is from Mencius (a Confucian scholar). The technique in which inside and outside are interlinked and faithful representing the Chinese person of letters. It mirrors the Gentleman’s feelings; the aesthetics emphasize light, simple, but elegant beauty, and tries to express “Righteousness and propriety with wisdom in mind,” a Confucian principle. “The gentleman’s taste”. “Gentleman’s instinctive quality, the faithful.” I feel this means if the interior is the same as the exterior the Gentleman lives the principles of Confucianism and is not a different person on the inside. Because this style of ceramics also reflects that same honesty and refinement, it may be considered symbolic of the Gentleman.
Glossary
Agateware: Ceramics made from pressed together colored clays which give color striations. The name comes from the agate stone. Also called “Lamination,” “millefiori,” and “kneaded ware.”
Cai Tao: Mandarin for colorful clay. 彩陶
Feldaspathic Glaze: Glaze made up of 50% feldspar, a high-fired, safe alternative to lead glazes.
Ghost Wave: another term for thrown agateware in China.
Hump Mold: Where the clay slab is placed over a convex shape. Also called Drape Mold.
Neriage, Japanese term for agateware. A process wherein different colored clays are placed next to each other and thrown on the wheel, giving random streaks of color. “Neri” to mix, “age” to pull up.
Nerikomi: Japanese term. A process which creates repeat patterns of contrasting colors in a clay slab. This is then used for handbuilding or with a mold. “Neri” to mix, “komi” to press into. Nerikomi is the term most often used for this technique by Modern Ceramicists.
Marbleware: Sometimes used synonymously with “agateware.” But more accurately, the technique of several colored slip clays applied to the surface of a ceramic piece and mixed in a delicate design.
Mason Stains: a combination of minerals and frits that create a uniform color in clay or glaze.
Rou Mian: (Google Translator) both Neriage and Nerikomi (Japanese) to Rou Mian 揉面 (Mandarin) .
Sancai: Lead-based three-color lead glaze ceramics primarily made for tomb decoration during the Tang Dynasty.
Slump mold: Where the clay slab is placed into a concave shape.
Slurry: recycled clay scraps hydrated to the consistency of pudding.
Twisted Placenta: Translated term for Nerikomi pottery. Also referred to as “Twisted Tissue”, “woven porcelain”, “flower porcelain” and “Jiaotai Ci”
Twisted Tire: From what I have have put together from sites unfamiliar with English, Twisted Tire is twisting two colors of clay together, then draping the strips of clay over a mold. I believe this is a modern term, as “tire” is a 19th Century invention. Also known as “through flower” technique. What I have been calling “Spiral logs” or “canes” may be what the Chinese sites have referred to as Twisted Tire.
Wedge: When the clay is kneaded by hand to a consistent texture and to remove air bubbles.
Zougan: Ceramics and metal inlaid with patterned colors. Although considered Nerikomi, the added colored clays go into, but not all the way through the clay.
Citations and Images
https://www.christies.com/lot/lot-a-rare-yellow-glazed-marbled-pottery-cup-tang-5880263/
https://www.marks4antiques.com/apa/MARBLED-POTTERY-JAR-Chinese-Tang-1636b6
A fine Marble-Like Ceramic Bowl. Tang Dynasty. Alaintruong.com
MARBLED EARTHENWARE WARE BOWL – TANG DYNASTY CHINA – 660AD – 920AD, http://rhrising.blogspot.com/2013_08_01
. Marbled Earthenware Bowl-Tang Dynasty China – Collection of the Royal Ontario Museum. Toronto. Canada.)
Bowl of Stoneware Marbled Clay, Chizou Ware, Alaintruong,com
http://www.xinhuanet.com/english/2018-08/29/c_137428386.htm
Metropolitan Museum Of Art. Mold For a Bowl. The Met Fifth Avenue. Gallery 204.
A Green Glazed, Marbled Pillow, Tang Dynasty. Christies.com
Pressmolded Dish, Marbled Body, lead glaze. Ceramicstudies.me.UK
A VERY RARE MARBLED EWER 10th Century, https://www.sothebys.com/en/auctions/ecatalogue/2007/fine-chinese-ceramics-works-of-art-l07210/lot.17.html
Shards. Henan Song-Jin. http://www.koh-antique.com/henanceramics1/henanyao3.htm
A rare Marbled Glazed Dish. Northern Song Jin Dynasty. https://www.christies.com/lot/lot-6039912/?intObjectID=6039912&lid=1&From=salesummery&sid=91b5f063-fc41-4d11-91e1-253818ce555f
https://www.metmuseum.org/art/collection/search/49202?sortBy=Relevance&=&when=A.D.+1000
Large, Marbled, Meiping, Five Dynasties. Rui Xil Lou Collection. Sothebys.com
Twisted Placenta/Embryo discussion: https://www.travelchina1.com/thread/Firing-Techniques-of-Dangyangyu-Twisted-Tissue-Porcelain.html
http://www.xinhuanet.com/english/2018-08/29/c_137428386.htm
http://chinaplus.cri.cn/mychina/culture/34/20190619/305124.html
Very interesting read. I am wondering if you have some resources that links to the Chinese character and history about twisted placenta. I would love to do more reading about it. Also love to connect on Instagram yehceramics to discuss 🙂
Fascinating research! I know very little about ceramics, but enjoyed reading about your work and challenges. Well done!
Thank you. If you want anything I wrote clarified, please just ask. I love to talk about it.
I’ve loved following your discovery path with this!
For the cracking – do you find it occurs most often between the colored layers, or between constructed building blocks/medallions?
Hi Phelan,
Thanks for the comment.
The cracking occurs most between the medallions. However it also occurs between colored layers. Those cracks can happen when the pot is still green or after it’s been fired. AND more cracks from the edge of the pot into the center after it’s been fired. The last category has me most perplexed. Those cracks are clean, meaning they occur after the kiln has hit peak temperature.
If you were using a single type of clay and a similar technique (like pinch pots I guess?), what would cracks like that imply about the process – or is it transferrable?
There is a different reason for every shape of crack and where it occurs in the pot. Cracks aren’t just random problems. I am not sure why these cracks occur, but I have an inkling it has to do with coefficient of expansion.
Mistress, I am so thrilled to read your Exhibit. I had not truly known how much time, craft and patience was involved and I am treasuring my new understanding of your process. Your writing style is amazing and I’m going to read this again and again to try and learn how to do a better job myself in presenting research. Just WOW!
Thank you my friend.
Such good things to hear.
I don’t post all my processes, so much breakage, it would be tedious. But that makes the successful ones more precious.
Wonderful research and very, very well written exhibit. I knew next to nothing about pottery or ceramics before reading your paper, yet I was able to follow and understand your process (and feel your pain through the labors!). The Glossary helped me with a few terms I couldn’t intuit. Thank you so much for presenting this exhibit; I learned a lot and think your work is beautiful!
Your comments made me feel great, like I have accomplished a goal.
I’m so pleased you liked my Exhibit.
This work and this type of pottery is amazing. What an incredible labour of love. I m not a potter (though I’ve made a few pots decades ago). But I am a pottery appreciator and collector (and user on a daily basis). This project was a delight to read about, and I would love to see actual pieces made by this technique.
thank you.
I am hoping/planning on another trip to China when both countries are open and it feels safe to travel. I have located a museum that holds Twisted Placenta Porcelain, and maybe even a trip to Hunan Province to see the kiln.
This is absolutely fascinating. Way to persevere. I would be honoured to have a piece in that style.
Thank you Signora Aspasia, I appreciate your comments and am glad you like this unusual style of ceramics. I’m very excited by them.
Très beau travail de recherche et félicitations pour les pièces!
Merci. Vos commentaires signifient beaucoup pour moi.
(I hope what I wrote is understandable.)
I deeply appreciate how much the unfired clay looks like bacon.
I also deeply appreciate how tenacious you’ve been about this, and that you’ve shared your explorations through your process. I love your work, just generally, but this has been particularly interesting and exciting!
The “bacon strips” crack me up everytime I make them.
Thanks, I’m from the “year of the Ox” so tenacious.
Thank you. It has been a lesson in patience for me.
This is beautiful and amazing and the struggle only makes it all the more so.
Just wow.
Glorious.