by Grace Amundsen Barnkow

Goal
My goal for this project was to research and create a couple of hennins as true to period as I could make them, and suitable to wear as part of court garb at future events. While I am still exploring my options for persona, I was immediately drawn to the whimsical impracticality of Burgundian dress and headwear, and wanted to make some of my own.
Introduction
The word hennin is believed to be derived from Genhenner in old French, meaning “to inconvenience or incommode”, but this was likely to be a mocking nickname for what was more commonly in period referred to as a turret, cornet or a haux bonnes quevrechiez a baniere (high bonnet with a banner-like veil). This variety of names reflects that this visible sign of extravagance and prosperity, sufficient to have people to handle the inconvenience, caught the notice of both the fashionable and detractors from the excesses of the wealthy. Hennin is used in this paper for ease of understanding.
The images of female-presenting people in this short-lived headgear style have survived centuries in popular imaginings and informs the image of the stereotypical fairy tale princess today. There are a variety of different types of headgear that can be folded into the term hennin, but the focus of this paper and project is on those that are conical or slightly truncated, and incorporate elements of an early Tudor hood, which narrows the range of hennin being considered to between roughly 1445 and 1480, most commonly in the 1470s, though there is some confusion due to the fact the style persisted in allegorical art and artistic convention long after the style was displaced in common wear, and travelled at different speeds through the fashionable set at various European courts. These hybrid styles are very versatile, allowing the wearer to dress down when it was inconvenient to wear a facsimile of a mast and sail on her head, or dress up to the literal heights of ostentation.
As part of this project, four different hennin were created. Two were made of wire and buckram, two of vellum, all covered with silk veils. Three were truncated, and one was a full steeple. Two styles of lappets (the black velvet hood-like accessories) were made, though I plan to create more in the future as I experiment with the medium.
Contextualizing Hennin
Sumptuary Laws
In France and the Duchy of Burgundy, the higher the Hennin extended, the higher the rank of the wearer of the headdress. Sumptuary laws in Burgundy show that princesses were permitted to wear hennin over a yard in height, while most noble ladies were restricted to no more than 24″ (Tortora 2009, 148). The most common size portrayed appears to be between 12 and 18 inches. Contemporary records in Italy document that some steeple hennin (a term for conical hennin that are not truncated) reached half an ell – two and a half feet or three quarters of a meter in contemporary measurements – in height. Records also show that some regal residences such as the Château de Vincennes needed retrofitting to increase the height of doors and portals so members of the court, like the entourage of Valentina Visconti shown in the illumination below (painted of a scene from the 1380s, but depicting the styles of the 1470s in the Château de Vincennes when and where it was painted), could enter rooms without stooping or removing their hennin.

Sumptuary laws restricted the wearing of hennin to people of wealth. Those with an income of less than ten pounds per annum (the equivalent of about $10,000 in the modern day) were not permitted to wear them. These hennin became visible symbols of prosperity, and the materials used for their construction reflect that. Velvets, silks, and gold and silver tissue, fine weaving and intricate embroidery, often similarly dictated by all made appearances among the fashionable, hennin-clad high society.
Preceding Styles
The contributions of those outside of Western Europe to history are often overlooked. Not only does this disregard the role of people of color in shaping the modern world, it also means that scholars dismiss the opportunity to learn about topics like the construction and history of hennin from additional sources. There are a few main theories on the origin of this style, and those may hold some insight into possibilities for how the headdress was constructed and developed.

A theory that has emerged in recent years is that Marco Polo and similar explorers brought home Mongolian boqta, also called ku-ku. Boqta resemble early hennin in their vertical nature and include a similar base to the early hood-hennin combinations considered for this project, though these were more cylindrical or like an upside down cone in shape than the cone shaped steeple hennin. These hats were constructed out of willow-withe and felt and could reach impressive heights of over five feet in height for Mongolian queens. There are actual extent boqta from this time period to look at for insight into their construction, for example the boqta unearthed in Grave 4 at Bayangolyn Am, Khutag-Ondor, Bulgan province, Mongolia. These hats were decorated with peacock feathers, which may have been harder to source for Europeans. Since silk veils were already worn with other earlier styles, adapting these to use with these new curiosities could have easily spawned the fashion. While the most common shape for these hats was more of a vertical cylinder than a cone, there were variants like the Japanese kazaori eboshi worn by the nobility that were conical in shape. Even if the exact style of the hennin is not a descendant of these, it may well have been inspired by them.
Alternatively, the style may have been imported from the Turks, whose royal harems had a similar headdress a generation earlier. An example of this possible origin can be seen in a miniature painting from circa 1450 (see Figure). This theory on the origin of the headdress is lent additional weight by other fashions of the time in the same regions that borrowed inspiration from the Ottoman court, such as turbans, sugarloaf hats, and balzos. These styles also used combinations of felt, leather, and basketry in their construction (Jirousek 2019).

These two theories are, of course, not mutually exclusive. The Mongol fashion may have migrated to Europe via the silk road and the influence of the Ottoman court. Either theory suggests some possible modes of construction for a hennin. Other theories suggest that the hennin was a natural progression from the hood, heart-shaped escoffion, and padded roll styles, perhaps just influenced by these other similar styles. I discuss more about what impacts that would have on the design in the Experimental Archaeology section.
The Burgundian Gown

This style of headdress was most often worn with a style of dress known as a Burgundian gown. The characteristic features of this style included a V neckline that became progressively wider over time, fitted sleeves, contrasting collar and cuffs that tended to get thinner throughout this era, and a train that bordered on impractical even for the relatively immobile lives of Burgundian noblewomen. This gown was most often made of velvet or silk and trimmed with a contrasting fabric or fur. It was also often fur lined as well, which is not as impractical as it may first appear, both since the fur was shorn to be lighter weight and softer without guard hairs, and because the L ittle Ice Age meant times were colder climatically.
I have made an attempt at a Burgundian gown to properly accessorize the crowning jewel of my garb, the hennin, out of two almost identical 100% silk fabrics (the same pattern, one in red and gold, the other in green and gold) purchased during the annual sari safari. I chose these fabrics because they resembled some of the red and gold gowns I had seen in David Aubert’s “Renaud de Montauban”, shown in the Reference Images section, handstitched for the few visible seams and machine sewn for speed and stability for the hidden seams. It is fully reversible, and the cuffs and collars are both removable and reversible.
This dress was created with a muslin mockup, based partially on an extant gown worn by Mary of Hapsburg somewhat later than the hennin style I am attempting, and modified to suit my silhouette, more closely approximate my reference images below, and be reversible to maximize flexibility for events.

I made some mistakes in the construction I plan to learn from in my next attempt. First, I did not create the proper undergarments to encourage the gown to drape right, something I plan to remedy before plague finishes sweeping this land. Second, I pinned on the collar and cuffs so they would be interchangeable, which proved to be a challenge to get to lay straight. In the next attempt, I plan to sew them on and have them fold out, which seems to better fit what I saw with more image research. Making the dress reversible, while optimal for minimal luggage for events, also proved to be challenging for getting the gown to drape right. I also 3d printed my belt buckle, since I couldn’t find anything suitable before the one event I had an opportunity to wear this to before everything fell apart. I plan to remake the belt using the reproduction buckle and belt tip I purchased from Raymond’s Quiet Press. I have also since added embroidery to the modesty inset, to make it more interesting.
Burgundian Black
When looking for sources on the construction of hennin, it quickly became apparent that there are no extent examples currently known, though many other styles of hat from this era do have examples readily available for study. Why the discrepancy? This was due to the dye used to create the Burgundian Black color which was most commonly used for this headgear. While traditionally dyes used to produce black relied solely on barks and roots that contained tannins such as walnut, around the time the hennin became popularized, iron salts or ferrous rich muds were added to this mixture to produce a deeper, longer lasting color. The downside to this color is that it was also extremely bad for the preservation of fabric (Ortega 2018). The dye takes on an acidic and corrosive nature over time, particularly when exposed to sunlight (Böhmer 2002, 168). Because the dye was also fashionable for a short period to use on parchment, we also know the effect on vellum and paper is similar (Franko 2017, 519), with examples of this black dyed vellum requiring extensive repairs for the few examples surviving to the modern day, which supports these being plausible materials used for the construction of these headdresses. While interesting, it was necessary to look elsewhere than extant examples for sources on how to make hennin.
Experimental Archeology: The Design Process
My first two attempts at period hennin were based primarily on portrait sources, many of which I now know were posthumous and post-dated the period when this style of hennin were primarily worn. Some were also from allegorical artwork, which exaggerated the fantastical elements of hennin. These sources often left off several of the details in the design. These were practical accessories that could be worn for years with the substitution of different decorative elements and survive in inclement weather, and which were even passed down to children and relatives. The details that made that possible, like a frontlet or what materials were used, were left out of those initial references I looked at. I set out on this project to create a better version, with a lot of helpful advice from the Judith de Northumbria, comita et magistra laurea and Barwnes Angharat verch Reynulf, among others.

There were a variety of theories to consider when deciding how to construct my hennin. My previous research on the construction of English Gable Hoods suggested layers of paper, buckram, and wire reinforcement was a possibility. Since there is an extent example of this reinforcement, and the hats were clearly related in at least a conceptual or fashion history sense, this seemed plausible.
While I did give this theory a trial first, making my two initial hennin experiments, it quickly became clear these materials were fundamentally unsuitable to this design, at least at the scale of the steeple hennin and with the modern theatrical buckram I could source. Making the hennin sturdy enough to last by using multiple layers resulted in a hat prone to bending and collapsing under its own weight and momentum, like a traffic cone that has been run over, particularly when combined with the weight of even a very light veil. If I made the hat out of a single layer of buckram with millinery wire reinforcement, it looked plausible enough and did not immediately collapse, but still had several failings. Even a slight breeze or high humidity threatened its stability. My first hennin completely collapsed and deformed when lightly sprinkled while walking from an event venue to my vehicle, and it was impossible to reshape without completely remaking the hat.


Another theory considered was that the hats were based on a similar structure to an Italian Balzo or the Mongolian Boqta. Both of these hats were also made during a temporally nearby period in an area with at least some likelihood of cultural contamination, so similar methods could be assumed to have been known by milliners for either style. Smaller balzos are just turban-style padded roll hats, but larger ones relied on a framework of wire or reeds creating the shape, which was then padded out and covered in fabric. As discussed above, the boqta used willow reeds and felt to maintain its shape. While this could plausibly create the shape of a hennin, this would also result in a heavy hat that was prone to be hard to anchor at the jaunty angle contemporary art often portrayed. The boqta were more vertical, and the balzo had a low center of gravity, so neither style had to contend with that problem.
One of the inspirations for the hennin style was the Turkish fez, which relies on thicker materials to maintain its shape, like making a party hat from construction paper. Some Turkish women’s headgear in this era were effectively hennin in shape, so it is not an unreasonable assumption to make that this formed the basis of the design of these hats too. Other contemporary similar headwear were based on a similar design, specifically those worn by the clergy. Bishop’s miters are a similar shape and size, often crafted on a vellum, linen canvas, or leather core with paper stiffening and fabric attached for outer layers. This was undoubtedly a style milliners of the time would have been very familiar with. Even better, there are multiple extant examples of this style from the relevant period.
Visual References
One of the challenges of this project is that the imagery of the hennin persisted in art longer than the headdress was commonly worn. Even in the period in which it was commonly worn, it was depicted in art in fantastical scenes or in ways that were allegorical exaggerations of the real dimensions, to imply the prosperity of the wearer. Even images of women who actually wore it were often depicted after their death, for example in memorial images for prominent figures such as Mary of Burgundy. Some research into the antecedents for any portraits or statuary used as inspiration for this work was, therefore, required. Below are some of the many images that inspired both hennin, with some info about their origin. I found the library of images from Marie Chantal Cadieux’s Secrets of Burgundian costuming a fantastic resource for getting ideas of where to look, and narrowing down what style to do. Once I had a better idea of what I was looking for, I narrowed down the visual references used for the latter hennin in this project to the following examples.

Source of the image: Portrait of Maria Portinari, Metropolitan Museum of Art, New York
When was it made: 1470-1472
What time did it depict: 1470 or 1471
Where was it painted: Milan
Notable features: This contemporary portrait shoes the black velvet band (called a lappet or fontange) folded back from the front by the brow and extending a bit below her shoulders, the sheer silk veil clearly covering the hennin cone with some wrinkles from storage, the truncation of the cone, the velvet covered V loop presumably used for adjustment (called a frontlet), and the accessories that accompanied it.

Source of the image: Portrait of Margaret of York, Wikipedia Commons
When was it made: 1468-1470
What time did it depict: 1468-1470
Where was it painted: Low Countries, Netherlands
Notable features: This portrait also includes a similar lappet and frontlet. The hennin itself is narrower, and the angle makes it appear that the lappet is a separate piece like a hood. The B pin on her lappet shows a common ornamentation shown in hennin from this period. The veil appears to be hemmed, rectangular, folded over the hennin, and with lines showing it was iron-folded for storage. The hennin appears to be a full steeple, not truncated as above.


Source of the images: David Aubert’s “Renaud de Montauban”, Bibliothèque de l’Arsenal, Paris
When was it made: 1450
What time did it depict: 1450
Where was it painted: France
Notable features: This set of illuminations, and others from the same set of volumes, are small but helpful because they show hennin from the same time and place worn in several different ways. The top left image shows a peaked lappet reminiscent of early gabled headdresses. The other three images show similar hennin without the hood piece. The second and fourth image also shows the full Burgundian dress with train. In all cases, including for the background characters, the veils are sheer silk with ironed pleats, draped over the hennin but in the case of the first image disappearing into the hood. The hennin are all truncated, at least slightly, but at different heights.

Source of the image: Alan I King of Brittany, Wikipedia Commons
When was it made: 1480
What time did it depict: 1480
Where was it painted: Brittany
Notable features: This image includes hennin with and without a smooth hood-style lappet. Almost all include a visible frontlet. These hennin are relatively plain, made of a black fabric and draped with white veils that extend to at least mid-back. The angle of the hennin varies from 10 to 20 from vertical. Several styles of Burgundian gown are shown.

Source of the image: Mary of Burgundy’s Book of Hours, Wikipedia Commons
When was it made: 1477
What time did it depict: 1477
Where was it painted: Burgundy
Notable features: This clearly shows a peaked lappet strongly similar to early Tudor gable hoods, extending to just below the shoulders in the back with fairly voluminous fabric. Underneath the hood, we see what could be the bottom of the veil, or a coif. The frontlet is not visible, and may be underneath this layer. The hennin itself is very thin. The folio image of Mary of Burgundy from the same book of hours also shows a hennin that is similar in size to the Low Countries one above.

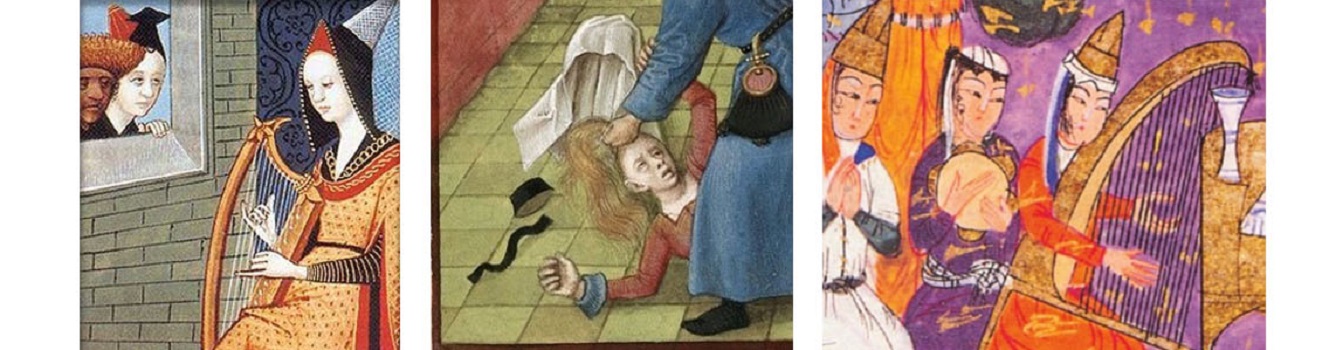
Source of the image: Donne Triptych
When was it made: 1478
What time did it depict: ~1475
Where was it painted: Bruges
Notable features: This painting immediately struck me because, not only does this show a great example of a slightly truncated steeple hennin with a veil draped overtop that disappears into the hood with the rounded black velvet lappets and frontlet, but the little girl in the top right is clearly wearing the same style of frontlet and lappet with pin but without a hennin, showing that these were separate pieces.

Source of the image: Giovanni Boccaccio’s “Le livre des cleres et nobles femmes”
When was it made: ~1475
What time did it depict: ~1500
Where was it painted: France
Notable features: This illustration postdates the height of hennin wearing, but does show a peaked base and an unusual veil that is clearly also draped over the hennin. The pattern could indicate a patterned veil or one with an unusual texture. Contrast fabric, unusually, is also shown inside the gable peak.

Source of the image: Moreel Triptych, Wikipedia Commons
When was it made: 1484 (inscribed on the panel)
What time did it depict: 1484
Where was it painted: Bruges
Notable features: While Barbara Moreel, kneeling in the front left, is wearing a truncated hennin a little outside of the styles considered for this piece, it is notable that her daughters in the middle right of the image appear to be wearing the underlayers (the lappet and frontlets, and in one case the veil as well) of a hennin, showing that these were separate pieces.

Source of the image: British Library
When was it made: 1490-1500
What time did it depict: ~1470s
Where was it painted: Burgundy
Notable features: This miniature dates a little later than when hennin of the style experimented with for this project were worn, but is very valuable for offering a view of what is under the hennin. To the left, we see that the lappet and frontlet are two separate pieces from the hennin itself. The silk veil also appears to be fixed to the hennin, perhaps with pins, because the two stay together when knocked off her head. This style differs from the transitional hennin that were the goal of this project in that there is not a hood as part of the lappet, but it still offers some clues for the construction.

Source of the image: Den Arnamagnæanske Samling
When was it made: ~1350
What time did it depict: ~1270
Where was it painted: Norway
Notable features: This image shows this inside of a bishop’s miter, lined in reused vellum from a manuscript of a Norwegian translation of Old French love poetry. It is a visible example of how the pages were shaped to form the structure of the miter, a method that may have been used for hennin and was attempted in this project.

Source of the image: The Victoria and Albert Museum
When was it made: 1500-1550
What time did it depict: N/A
Where was it painted: Italy (probably)
Notable features: This shows an extant bishop’s mitre in cream satin silk with embroidered images made with long, short, satin and chain stitches likely made in a professional workshop or convent. It had a silk taffeta lining and was stiffened with pages from books in Spanish and Latin which are visible where the taffeta lining is damaged.
Based on these and other sources, I decided to make as my second attempt two hennin with different cone widths (one thinner like Mary of Burgundy’s, one thicker like Maria Portinari’s). With the most common colors I observed being black and red, I made one of each. I chose white sheer silk for the veil color. I decided to make two lappets, one in the style of an early Tudor gable hood with the back removed, and one in the style of the folded up smooth band that resembles spaniel ears. I decided that only one frontlet would be needed, since all the frontlets I saw appeared very similar in style, differing only in the shape of the loop (V or rounded) throughout this era.
Materials Used
Goat Vellum
Since my supply of illuminated manuscripts or lovingly calligraphed erotic poetry to reuse for the lining of my hennin was in sadly short supply, I chose to make the extravagant purchase of an entire goat hide for the structure of my headwear. The goat rawhide was treated used modern processes, but fairly minimally (just to remove hair and bleach out any remaining organic aromatics), since this was produced to be a raw material for craft projects such as drums.

Cotton Velvet
This seemed like a reasonable choice for the velvet for the hood and frontlet (the headband with the adjustable loop, sometimes worn on its own and sometimes work with a hood). Modern silk velvet is still mostly artificial fibers. Cotton velvet is still not exactly what would have been used in period, since cotton was still very rare in that era, but it is all natural fibers that could have been used for this purpose.
Silk Veils

I used two materials for the different veils in these hennin. One was a sheer white pure silk chiffon, machine woven. The other fabric used was a beautiful and fairly unusual sheer silk georgette fabric shot with silver and gold, also machine woven. Because the veils are not attached to the hennin, they can be switched out between the hennin. I may replace them with better or more authentic choices over time, as the opportunity presents itself.
Silk for Hennin and Lining


The red silk used is 100% dupioni silk, handmade on a loom in India. The warp has tiny defects showing that this was not a textile constructed with modern machine methods. However, dupioni silk would have been uncommon in an era before commercial scale silk farming, so the texture is not as true to the historic fabric used for these hats as I would like, something I only found out after I ordered it. The black silk is 100% silk taffeta, made on a rapier loom. While the construction method was more modern, the end result was actually more period, because silk of this style would have been prized, the exact sort of high class fabric that would be a likely choice to be highlighted in a hat. Both fabrics were dyed using modern methods, though I would like to try making my own Burgundian Black for a future project.
Thread


I chose to use silk thread to most closely match the material used to cover the hennin, and because it is something that could plausibly have been used in period. For sewing the hennin vellum, some experimentation showed silk thread to be insufficient, so I tried waxed leather cord instead, which was considerably more successful. All hennin were hand sewn.

Tools

In order to make the experience of creating a hennin as authentic as possible, I acquired some elements of a medieval sewing kit. My needles were hand forged brass reproductions of extent medieval needles. Brass was the needle material that would have been primarily used in period for sewing with silk thread on silk fabric. My scissors were a reproduction of a medieval style in steel for durability. I also used a reproduction glovers’ needle for the vellum stitching. Other tools used, such as glass headed pins, are those typical of a modern sewing or leather kit.
Modern Substitutions
The major modern substitutions were in the fabric choices. The red silk is dupioni, which is not a period silk style but is handwoven and 100% silk. This silk is named for having been produced from double cocoons that are nested together, accounting for the unique slubbing pattern. In period, the preferred silk would have been as smooth as possible, which I only found out after I had ordered the silk so…oops. However, this was one of the closer options I could find in construction and fiber content, and overall creates a good impression. Dupioni silk also has the benefit of being wrinkle resistant, which seemed preferable for a hennin I plan to wear often. The black silk is smoother and is machine woven. Neither were dyed using period methods, something I would like to remedy in future experimentation. The cotton velvet used is not exactly what would have been used in period, but it was the closest I could source without finding a very expensive reenactment fabric. It differs from period fabrics in that is machine woven and has cotton in the material content.
Assembly
Hennin 3
My pattern source for this hennin was seamstrue’s Veiled Hennin Tutorial.

First, I cut out the paper patterns and modified them to suit the shape of hennin I was trying to make. Then, I cut out the shape of the hennin in the vellum, shaped it roughly into the cone, and left it in a humid room for a day to make it easier to get it to assume the proper curve, since it is not a good idea to iron vellum.


After bending a brass needle trying to stitch it like fabric (it is way thinner than leather, and the method almost worked), I had to do some experimenting to find a method to sew the vellum. After some trials, I ended up using a leatherworking stitch punch and replica glover’s needle to sew it together. It took me three tries to figure out a stitch and a methodology that would allow me to smoothly join it even at the top where my fingers and needle couldn’t fit into the small tip. The solution I came to was a pretty simple stitch with waxed leather, since silk wasn’t sturdy enough and ripped out.

I next cut out the cone shape in the red silk for both the cover and again for the lining, and fit it over the cone, pinning it to mark where to sew for a smooth, snug fit.

I trimmed and hemmed the lining by hand to create finished seams. I made several shallow cuts along the top and bottom edge of the covering fabric, and folded it over the bottom edge and into the small hole at the top with the aid of a small stick for the top.

I used a dab of vellum glue at the top made from scraps of the hennin vellum, cut into small pieces and boiled in crockpot on high for about eight hours then strained with leftover cheesecloth from my husband’s experiments in cheese making, to secure the top. It isn’t clear how effective it is, since the shape itself held the material in place fairly well. I sewed the lining in at the bottom.
Hennin 4
The construction of this hennin began with the creation of a new paper pattern, since the dimensions I wanted were more like the Maria Portinari portrait than the narrower cone of Hennin 3. I cut the pattern out of the vellum, punched the stitches with a modern leather punch and hammer, and stitched it together as I had Hennin 3, with waxed leather thread. Rather than let in rest taped in the desired shape to conform, I made a couple of thick wire rings, and inserted them into the hennin to encourage it to have the desired shape. The benefit of this is that the wire can be used if I ever have to reshape it, or as reinforcement when traveling.
Next, I cut the pattern out with margins at the top and bottom to fold over, and constructed the outer and inner lining. I miscut the black silk on my first try, so ended up lining it with red silk, which I had leftovers of. I hand-sewed the lining and outer fabric together. I decided against inserting an oval of fabric on the top, because I do not have any sources showing what this looked like from above. While later, much smaller hennin appear to be closed, they’re also substantially different in shape. Since the earlier escoffion were left open at the top, it is reasonable to suspect this was a possible design choice used for this style.


Lappet 1 (Smooth)
This was made of two shapes, a large rectangle for the brim (1 piece, folded over) and a cone shaped hood (2 pieces). The hole of this piece was designed to be just slightly under the size of the bottom of the hennin’s cone. Both pieces were handsewn wrong-side-out, flipped right side out, and whip-stitched together.


Lappet 2 (Smooth)
I made this from a modified version of the pattern in Lappet 1, to address some of its shortcomings, and to see if it would still help support the cone without a hood attached. I made this version with a little tab to more easily keep the pieces together with friction from the velvet, 3/4s as wide as Lappet 1, and lined with (yellow) linen to lie flat better. This style more closely resembles the style in the Burgundy miniature (above). This version will also work for both my version 3 and version 4 hennin, unlike the Lappet 1 style, which had to be modified for the diameter of the cone, though I have idea for later versions that are more flexible. I like how it lays, and modeled Lappet 3 on it.


Lappet 3 (Gabled)
I made this lappet very similarly to Lappet 2, though I plan to add a hood to help it sit better in the future, as I did in Lappet 1, and to more closely mirror the related Tudor hoods. It’s made of a single black rectangle, the same size and shape as Lappet 2 above. When I turned it right side out, I left an entire side open, inserted the wire, and sewed it into place. The wire was already shaped into two, linked gable shapes, resembling the extant wire remains of a gable hood found in London.
It doesn’t photograph well, since the camera tends to get just “bumpy black” rather than the distinct gable it has in person, but it turned out fairly well. While more decorative, it does not aid in keeping the cone on my head as does the style of Lappet 1 or 2. I suspect this was more of a fault with my construction than with the design, and plan to continue tweaking this until it works as it should.

Frontlet
The frontlet was made of a simple rectangle of black velvet, the length of the diagonal circumference of my head at the hairline plus a small seam allowance. I initially made it around 3″ wide when folded in half, but that was too wide, and left loose fabric at the edge. After trying it on, I took it apart again and narrowed it.
I folded the large velvet rectangle over wrong-side-out, making a rectangle 25″ long by 3″ wide. I then shaped braided millinery wire into the V or U shaped wire edge of the frontlet that appears in the visual references (see below). Next, I made a tiny tube of black velvet, hand sewn inside out then turned right side out from an end and slid over the wire shape. I then sewed around the edge of the large rectangle, except for the center of the long edge, where I left a small opening. The rectangle was then flipped right side out using this hole, and I inserted the shaped wire into this gap, sewed it in, and whip-stitched the opening closed. Then I gently molded the wire into shape, tried it on, and adjusted it for fit.


How to wear the hennin
The Hair
There are two main styles of hair shown worn with a hennin. The first is like the Burgundy miniature in my visual references section, with hair worn loose. For that style, the frontlet functions much like a modern headband, holding the hair back and out of sight. Since my hair is wild and unruly at the best of times, and gets worse with the humidity and disruption of wearing a hat, this style seemed fraught for me. Luckily, history does offer me other options. Hans Holbein the Elder’s Temple Detail depicts hennin worn with braids. While this postdates the period under consideration for this project, it does depict an area where this fashion was late-arriving, so can be considered to be an acceptable reference. It was fashionable in Burgundy to remove hair from the forehead, and tightly lace braids down (Figg 2005), possibly to form a better anchorage for the hennin itself. This is the style I attempted, though I may experiment with wearing it loose with a snugger frontlet in the future, or with other braid styles.

Donning the Hennin
Next, I put on the frontlet like a headband, adjusting it until it fits snuggly and firmly along my hairline, fully concealing the edge of my hair. Next, I arrange the veil to drape smoothly over the hennin, with the edge of one of the short sides centered on the front of the hennin cone. I then draped the hood and lappet piece over it firmly, and add a pin or two to hold everything together. I then gently put the whole setup on my head, and pin the hood and lappet to the frontlet with reproduction medieval hairpins. I initially planned to do this draping and layering while the whole setup was precariously balanced on my head, but Judith de Northumbria suggested I try it in this order instead. Having tried both, I can tell you the former works much better, unless you happen to be an actual Burgundian noblewoman who has maid to do these steps for her.

The Finished Hennin
I worked on this project until about the last possible minute, but did manage to dress up to get a few pictures of the different finished combinations.

Hennin 3 
Hennin 4 
Hennin 4 from the back 
In the gabled lappet. 
Everything I have made for this project so far.
Conclusions and Opportunities for Further Experimental Archaeology
One plausible construction mode I researched but have not attempted is felt with a reed base, such as were used for the balzos and boqtas. While I decided against them for this attempt, it would still be rewarding to try this method next for thoroughness. I also did not incorporate paper into my stiffening alongside the vellum, as I now know was often done for similar vertical headwear in period like bishop’s miters. That mode could also be explored further.
There are other things I plan to do in order to improve my current hennin, in addition to expanding the diversity of my outlandish headgear flock. The silk veils I chose for this project are beautiful, but most of the artwork I referenced for this project show that the veils used in period are much more translucent. I ordered a handwoven 100% silk chiffon gauze from Uzbekistan I think will be closer to that level of translucency; while there is a substantial lead time for that order, I am confident that the current state of the world means I should have it before I attend an in-person event once more. I also want to narrow the band on my frontlet, to more closely match period art. I also outline plans above for improving my Burgundian garb to do my hennin justice.
One of the big tests of this round of hennin construction will be durability. I want to know how these hold up to regular wear and tear. I have some ideas for improving durability, like including wire reinforcement in the rim, but wanted to see if the vellum alone was sufficiently stiff to hold up to regular use. While other period headgear like English Gable Hoods have extant evidence of wire stiffening, bishop’s miters formed the primary construction reference for this project and generally do not.
Overall, this was a really fun project I anticipate wearing and expanding on for a long time. I learned a lot making these hennin, and have met some really awesome people…and picked their brains about hennin too. This project added some whimsical and visually striking additions to my wardrobe I am excited to bring to future events.
Other Miscellaneous 2019/2020 Projects
I made full sets of Roman garb for my brother, husband, and sister-in-law. This project included tackling first projects for inkle weaving and block printing, and learning some pretty cool decorative stitching.

I originally intended this hennin project to be part of a larger project to compete for Baronial A&S Champion, and made a pretty fun scroll to announce that intent. The only other scribal project I have done was a bookmark, but I look forward to exploring more of that art.

I have also really enjoyed the baronial culinary group, and was having fun making some subtleties while there were still events. I have been doing some experiments since then, to be better prepared to make both delicious and entrancing treats when next I get the opportunity.

When designing this subtlety, my intent was to create something that might have been familiar as an image of Valentine’s Day to a medieval audience. Valentine’s Day only became more associated with love in the 14th century, exemplified by Chaucer composing in 1381 a poem in honor of the holiday engagement of Richard II and Anne of Bohemia with the lines “For this was on St Valentine’s Day / When every fowl cometh there to choose his mate.” This date became known both for its auspiciousness for weddings, linked to the medieval-era hagiographies of St Valentine that described him performing illegal weddings in Rome leading to his arrest or while imprisoned awaiting execution, and as the day birds started mating in the spring. I chose therefore to depict a wedding scene between birds, as a whimsical nod to both of these Valentine’s Day traditions.
Another craft I have been honing is tin casting of molds. I made myself turtle brooches for the Norse garb I made in the spring, and have also been working on casting copies of some Baronial awards. The turtle brooch was made from a 3d scan available for free online from a museum, printed on my 3d printer, then cast. I am pretty excited to see what other applications I can come up with for the synergy of modern technology and medieval reenactment.

I only started in the SCA in April 2019 by joining the Blatha an Oir sewing circle, because I had made myself a gable hood and wanted to make a Halloween costume to match. That outfit turned into our first set of garb, below. My first event was September Crown, 2019.

Citations
Böhmer, Harold, 2002. Koekboya: Natural Dyes and Textiles, REMHÖB-Verlag, Ganderkesee.
Charlotte Jirousek, Ottoman Dress and Design in the West: A Visual History of Cultural Exchange, 2019.
de Courtais, Georgine, 2006. Women’s Hats, Headdresses and Hairstyles: With 453 Illustrations, Medieval to Modern, Dover Publications.
Franko, Mark, 2017. The Oxford Handbook of Dance and Reinactment, Oxford University Press, England. Natalia Ortega Saez, Black dyed wool in North Western Europe 1680- 1850: The relationship between Historical Recipes and the Current state of preservation (unpublished PhD. dissertation submitted for University of Antwerpen, 2018).
Figg, Kristen; Friedman, John, 2005. Arts and Humanities through the Eras, Thomson Gale, Detroit.
Hans Holbein the Elder – The Yorck Project, 2002. 10,000 Meisterwerke der Melerei, DIRECTMEDIA.
Ortega Saez, Natalia, Black dyed wool in North Western Europe 1680- 1850: The relationship between Historical Recipes and the Current state of preservation (unpublished PhD. dissertation submitted for University of Antwerpen, 2018).
Thursfield, Sarah, 2015. The Medieval Tailor’s Assistant, 2nd Edition: Common Garments 1100-1480, Costume and Fashion Press.
Tortora, Phyllis; Eubank, Keith, 2009. Survey of Historic Costume, A&C Black.
Impressive work! I’m so intrigued how you worked with vellum, I learned something new. Thanks for linking to our pattern for the red hennin. I enjoy seeing your process! I hope you inspire more Scadians to get into millinery 🙂
seamstrue.com
Thank you! Your pattern was super helpful, and cut out a lot of trial and error.
Wow! So much awesomeness <3. Have you entered your hennin project in an A&S Competition? You have done an exceptional job at the research and have a wonderful skill at writing documentation. Please consider entering at the next Kingdom A&S competition. I see from your photo that you were at the 2020 event, but I was not able to get to all the entries. Thank you for sharing your knowledge, skills, and obvious joy in A&S <3
Thank you! I was there, but to be a baby judge and get more familiar with the requirements, not to compete this year. I was planning to enter my hats to compete in the Baronial championship, which was cancelled. With most of a year still to polish and expand on this, I may enter this in Kingdom A&S next year.
Thank you so much for sharing your art! This was a true delight to ready through, beginning to end!
I love that you ventured out of Western Europe for your construction techniques!
There is so much here, it’s hard to identify just one thing I want to call out; this is truly a wonderful exhibit! I love how you shared some of your failures (such as the melting hat) as well as your successes! I have enjoyed seeing your garb and hats about at events, and I cannot wait to see how you make improvements.
Thank you very much!
Hello! Excellent research. There are so many different stylistic influences to parse out and you’ve done a thorough job.
I am 1/3 of SeamsTrue and I hope you liked the pattern! I love that you did it in vellum! A change of material creates all sorts of interesting new challenges. Very good ideas about the glue. Beautiful work!
I did, it definitely saved me time getting the dimensions right. I already sent some feedback and minor directions suggestions to Alexis, who is great fun to geek out with. She actually linked me to an article of yours about balzo, because I’ve been trying and failing to make one of those that looks right. We should totally connect on Facebook or something so I can pick your brain about those too 🙂
The research into and analysis of images was particularly striking – keep it up!
I love the idea of using vellum! An the boiling a bit of it for glue- most excellent.
I had been toying with the thought of using hide glue and laminating layers of linen, but I suspect it might have some of the same issues as modern buckram. A lightweight goatskin seems like a great solution.
Thank you! I got the idea from talking to Judith, and it immediately struck me as a good option, especially as I looked into the extant bishops’ miters. Once I figured out how to get the holes in it, it went together beautifully, and is super lightweight and springs back easily when deformed.
This is lovely- so nice to see you going beyond the common modern methods and materials, and looking for the “why” and “where did this come from”.
Thank you Annisa, I tried 🙂
I am very excited to see the marvels you have been creating. I especially love that you ventured outside the typical Western European resources for your inspiration.
~Dame Elizabeth FittzWilliam. OL
Thank you :). I did my best to do the subject justice by getting the best variety of sources I could.
WOW! I am SO impressed with your breadth and depth of research! I am recreating 1480s Lorraine, so I am fascinated with this project.
You learned so many new skills with this project, and I love the way you used period methods and materials as much as possible.
I can’t wait to see what you create next!
Thank you! 1480s Lorraine is awesome too :). Next up is finishing a Tudor dress for a friend, then making a red Italian Renaissance dress and underpinning so I can join my local Venetian mafia lol. Then under layer for a really good Burgundian gown, tweaks to my current hennin and adding to the flock some wicker versions…always some project to work on!
Great job describing the steps you have been doing so far on these projects. It has been a pleasure to see you working on tweaking each piece and putting steps together to show a project as a whole, with that fresh perspective.
Thank you! I just tried to take pictures at every step like you recommended.
Great discussion of the history and experimental archaeology. It is really inspiring to see all of the different tests and transitions to the final product. Very well done!
Thank you!
Hello Grace,
I really enjoyed reading about your millinery experiments. Like you, I have made hennins from buckram, which does not do well in our rainy climate at all. 😉 It’s so sad when your hat melts. 😉 Referencing extant structures from Bishop’s miters of the same period is a great idea. I would be interested to hear how well the vellum holds up to weather – once we are all able to attend events again. It seems to have stitched together beautifully. Very nice work. I agree with you, that you may benefit from reinforcing the edging with wire. I was able to photograph dozens of extant headdress wires at the Museum of London’s archives a couple of summers ago. I would enjoy talking with you about that in person at a future event.
The format you used, with so many pictures alongside your narrative, was fantastic.
If you do not already own a copy of From the Neck Up: An Illustrated Guide to Hatmaking by Denise Dreher, it’s an excellent resource for millinery work. 🙂
From Huntington House,
Cristiana, OL
Thank you, I just ordered it :). I would love to see those, and hope to see you at a future event!
Thank you for the recommendation, I got a copy! Thank you for the advice, too. I would love to see the photographs and talk hats with you at a future event.
I love seeing your exploration of this style, the extremes of fashion, particularly the really impractical ones, fascinate me because their evolution is often so meteorically odd. You’ve chosen really lovely fabrics to make your interpretations with, the textures and colors really bring the styles to life in lush detail…..I look forward to seeing how these pieces take on a life in your SCA wardrobe!
That’s what draws me in too- the kind of fashions that make you double take and then wonder how in the world that happened always fascinated me. Thank you!
LOVELY display! I especially appreciated the research into the hennin’s development. I thought that was absolutely fascinating. All of your hats look fantastic. Outlandish hats are the best hats, and I would love to see an attempt at reed construction. -HL Lantani de Forez
Reed construction is definitely high on my list. I think I’m going to attempt a reed-based balzo, since there’s better available research on how that was done, then try a hennin using what I learned from the Balzo base.