Vittoria di Carduci
Is there anything as sad as garb you love, but can’t wear? Regardless of the reason, there it hangs, in the closet.
Staring at you. Judging you.
Every time you open the closet, you feel guilty about it, cringing when you pick another gown to wear.
“I’m sorry,” you think. “But I just can’t wear you.” Silently in the dark it plots your demise as you frolic in other, less “troublesome” gowns.
I had a gown like this. Let me regale you with this sad, sad, tale.
The Tragedy
Once upon a time, I changed my SCA persona from high medieval to Venetian Renaissance. Specifically, the first half of the 1500s. The sleeves were huge. The skirts — huge. Even the hair was huge. As I am a “not small” woman, all of these things appealed to me. The women in these portraits looked just like me, and I felt “seen.”
(Representation matters.)
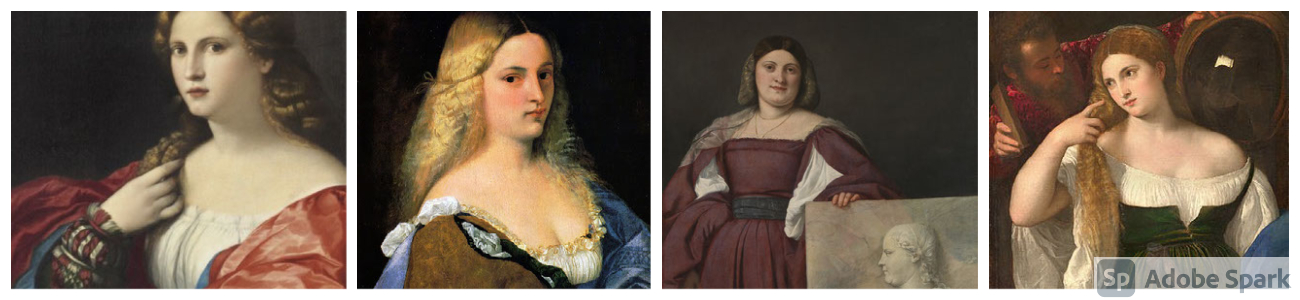
My Inspiration Images
Titian, “Woman With a Mirror”, c. 1512 – 1515

This image I used for the amount of camica showing, the presence of the soft sash, and the size of the sleeves. Also to note that the sleeves aren’t there. This is an indication to me that the sleeves lace on and off. The bit of blue on the image right could be either a sleeve, or an entire gown. Throughout the 16th century, to be dressed for being out in public required three layers. One for god, the body linen. One for the family, the layer she has on. And then another layer over this one for the public view. This also indicates that specific “ petticoat “ layers might have been made, but the possibility that entire gowns were merely layered one over the other is still there.
Titian, “ La schiavona”, c. 1512

Interesting to note here is the caul, the casually worn partlet that actually does nothing other than to prove she can afford cloth of gold, the necklaces, the gloriously ragged trim along the neck and the sheer amount of fabric in those massive sleeves. It is obvious from the image that the shape of the sleeves is much smaller up top than it is at the bottom. They do not show full pleats, therefore the panels must be gored. The sash here is a woven material that hits my eye as an ottoman or ottoman influenced textile. For the modern wearer, a woven scarf might do the trick, or a length of sari silk.
Bartolomeo Veneto, “ Portrait of a Young Lady” , c. 1510

Rather than a soft sash, she wears a beaded belt that echoes the shape and line of her necklace. Her body linen steals the show, keeping the focus on it. Her circlet has enamel work on it and her camica sleeves show highly visible embroidery. Venice tends towards tone on tone embroidery so this high contrast is a marvel to see. The openings on the camica are also functional, as well as lovely. While likely only the first three in front are functional, this lets the wearer use the same garment with higher necked gowns, as well as lower cut gowns such as this one. This tie closure appears until about 1540, when it finally vanishes.
Palma Vecchio, “ Woman with a Lute”, c. 1518-1520

Look at the masses of linen in her camica! The ruffle on her camica is made and then attached separately. It is not nearly as full as the garment. Of note is the gold trim along the front opening of the bodice, and the manner of closure with ties. I find it interesting that her hand seems to rest solidly against her head, but it is actually a good three inches away from her head, resting on her hair. This could imply a posing conceit. It could also imply the use of a rat to fill out the hair on the sides of the head. The presence of a rat would make the hair much more solid, meaning a hand could rest against it securely, with no artifice needed in the pose.
Resolving to Make a Gown Like Those
I had no idea how to construct a gown such as the ones in these paintings. Come to think of it, I had no idea how to make ANY late period clothing. I had only ever made t-tunics. But that did not dissuade me, though perhaps it should have. I needed these dresses!
I knew no one in the area, and my online searches revealed very few people worldwide doing Venetian personas, and far fewer than that doing the early decades. Certainly none in An Tir. Of the few dresses I saw made, none of the seamstresses were actually happy with their gowns, even though they all looked fantastic and awe-inspiring to me. That should have warned me off. “Should have” — but did not.
Committed beyond reason, I gathered up my pile of paintings, my needle and caffeine, and fell into the canals of Venice.
I worked on the body linen and undergarments first, which was in and of itself a mistake, as I cheerfully got lost in it and did not want to come out. I made a corset first. Completely over-engineered, it could have easily been a bulletproof vest. And then I made a Petticoat To Withstand Time Itself. Again, completely over-engineered and far too thick and bulky to be useful. I messed up my timeline so much I ended up with a whopping week to get the gown itself done.
Obviously this is what sane people did. As one might expect, it was a disaster of biblical proportions in many ways. But in others, to my complete surprise, a complete success. I managed to get the bare minimum of the gown itself done in time.
The event itself was utterly miserable. I was boiling hot and could barely move under all the layers of fabric I had entombed myself in. Misery, misery me.
The week after the event, I promptly lost the sleeve fabric. For four years.
I was attempting to be as period as I could be. I made the gown to be worn over a pair of bodies or underbodice and petticoat as my painting-staring had shown me that undergarments like these existed, though the exact form of them remained a mystery. I was sure that given my body type, I needed the extra support. So the gown itself was very flimsy, merely draped over the ironclad undergarments.
The problems became apparent immediately. Beyond the sweating. With the bodies I had made on, my posture was far too stiff, my bosom sat in the wrong place, and the gown sat oddly around the ribcage. Without it, the waistline dug in quite painfully and the gown shifted about uncomfortably from side to side. The petticoat I made to wear with it weighed 10 pounds, as I made it bombproof and out of wool. It was hot, bulky and heavy and I hated it. The line of the skirt was fantastic, but I was roasting alive. When the petticoat was worn with the immense body linen layer, the outfit was instantly sweltering. Without the petticoat layer, the gown was too long and I constantly tripped over it.
The camica I made to wear under it was a screaming joy to make, becoming My First True Love immediately, and incredibly fun to wear. Each sleeve was and is big enough for me to stuff one of my friends to hide them completely. (I find this endlessly amusing.) The problem was that the sheer weight of the fabric slowly pulled the neckline larger, and larger and yet larger. I tried stay tapes. I tried extra whip stitching on the back side. To no avail. It became far too large to wear without a NSFW warning and became larger than the neckline of the dress itself. As the kids say; “ Fail.”
The good part of the gown was the success of the actual experimentation. Even cut below the bosom, the shoulder straps stayed up without thought or effort. Four years later when I found the sleeve fabric, ( go ahead and judge me, it’s ok.) The sleeve experiment went swimmingly as well. I used every single inch of the fabric I had, and I thought it looked great.
But I couldn’t wear it. All the problems of the gown precluded me from wearing it at all. So for this year’s Athenaeum, I decided to rework this gown back to wearable.
Bear in mind if you will that I hate, loathe, and despise alterations. That’s how much I love this silly dress. It represents the essence of my persona, and I wanted to be able to be *myself* when events began again on the other side of the plague.
And Thus Begins:
The Great Redoing
The original inspiration for the camica neckline came from “ La Violante” by Palma Vecchio, c. 1515-1518, shown here. This portrait clearly showed the wadded up masses of linen stuffed into the upper section of her sleeve, explaining the massive size of the sleeves. I loved the wildly variable frill that resulted and set out to mimic it.

The Camica
I did Italian smocking (which is fixed, not stretchy) on the whole neckline. I only did two rows of gathering threads, approximately a pinkie finger apart. That’s roughly a half inch. I use my hands and fingers as measuring devices as I perpetually lose my actual tools merely sitting in place. As superpowers go… it’s really annoying.
I did not use a grid of dots or an iron-on guide. I marked dots using a sharpie along my needle, and did a running stitch using those marks as my guide. That kept my stitches very even, even enough to make nice pleats to use as the base for the pleatwork. I had more fun making the camica than should have been allowed. I had accidentally fallen into my bliss and didn’t want to stop. I made the entire thing by hand, thrilling in whip stitching each panel together and losing myself in all the simple embroidery I added to it. I did three rows of chain stitch down the front and around the hem, and whip stitched all the hems and neckline all in pale warm pink that almost didn’t show up as pink at all.

I won’t lie. I swore and sniffled as I pulled out yards upon yards of tiny smocking stitches. I loved that finish so very much. I then washed it on gentle to get most of the pinholes out of it. I then redid the neckline using doubled, and in some cases, tripled, pleats. After three rounds of porcupine try-ons, I finally got it small enough. As my dominant hand was in a brace for this entire process, I had to use the machine to stitch it down and the pleats were crude and clumsy to my eye. I cried over that, too.

I needed to finish the neckline on the outside. Actual embroidery was out of the question and machine embroidery felt so much like cheating I opted for a “softer” cheat. I used a length of “close-to-period-looking” bobbin lace.
Is lace period for this time frame? Yes, I believe so, but at the time, it was limited in clothing use. Thanks to the new style of painting on canvas, white-on-white camica necklines and edges are usually portrayed as squiggles and dots, with no way to determine what it was, other than a vague description such as ” a series of x shapes.”
I was able to whip stitch it on with a pink very close to the pink already on the camica edges. It’s bearable and wearable, but one day I want to get a real strip of embroidery for it.
The only problem with the camica now fixed, and the other undergarments scrapped, I moved on to the gown itself.
The Bodice
What an unholy mess. The waist-to-skirt seam was hugely bulky, unsecured and crudely done. Knowing the waistline pain was the biggest problem this garment had, the whole thing had to come apart. The pleat padding was very thick and awkward, with exposed machine stitching just hanging out there in the middle of everything. I climbed back onto the sofa with a seam ripper and got back to work. Much more swearing with this part, and less crying.

As I worked, I stabbed myself in the palm with something sharp. I had broken off a needle deep in this unholy waist seam and… JUST LEFT IT THERE. While I don’t think it was actively poking me while the gown was worn, this did not help, to be sure. A certain indication that what I was trying to do was not working.

As I studied it, I realized that the interlining, a linen canvas, had stretched considerably, causing internal wrinkles and bulges all along the bodice. It was painfully obvious in the shoulder straps, along the side seams, and the waistline itself. I unpicked all of the quilting stitching I could reach and re-steamed the entire bodice, pinning the layers together at the waist.

I inserted a folded strip of crinoline braid into the shoulder straps to protect my skin from the lumps in the structure from the interlining. I covered it in black bias so there is no hint of the crinoline. The machine stitching holding it all together is covered by the neckline trim, thank goodness.


Note that the lacing loops are on the *inside* neck edge of the shoulder strap. I have no evidence either way to definitely say that sleeves were sewn in or laced in, *but* there are so many possible combinations of sleeve types in this era that I feel for purely practical reasons that sleeves were often laced in to allow for changes and additions.
Why the inside? These sleeves are heavy, and the two inch shoulder strap grants a leeway to make sure there are no unintended gaps at the shoulder line. It also pulls from a position higher on the body, rather than pulling directly on the edge of the shoulder. The flared shape of the sleeves themselves also helps keep everything in place as there is more fabric on the outer edge of the sleeve, which competes for space under the strap and pushes the strap back up on the shoulder, helping the strap resist the weight of the sleeve. If I ever get a set of contrasting sleeves made, they can be laced into the same spots without issue, even while wearing the large oversleeves.
I decided to trim the neckline with a pinked bias strip of wool. Trim in this era was exclusively either the same fabric as the gown that had been manipulated into folds, fringes and pleats, or bands of contrasting fabric laid simply. Every Venetian’s favorite, pearls, had been outlawed on clothing, as had cloth of gold and silver. Venetians responded by using three times as much fabric, keeping their expenditures on clothing just as high as they had been.
As for the bias? There is evidence in “la bella”, by Palma Vecchio, 1518-1520, for two colors of fabric pieced together on the straight of grain, pintucked, and then turned and cut on the bias to create a diagonal pattern. She’s also wearing not one, not two, but three sets of sleeves. (ahhh glorious!!) Note the raw and fringed edges on the sleeve used as decoration. As opposed to later time frames when Venetian clothing is known for its neatness and tidy elegance, the Teens were a time of delicious raggedness and glorious excess.
I knew I would not have good hand control for the duration of this entire project, so I went with bias to compensate for my poor precision. I went with the tone-on-tone mode of trimming for my black gown, as I did not have readily available gold or ochre wool to use.
I cut all of my trim strips for the entire gown, and moved on to more machine work.
How to fix the waistline digging problem?
In later gowns for Raffaella, my persona sister, I built the bodice as a tabbed corset and attached the skirt right over it, at the top of the tabs, ensuring that the skirt did not push the waistline into her skin. This also kept the waistline seams flat and tidy, with no flipping up or down.
But an actual “corset” for this era is simply too much. The body language of this era is very much “Look Mom! I’m a nymph!” It is slouchy, languid and “innocently” seductive. Nothing on their bodies is “drooping”, per se, but then neither is it obviously “lifted” or “confined”. The look is intentionally casual, intentionally disheveled.
Heat and weight had also become a factor. Over the last decade, I’ve lost what ability I had to regulate my body temperature, lost significant amounts of hand strength, and lost the ability to tolerate common discomfort in clothing, like seams pressing into skin or underwire bras.
As heavy as the camica is for this gown, I did not want to add yet another garment on the torso, but the waistline *needed* a tabbed type support to prevent the pain it had been causing.
I decided to add “corset panels” to the inside of the bodice, thereby making a lightweight “tab” structure to soothe the waistline while keeping the overall compression the same. The gown laces shut without much effort. The boning isn’t intended to make the waist smaller. It is merely to keep the waist where it is.
When you are of a certain size, when you sit, your body changes shape. In this type of gown, the tendency is to creep up, away from the pressure of the body. What then happens is that the gown rides up when you sit, and the shoulder straps fall off.
Stiffening at and *below* the waist would solve the pain and prevent the upward scooting from happening at all.

I made my stunt tabs by machine. They were simple, merely squares of black fabric with two bones inside, near but not touching, both vertical edges. I made five per side of the bodice, keeping the width of each one to about the same as a tab on a corset.
Now how do I close it? When I made the gown originally, I tried making lacing eyelets. But I had no idea that they were anything different than a buttonhole. SO! I made them large and flat slits that I tried to buttonhole over in silk thread. The result was so embarrassing I literally cut them out of the bodice, rather than look at them any longer.


I used the opening in the bodice to pull on the wiggly interlining and tacked it down. I applied the stunt tabs right over the opening and pretended it wasn’t there. My shame is hidden.
Now I had a problem. I had to get it to close again. I had my hand back, but only in a marginal way. Making new lacing loops or eyelets was more than my hands could do. Sewing on metal rings might have worked, but I didn’t have any to use. SO, in a pinch, I took the old cord I had laced my sleeves in with and turned it into lacing loops along the side seams. This took me several days anyway, as the start and stop sections used a lot of hand strength and I could only do one set a day.
The Skirt
While visibly less of a mess than the bodice, the skirt was not without its share of issues.
To begin with, I needed to stiffen and trim out the hem. I left the original hem in place, as I could handle length issues at the waistline. In fact I was pretty sure that just stiffening the hem as it should have been to begin with would fix the issue without touching the length at all. (Turns out I was right. )
I used two strips of artificial crinoline layered on top of each other and machine stitched a black fulled wool strip over it. Down at my feet, the black on black machine stitching doesn’t really show, and regardless, I was still one handed.


To save time, I applied the crinoline and one side of the wool trim in one pass. I then wrapped the wool around the hem edge and used a machine applique stitch to sew all the layers together at once.
A currently unfixable problem: the skirt has no walking gore. Based on the shape of the skirts I was seeing in the paintings, I should have added a narrow triangular gore at the side seams to allow for more graceful movement. As it is, if I use too large a stride, the skirt “catches” on itself at full stride and snaps back in a weird and awkward way. It’s unfixable, as I literally have none of the fabric left. Should I ever run across a fabric match, I’ll whine and take it apart again and fix it.
The next problem was the pleat padding. Teen gowns have volume and more volume in the skirts and it seems obvious that some type of pleat padding was used. (Skirts in Venice are knife and box pleated. I have yet to identify anything resembling cartridge or roll pleating.) My problem was I had used way too much the last time, contributing to the bulky waistline apocalypse. I tried a thinner set up of crinoline net, but when the pleats were folded up, the edge became super thick and impossible to stitch through, by hand or machine.
I switched to a single layer of wool all the way across and — with my reduced hand function — it was *still* too much for me to handle. I ended up using the pleat padding only in the center of each panel where they were pleated singly, rather than the double pleats out on the edges. The result looks pretty close to period portraiture on the outside.


I waited to reassemble the gown till my hand was out of the brace. I sewed the pleated skirt back on to the bodice and bound the seam off like I did originally. This time, however, there was much less material enclosed, and I was able to encase it in black bias, flip the seam upwards, and stitch it down to the lining of the bodice. I essentially did the exact same finishing technique I had done before, but the refined amount of material involved let me finish it off in a much nicer fashion.


I applied the stunt tabs to the inside of the bodice by hand, whip stitching them to the lining. This gave another layer of protection to the waist seam. With the tabs between the body and the skirt, the seam is almost guaranteed to be secure, and most importantly, completely unfelt.

The Sleeves
Once the gown was back together, I turned my attention to the sleeves. The sleeves were basically complete, merely missing ties and trim. These giant sleeves often had ties or other closures even if intended to be worn open, because the tie gave you a chance to add a bit of bling and detail to the gown. Some even have tassels at the tie points.
All I needed to do with mine was add the ties and trim. I used pinked fulled wool strips for trim and black grosgrain cut on the bias for ties. The edges are pinked to simulate the raw and ravelly fringe-looking edges on the trim in period. I think after a few wearings and washings, it will look spot on. I may be able in the future to figure out a better way to get the ragged edge look like that, that my hands will do, but for now I am happy with the blurriness of the pinked edges.


By this time my hand had improved enough that I could manage a simple trim application. If I was careful not to go through doubled or already sewn through areas, I could get the soft wool on without stressing my hand over much.
When I applied the trim to the sleeve hems, I used the wool to extend the lower edge a bit. For one, the actual hem looked like a drunken toddler had done it. And it must be said that no Venetian ever turned down extra length on her sleeves.
Ever.
The sleeves measure 24 inches at the armhole, and over 100 at the hem. They are cut from two lengths of fabric split into multiple gores.

They are open at the top edge, all the way to the arm hole. The bottom of the opening is finished much like the over sleeve shown in Palma Vecchio, “Three Sisters,” c. 1518 – 1520. The two sides are sewn together at the bottom. Also note that those sleeves are actually worn OVER the bodice strap. This would make wearing two (or more) sets of sleeves more comfortable as it expands the area the sleeves can attach to.
Adding the trim added just enough weight to allow the sleeves to drape gracefully, and hold their own against the massive amount of camica inside. Honestly, it’s always been about these sleeves. Doing the sleeves last was actually a rather pleasant way to end this phase of the project!
Results
Here are the results; a reasonably period looking gown that is comfortable enough to wear.


Things I learned by doing this project
- Never use a fabric you love and only have a small amount for an experiment. The risk of mucking it up is high, and if you need to make changes after you’ve used it all, you’re stuck.
- The extra effort of making a “tabbed” structure for my bodices is more than worth it! I think I will be putting it into the “accommodation variance from period” pile of changes as it really does make a huge difference in the comfort level.
- Never make an experimental gown the only garb you have. On a deadline. I could have made a t-tunic. Oops. Had I given myself time to puzzle things out as I went, I would not have had to come back after the fact and struggle through alterations.
- Stiffened hems are now a necessity as I can’t feel my feet. They also seem to give the skirts a flow and drape that is much closer to period, even before it can be proven by extant finds from other regions. Using the crinoline made it possible via machine, and added hardly any weight.
- Walking gore. Just add the walking gore next time. Yes, massive sleeves are important but so is walking. Add the gore.
- There are ways to use the machine to replace a hand. I don’t like it. It feels like cheating, but with continued study, I think I will be able to make it work in a manner consistent with what the SCA expects.
- I really love this style of gown and my gut call that THIS is my persona is right.
- I need more of these babies. With even bigger sleeves.
To truly finish this gown, it needs another set of sleeves, based on those in Palma Vecchio, “ Three Sisters” , 1518- 1520 ( upper poof, forearm detail, wrist detail) to wear with the large oversleeves. It also needs a sash, and a fabric caul. I have been gifted a beautiful pink sari that I think will become the sash, perhaps in its entirety. As there is evidence for the occasional non white or gold caul, ( Bellini, “ Naked Young Woman in Front of the Mirror”, 1515) I will be making a pink one of sari silk as soon as I figure out the construction.
Moving forward from this:
1. Experiments regarding the fabric manipulation for the trim. I have ideas about ways to make the pintucks that I want to try out.
2. Prototypes of caul structures.
3. Further investigation into methods of machine construction that will save my hands for the work I love to do.
I do have a 1570s gown planned and almost in the works in solidarity with my persona sister Raffaella, but other than that, I want to focus on the Teens and 20s.
I mean seriously, who doesn’t need a balzo??
But to go with a balzo, you need the hair in place!
Putting the Hair in Place
Last weekend, while taking photos of my giant bat wing gown of doom for Athenaeum, my friends offered to let me play with their hair.
How could I resist? I CAN’T resist! I cannot count how many event bathrooms I have stood in for hours braiding and coiling other women’s hair into something that works with the gown they are wearing.
Much like those afternoons in sweltering bathrooms, the tools at hand were slim to none, and there was zero planning involved on my part. The two ladies who volunteered are making Venetian gowns for this upcoming 12th Night, so I did a “quick and dirty hotel bathroom” hairstyle for them both, based on the decades of the gowns they were making.
The wee lady that came with her mother also let me play with her hair. As the day was hot, we opted to make the hairstyle that forms the base of the Venetian balzo in the mids 20s to 30s, and served all the way up to 1540 without the balzo.
For extra fun, I decided to test the utility of my newly finished dress by trying to dress all three ladies while wearing my complete gown, sleeves and all.
Hairstyle number One, 1560s Venice


Hairstyle details of the 1560s by Titian, Veronese and Fasolo
The Venetian look in the 1560s is more individual than decades prior or after. While the hair is always up in some fashion, almost always with a center part, the hair is arranged along the side of the head, often all the way around the head to the back, where the length is dressed in a bun, coils, or loops, often with pearls.
Hairstyle Two, 1570s Venice


Hairstyle details of the 1570s by Veronese
Note the bun on the back of the head, often braided and pearled, and the focus on the temples at the hairline. There is no detail along the side of the head at all. The focus remains tightly at the hairline with the hair curled or coiled into puffs and rolls that square off the hairline. Note that there are no “horns” as of yet. However, the hairline has developed a definite rise to either side of the center part, and the overall feel of the hair, especially around the face, is fuzzier and less controlled than in the 1560s.
Hairstyle Three, 1525-1535 Venice


Hairstyle details in portraits of the 1520 – 30s Bordone and Licinio
Hair is divided at a center part and braided up in a two strand braid. They are then wrapped around the very back of the head, as far back as it can go. There they are pinned and used as a base for the balzo to rest on.
Quick “Hotel Bathroom” Versions
Hairstyle One – 1560s
First I parted the hair over the head from ear-to-ear and then down the center in the front section. I put the hair on the sides of her head into rolls, and let them wiggle about a bit before pinning them down. They remain close to the head, and do not “puff” or “rise” from the temples.
The rolls formed a good place to hang pearls from, in this case a pair of pearls I had knocking about. The length I dressed in a coil in back. I would have loved to wind a strand of pearls into it as I did.


Hairstyle Two – 1570s
I began with parting the hair the exact same way as for the 1560s. Over the top of the head, and then down the center front. To reflect the commonality of the braided bun, I did a two strand braid and coiled it at the upper back of her head.
For the front, I coiled each part towards her face and then tucked the coils up close to the front. I pulled the hair at the hairline out a bit to square out the hairline and give her the required volume.


Hairstyle Three – 1530s
For this hairstyle, a simple center part is all that is needed. I braided her hair up in a two strand braid behind each ear. Then all that needed to be done is to wrap the two braids up over the top of her head all the way at the back. Tilting her head down a bit made it easier to locate the right spot. Her hair was long enough to wrap all the way around her head.
I tucked in the ends and pinned the whole thing down. At this point, she’s ready to wear a balzo if she wants to. For practical purposes, this hairstyle could be taped to her head for extra security while running about, but exposed taping is not common in Venice after 1505. However it is highly likely that taping was done for extra comfort and security under the balzo. Pinning alone, was enough that Rhoslyn was able to run outside with the dogs and have it stay securely in place for the remainder of the day. If it was taped as well, at an event it would likely hold securely overnight without needing much additional care, or a long period of time detangling.


Citations
- https://www.nationalgallery.org.uk/
- https://www.wikiart.org/en/palma-vecchio
- https://www.wikiart.org/en/titian
- https://www.wikiart.org/en/paolo-veronese
LOVE that you presented not only your research and items produced but all the why behind your love of this period. I feel the struggle and can relate to your journey. This presentation is meraviglioso!
Ohhh, this is all so nice. My eye was caught by the furthest left portrait in your header. That is Francesca Caccini, I believe. She is a poet and is the earliest female Opera composer we know of (by my freshman research). A fascinating person.
Will you be leaving your project up after Athenaeum closes down for this year?
Many thanks for your efforts!!! Brand.
This is wonderful and the end result looks so lovely! Thank you for sharing the journey
Isentrud
I’m so sorry but I laughed all the way through this (I know that was the intent, but oh…the pain evident here!). I FELT. ALL. OF. THIS. My time period is 1527ish Florence, so I GET it. I am not a seamstress by any means, I cannot even FATHOM alterations, and you did an absolutely stunning job. I also may have to bookmark this to try out some of those hair styles (my hair is particularly troublesome and I generally loathe doing anything with it…). Well done!
Beautiful! Thank you for sharing. 🙂
It was both informative and delightful to read over your gown process. I love the idea of the tabs, and the inside of neckline sleeve fastening! I am planning on a Venetian for next 12th Night and this glimpse into your process was very helpful. I hope before long we can discuss in person. The hairdos were a nice feature too, and a dangerous-looking rabbit hole. Well done!
Having added so many guards on German gowns, one key way of hiding the machine stitching on hems is to think about putting the guards on in a counter intuitive manner. Instead of sewing the guard on to the skirt and folding it down to the hem, work from the bottom up. Stitch the band wrong sides together at the hem and then flip it up instead! You can pre-iron the upper edge of the band and even use some fusible strips or glue stick to hold it downto the skirt with authority. Then one uses the stitch in the ditch method with one of the heirloom applique stitches or a small blind hem stitch if the machine just has the basics. The machine stitching ends up being mostly hidden in the bend radius of guard – at any rate one has to look really hard to see it. And the bottom hem looks perfect. It’s a great hand and time saver suggested to me by the lovely Etain.
Tante Katrine
Very well written up! I really enjoyed learning more about this outfit and hope to see it up close again one of these days now that I have more info about its construction. Very cool!
My Goddess How I have looked forward to this day! Seeing your display at Athenaeum and you have not disapointed! You are truly a maestro del suo mestiere! I love learning from you and have so greatly enjoyed your posts on clothing and hair so to find you presenting here is Exquisite! Thank you for sharing and continueing to inspire and teach us about the Glory and inclusivity that is Ventian- I mean you’ve got me going Venetian! <3 This was a Glorious read with excellent references and pictures. Thank you My Venus Reborn!
I hope I get to chat with you a bit.