I enjoy weaving, both cloth and narrow wares and I enjoy working with natural dyes as well as exploring medieval cookery and garb construction and combining my interests into an item, making a simple object into a broader project
Sometimes I work towards creating a specific item to compete an outfit and other times I create an item just out of curiosity – can I do this? What if I do this… Sometimes this works and othertimes….
A linen tablet woven band, as one discovered in a field in Cambridge

Objective
To dye thread and weave a band in the fashion of the “Cambridge Diamonds” artifact using linen dyed with woad as the original object
While I am an experienced tablet weaver I had not used the pack idle technique.
I had worked previously with an indigo vat, but not woad and never on linen fibre.
I worked in steps- starting with a simpler band using the same technique, then working with commercial dyed linen and finally weaving a band dyed with woad grown from seed.
Introduction and discussion on the found object
During excavations in a cemetery at St Johns Cricket Field in Cambridge a small bronze strap end was found in a cinerary urn and was assumed to be from the early Anglo Saxon period. The strap end and the small woven fragment has no firing marks on it.1 The strap end is simple and described as similar to one located in Fakenham and dated to the sixth century. 2
The fragment is unique in several ways- it appears to be of dyed linen in a “woven in” pattern where the design is created from specific threading through the cards rather than the more complex brocade or twill designs. 3

It also has a unusual weave structure, created using what Collingwood4 refers to as “pack idling.” There are very few examples of bands created in this technique.5
This band if often referred to as the Cambridge Diamonds or Anglo-Saxon Diamonds when referenced on websites and weaving forums.
Grace Crowfoot examined the strap end in the early 1950’s along with several other weavings from the Anglo-Saxon era, she places this band as being from this period and feels it is the earliest example of Anglo-Saxon woven in patterned tablet weaving as well as the first instance of a textile belt.6
Gale Owen-Crocker dates the strap end and belt fragment to the 7th century. 7
Penelope Walton Rogers disagrees with this dating feeling that the weaving technique and strap end are early medieval. 8
Other examples created in this pack idling method, two are 13th century brocade pieces with the pack idle as the background and one is from the early medieval period in a chevron pattern and found in Felixstowe.9
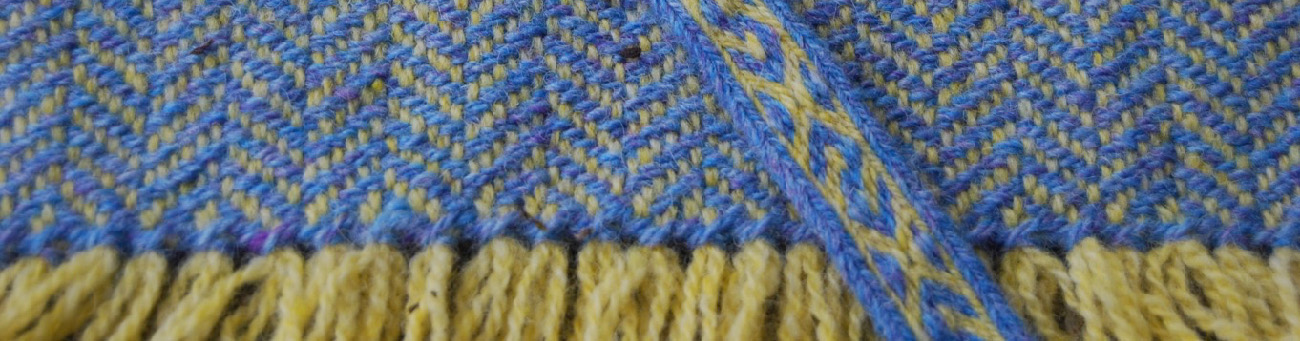
The Cambridge fragment is 1.1 cm wide and only 1.5cm long. As the fragment is so small it has not been removed from the strap end so the reverse side has not been analyzed, nor has the fibre been tested for composition or dye. Determination of the use of dye, the fibre, and the weaving technique has been done by visual study only.10
The fibre is bast, likely linen and appears to be woven in a diamond pattern in two shades of blue, dyed with woad or indigo, and white. 11

Shelagh Lewins was able to examine the fragment and feels that the the colours are too regular to be caused from staining or oxidation from the strap end as they follow the diamond pattern.12 The outer half diamonds are a greenish blue and the inner diamond is a lighter shade of blue outlined in white or natural.
The weave structure is flatter than normal tablet weaving and lacks the usual twisted cord or v of two cords meeting, instead the warps interlace like a Y creating a very thick braid that almost resembles modern webbing.

Crowfoot recreated the pattern using a technique where a weft is throw from left to right, the odd cards rotated a 1/4 turn, then the weft is thrown from right to left and the even cards are twisted a 1/4 turn- on every pick half the cards sit “idle”. 14This is often called the “Anglo-Saxon” style in tablet weaving discussion despite this being the only known example of this technique from this era.15 I prefer Collingwoods term “pack idling”.
This pack idling technique creates a very thick sturdy band, much narrower than you would normally achieve with the number of cards needed as the threads interlace and form essentially a double band held with a single weft. The reverse of the band is a slightly offset version of the front, making it a great technique for belts or straps due as it is both reversible as well as very strong.
I find it surprising that this band is considered to be from the Anglo-Saxon period when this structure has only been seen in other bands dated to the medieval period. One of those bands, known as the Felixstowe band, was also in hemp or flax and was a simple chevron design.
The Felixstowe band was attached to a bronze buckle dated to the 14th or 15th century. The band is a simple chevron pattern in white and brown but created with this same pack idle technique.17
My project with test bands, dyeing the fibre and final tablet woven band
As I had never worked in the pack idle technique and had limited experience working with linen threads I started with the simpler appearing Felxstowe Band before moving on to the Diamond pattern.
Felixstowe Band as a test of the pack idle technique
Using a 2 wet spun 2 ply linen in lace weight (2/14) in natural unbleached and white I threaded my cards as per the pattern in Crowfoots paper A Medieval Tablet Woven Braid from a Buckle Found at Felixstowe.

I did my weaving on an inkle loom as it is more comfortable for me to work on than a more period upright or oseberg style loom that may have been used by weavers of the period.
I used wooden cards on the loom and a polished wooden shuttle to beat my weft.
Separating the cards into two packs, odds forward and evens slightly back allowed me to easily keep track of which pack of cards to turn.

After wet finishing the band was 9mm wide and has a hand that appears unique to linen, both firm yet drapey. The band is roughly twice as thick as a typical tablet woven band of the same fibre as well as much narrower than one made from the same number of cards.

Front of Felixstowe Band 
Sideview of Felixstowe band showing width and single weft
Weaving the diamond pattern in commercial dyed linen yarn
For this attempt I used a pattern located on the web page of Shelagh Lewins. Her pattern is based off the one initially written up by Crowfoot but it contains a slightly better diagram of the card threading.

Crowfoots formula for Cambridge Diamonds showing 18 cards 20 
Shelah Lewis’s pattern for band 21
Using this threading diagram and two shades of commercially dyed blue linen and a natural unbleached linen I again used my inkle loom and wooden cards.
After wet finish my band is 11mm wide, the same width of the original.

My version of the Cambridge band in commercial dyed linen 
Back of the woven band showing the it is double sided
As the turning direction for this band is all forward using an inkle loom means twist will build up on the warp so I had to reverse the pattern somehow to be able to use all my warp threads.
If you flip all the cards, reversing their threading (S becomes Z, Z becomes S) and change your turning from odd, then even to even then odd you can then proceed weaving and the twist will undo. This handy hint was from Shelagh Lewins.
It is worth nothing that Crowfoot drew her reconstruction with 19 cards, but her pattern was only 18 cards. I could have added the 19th card but chose to leave it to match her threading diagram.
Drawing by Crowfoot of the fragment Crowfoots formula for Cambridge Diamonds showing 18 cards


Dyeing the yarn and weaving the final band
For my final version of the band I wanted to use linen yarn dyed with woad as opposed to commercially dyed yarn.
I had planted woad in late spring and was able to harvest just under 100 grams of leaves.

Woad and indigo vats typically are fermented to remove oxygen from them. This can be done with vegetable matter or urine or a chemical vat. I opted to use a chemical vat as I was running out of time to complete my project and as an apartment dweller and pet owner, leaving a vat to ferment for 10 days did not seem ideal.
Using the technique for extraction and vat found on www.woad.org.uk, I tore the leaves and steeped them in warm water, then squeezed out the excess liquid and discarded my leaves.
I then added soda ash to make the liquid caustic. I should have used litmus paper to test the ph, instead I used my fingers to determine if the water was alkaline by how “slippery” my finger tips felt after dipping them.
The liquid then needs to be aerated, I used a hand mixer to whisk the vat until blue foam appeared on the top.

Areating woad tea 
My woad bath
Adding dye remover and gently heating the woad liquor causes the oxygen to deplete from the vat, turning the colour of the vat to a lighter yellow green and causing a bronze sheen on the surface.
My vat was still a darker colour but had the bronze sheen. I decide to proceed with dipping my linen.
I had wound off 3 skeins of unbleached linen yarn and scoured then with a solution of soda ash and a little dish liquid and simmered it for just over an hour – the liquid in the pot turned a hazy yellow showing that any spinning oil or finish had been removed from the linen. I was now ready to dye.
I submerged all three skeins for 5 minutes, and then removed them from the vat.

Yarn being removed from vat 
Yarn changing colour as exposed to air 
Dyed yarn drying and darkening due to exposure to oxygen
When removing the yarn it appears a sickly yellow, which changes to green and then blue as the active ingredient in the dye oxidizes.
In an attempt to get two different shades of blue I did a second dip with two of the skeins for an additional 5 minutes.
I allowed all the yarn to dry for 24 hours then rinsed it with neutral soap and a little vinegar to balance the PH of the yarn.
For this final band I used the slightly darker linen for the the outer half diamonds, natural for the outlines and the slightly paler blue for the inner diamonds to match the colours described by Crowfoot.
Again it was woven on an inkle loom with wooden cards.

Cambridge band attached to strap end.22 Drawing by Crowfoot of the fragment23 
Cambridge band woven in woad dyed linen yarn
Conclusion and Observations
My final band would have looked better had I over dyed the darker linen with weld or otherwise had more contrast.
While the skeins I dipped twice did take on a darker colour it is slight, I suspect there was not enough pigment in my vat. The band has also faded from when I first wove the piece.
I had started with unbleached yarn, had I used bleached white yarn I would have achieved a more clear blue. As the dye took fairly well from a small amount of home grown leaves I feel this was a successful experiment in processing woad and linen. Hopefully future cultivations of woad will produce more leaves.
The structure of the band is very much as the historic example and both my bands are of a very similar width to the period finds
The structure is both strong as well as soft, and appears ideal for belts or straps as they do not tend to fold as a belt woven in a more traditional tablet weaving method might. With a pattern on both sides, it is attractive from more angles.
Citations
- Crowfoot, Grace M. Textiles of the Saxon Period in the Museum of Archaeology and Ethnology, Proceedings of the Cambridge Antiquarian Society 44, pp. 30 1951.
- Ibid. p. 30
- Ibid. p. 29
- Collingwood, Peter. The Techniques of Tablet Weaving Echo Points Books and Media 1982 p.121
- Crowfoot, Grace M. , A Medieval Tablet Woven Braid form a Buckle Found at Felixstowe, Suffolk Institute, Volume XXV, Part 2, 1950 p. 203
- Crowfoot, 1951, p. 30
- Owen-Crocker, Gale R. Dress in Anglo-Saxon England. The Boydell Press, 2004. p 152
- Walton Rogers, Penelope. Cloth and Clothing in Early Anglo-Saxon England (AD 450-700) (CBA Research Report 145). York: CBA, 2007.
- Crowfoot, 1951, p. 30
- Crowfoot, 1951, p. 28
- Crowfoot, 1951, p. 30
- Lewins, S. (n.d.). The Cambridge Diamonds. Shelagh’s Website. http://www.shelaghlewins.com.
- Crowfoot, 1951, p. 28
- Crowfoot, 1951, p. 29
- Crowfoot, 1950, p. 203
- Crowfoot, 1950, p. 202
- Crowfoot, 1950, p. 201
- Crowfoot, 1950, p. 203
- Crowfoot, 1950, p. 203
- Crowfoot, 1951, p. 29
- Lewins, S. (n.d.). The Cambridge Diamonds. Shelagh’s Website. http://www.shelaghlewins.com.
- Crowfoot, 1951, plate 6
- Crowfoot, 1951, p. 29
A gallery of other tablet weaving projects

Tussah silk 
Hand dyed silk (commercial dye) 
Silk dyed with woad and weld 
19 th centry kirvim pattern in cotton 
Silk belt, red dyed with madder, green dyed with commercial dye 
Mixed skip hole pattern 
Silk Oseberg variation 
Oseberg in tencil 
14/2 Linen 
Silk fillet 
Belt in tencel 
Band in tussah silk dyed with madder 
Silk and tercel belts 
Deerskin pouch with silk tablet woven edges, silk hand dyed with madder and acorns 
Modern design in pack idle technique in 8/2 cotton 
8/2 cotton 
A belt for a laurel, modern pattern in cotton 
Trim for the crown of An Tir in 8/2 cotton 
Patterns from Applesies and Foxnoses, in cotton, tencil and linen 
Trim for a knight, modern pattern in 8/2 cotton


Bibliography
Crowfoot, Grace M. Textiles of the Saxon Period in the Museum of Archaeology and Ethnology, Proceedings of the Cambridge Antiquarian Society 44, pp. 26-32. 1951.
Crowfoot, Grace M. , A Medieval Tablet Woven Braid form a Buckle Found at Felixstowe, Suffolk Institute, Volume XXV, Part 2, 1950 pages 201-204
Owen-Crocker, Gale R. Dress in Anglo-Saxon England. The Boydell Press, 2004.
Walton Rogers, Penelope. Cloth and Clothing in Early Anglo-Saxon England (AD 450-700) (CBA Research Report 145). York: CBA, 2007.
Collingwood Peter, The Techniques of Tablet Weaving (New York: Watson-Guptill, 1982)
Karisto Maikki, Pasanen Mervi, Applesies and Foznoses, Finnish Tabletwoven Bands, SAlakirjat, 2013
Barret, Gina, Benns, Elizabeth,Tablet Weaving; Narrow Girdles, Soper Lane, 2001
Web pages
http://www.shelaghlewins.com/tablet_weaving/Cambridge_diamonds/Cambridge_diamonds.pdf
https://maiwa.com/pages/instructions
http://www.guntram.co.za/tabletweaving/gtt.htm
Have loom, can’t travel, will learn; learning to weave cloth
A number of years ago I acquired a small table loom -it sat in my sewing room, unused for several years while I leaned tablet weaving and focused on making garb and doing SCA service.
Some renovations to my building caused me to clear out my sewing room and I challenged myself to learn to use the loom with the intent to weave cloth yardage for making garb.
It took a year of small steps to lean to use my loom and weave a fine wool twill, which I hand sewed into a hood.
After that project I continued to learn, buying a larger loom, joining a modern weaving guild and applying my new skills to creating more textiles that were appropriate for SCA use.
Baby Steps
My objective was to learn to create cloth with wool suitable for use in creating garb, but first I had learn about weaving and how to use the loom I had.
My first loom was a 22” wide 4 harness jack loom – this is a modern craft loom that works by raising the harnesses to create your sheds, either with treadles of leavers. Being a table loom, mine used levers.

It is similar in function to the medieval horizontal loom in that it has a reed to separate the warp, an incorporated beater and the warp is worked and tensioned horizontally but uses a slightly different method to open the shed.
The horizontal treadle loom was introduced to England in 1000 CE1 and began to displace the earlier vertical loom.2 Being a more efficient way to produce cloth its introduction lead to the creation of weaving guilds and the industrialization of weaving.3
As my interests lie mostly in the era post 1000 CE this loom seemed a good starting point.

A jack loom is modern creation, possibly from the 1930’s4 which creates its shed in a slightly different manner from counterbalance and countermarch looms but it was the tool I had access to at the time.
Using lessons in “Learning to Weave” by Deborah Chandler, I learned basic plain weave and 2/2 twills and started expanding into broken twills using modern 2/8 weaving cotton as it is easily available, low priced and easy to work with.
To learn the mechanics of weaving, like even beat and shuttle throws I worked on a number of moderns projects with cotton and cotton/linen in a variety of twills.
Starting with Wool
Inspired by the beautiful work by Drifa in Rauða that I had seen on facebook and her blog as well as the always inspiring Mervi Pasnen, I wanted to work with wool.
For this first attempt I selected Harrisville Shetland as it has an affordable price point and is available in a good range of colours. It is S spun rather than Z spun, which was more commonly used in the medieval period.5 It is also quite a bit heavier than examples located in London or Greenland being “fingerling” weigh with a manufactures recommended set of 12-15 EPI for twill while historical examples from Greenland are typically finer at 7-10 threads per cm6 or 18-25 EPI (ends per inch).
I also chose to use contrasting coloured threads as I liked the aesthetic.

Weaving draft for broken diamonds, based on one located on Difra’s web page 
Broken diamond twill on the loom 
Broken diamond twill, after wet finish


Using the weaving draft from Drifa’s web site7 I warped my table loom at 12 EPI with a black warp and I used evergreen for the weft.
Due to my yarn choice the result was a large bold broken diamond. While likely not historically accurate in size or contrasting colours I was fairy happy with the end result and used this fabric to handsew a hood in the style of the Skjoldehamm Hood.
Working with finer wool and recreating a 2/2 twill inspired by one found in London
My laurel had gifted me with 2 large spools of undyed 28/2 wool. With this finer yarn I wanted to try and create yardage similar to textiles found in London.
The wool is a bit old and “snappy” so rather than weaving it in its current state I thought dyeing it to bloom fibre may make it easier to work with.
Objects Nos 38 and 159 from the Baynards Castle excavation in London were woven in 2/2 twill in contrasting tints of madder red and white.8 No thread density is reported in my source book but the cloth is described as “good quality” and “of similar quality” to object No 392 located in the same excavation site9. No 392 is woven of fine yarn with a warp of 17 threads per cm.10 (aprox 43 EPI).
I experimented with the 28/2 yarn in plain weave and twill. Threading at 32 EPI produced an even twill but the plain weave was too tight a set.
I had dyed some of the yarn with madder and found that the processing did seem to increase the tensile strength of the threads so it was used as the warp and the undyed as the weft in my sampling.

Objects Nos 38, 159 and No39 Crowfoot et all, 2001 
My twill sample in 28/2 wool


After this sample warp I was ready to proceed with creating my yardage
Using the 28/2 yarn I dyed with madder (see appendix) as the warp I threaded my 4 harness loom at 32 EPI (4 threads per dent in my 8 EPI reed) in a “straight draw” of 12341234.
I then wove my twill trying to maintain an even beat and twill line at 45 degrees to create an even 2:2 twill.
The best technique was to throw the weft, change the shed and then beat on the open shed.

My madder dyed warp on the table loom 
My final twill in progress


I could see some vertical striping from some variations in the dye on the thread, but over all it looked very nice.
After weaving the wool was soaked in hot tap water with a little orvus paste to loosen any residual dye. I had played wth overdying my sample and I was hoping this might also “mute” the natural undyed weft to a more pleasing colour. This released more dye than I had anticipated and over dyed the natural weft a light orange.
While this was more over dye than I had expected the finished result is a lovely soft wool in a pleasing autumn tone. The contrasting twill line is minimized as are some of the vertical colour issues caused by some variation in the dyed wool.

The end result was 4 meters of cloth, which has a fine hand and good drape. I used this fabric to handsew a button hood (see appendix).
It took just over a year from my first experiments to completing my hood. While there were some flaws in the cloth from snapped warps I was over all satisfied with the cloth density and drape as well as the colour.
Moving on to Counterbalance loom
After my year long odyssey of teaching myself to weave on the table loom I decided to upgrade to a counter balance floor loom. This new loom is wider, uses treadles rather than leavers and opens sheds by lifting one harness while lowering the other – this provides a more even tension on the warp and is more similar to the action on a medieval treadle loom.

Weaver at his loom from the Romance of Alexander11 
Diagram of horizontal loom, Image Pepper, 2019 
My counterbalance loom


I also enrolled in an modern online weaving guild which has improved my technique and overall skill with this loom.
I have woven quite a few lengths of broken diamond twill for norse “apron fronts” as well as plain weave wool wraps using “colour and weave” to create patterning.
Another recent project was 5 m of 24 EPI plain weave from 28/2 wool, this wool will eventually be overdyed and handsewn into a Roman Stola.

Fixing snapped warp threads on the loom 
Wool plainweave after wet finish


Moving forward Id like to weave more with finer wools and create more yardage for garments.
Gallery of Weaving Projects

Pilgrims bag in handwoven cotton twill 
Towels in various twill, 2/8 cotton and cottolin 
Goose eye twill in 2/8 cotton 
Plainweave cotton, with denting sewn into a pilgrims bag 
Borken Diamond twill close up, used in step up garb 
Broken twill in wool 
Wool “apron fronts” in broken and broken diamond twill 
Wool “apron fronts” 
Wool wrap on the loom showing loose set 
Wool wrap in plain weave 
Modern scarf in 30/2 20/2 Bombyx Silk and Tussar Silk


Citations
- Pepper, Gwendoline, Time looms over us: Observations from an experimental comparison of medieval English loom-types, Archaeological Textiles Review, No 61, (2019) pg 74
- Elisabeth Crowfoot, et all Textiles and Clothing, c.1150-1450: Finds from Medieval Excavations in London, Museum of London, Boydell Press 2001 pg 22
- Pepper, 2019, p 74
- Hoogt, M. van der. (2016, January 5). Ask Madelyn: Jack Looms. Handwoven. https://handwovenmagazine.com/jack-looms
- Elisabeth Crowfoot, et all, 2001 pg 36
- Lilli Fransen, Anna Nargaard and Else Ostergard, Medieval Garments Reconstructed, Norse Clothing Patterns, Aarhus University Press, 2011, pg 36
- www.drifasweaving.wordpress.com/2017/09/15/broken-diamond-twill-fabric-as-found-in-sweden-from-the-10th-century/
- Elisabeth Crowfoot, et all, 2001 pg 37
- Elisabeth Crowfoot, et all, 2001 pg 37
- Elisabeth Crowfoot, et all, 2001 pg 38
Appendix 1
Dying the wool and sewing the hood, information on dyeing the yarn for my wool yardage and constructing a buttoned hood
Preparing and dyeing the yarn
For a warp 21” wide x 4.2 meters long at 32 EPI I would need just over 2800 meters of warp. I wound off 9 skeins of 400 m and one of 200 meters. For a total of 3800 meters of yarn to dye.

This was 325 grams of wool. I knew from past experience that to get a nice red the best ratio was about 80-100% weight of fibre (WoF) for madder. So 325 grams of wool would require 260-325 grams of madder.
To dye with madder, first you need to scour your wool and treat it with a mordant to allow better absorption of the dye stuff. 1
The wool was scoured with a neural soap (orvus paste) by placing the wool and soap in a large pot of warm water and holding it at a “gentle heat” of about 60 degrees C. I do not use a thermometer, instead relying on measuring the water temp by dropping it on the wrist or other ways of “reading” the pot.
After scouring, the wool was treated with a mordant. I used alum and a little cream of tartar to bring out a nice red. The chemicals are dissolved in hot water and the wool was held at just under a simmer for about an hour, then allowed to cool. It was then allowed to partially dry and then wrapped in damp linen for a few days.
After mordanting it was time to dye- I measured out 250 grams of powdered madder root add placed it in cheese cloth to prevent the ground roots from sticking to the yarn.
I soaked this bag of madder in a warm pot and added some chalk as hard water creates more vibrant reds and the water here is quite soft.

Checking the yarn 
Yarn afer dye bath 
Yarn wound into balls


I then added half the yarn to the pot and held the water around 60 degrees for 2 hours. You can gauge the water temperature by dripping on the wrist or feeling the heat coming off the pot, if small bubbles form the water is over 70 degrees and this will effect the colour..
After two hours I removed the first batch of yarn, added a little more madder and placed the second set of skeins into the pot.
After drying the yarn appeared fairly consistent in colour.
The pattern and construction of the hood
I drafted the pattern based on the size of both London Hood 2463 and the Greenland hood D106064 including the top seam and “horn”, adjusting the pattern from Medieval Garments Reconstructed, Norse Clothing Patterns5 to fit my somewhat small skull and generous hair.

Pattern of hood No 246, Crowfoot et all, 2001, pg 190 
Museum Number D10606, Fransen et all 2011, pg122 
Pattern for D10606, Fransen et all 2011, pg122


The final cloth is very soft and light so needs to be lined for support. I used a fine creamy natural linen for the lining.
Considering the method of lining, I needed to support the wool but also needed to ensure the hand woven fabric was not going to fray. I wanted the front opening to be nicely faced to allow for more support for the buttons and holes. So I opted to line the entire hood minus the liripipe, sewing the hood together and turning it back on itself.
Seaming was done by hand with the same yarn used to weave the wool. This thread is not ideal for sewing, linen thread may have been a better choice but linen sewing thread is somewhat difficult to source.
A running stitch was used along the front opening as the strength was not required, stab stitches were used to “set” the lining in place when turned.
For the top of the hood I used an overlap with small stitches and overcasting on the raw edge – this way there is no “open” seam on the top of my head.

Wool and linen to be used for lining 
Hood and left over yarn


I hand sewed button holes equally spaced along the front opening to match the size of the hand cast pewter buttons I had been gifted many years ago. These buttons are consistent with cast lead/tin buttons dated to the later part of the 14th century. 6
Conclusions and observations
If nothing else this project reinforced the medieval mindset of waste nothing, this was a fairly labour intensive process -from dying to weaving to the relative ease of sewing.
The yarn bundles clearly had some overly tight choke ties as there were some light areas near the ties. It also might have been a better idea to split it into three batches rather than two as I think the dye may have been more even if there was more room in the dye pot.
Due to some irregularities in the dye bath you can see vertical stripping in the finished cloth. There is also some horizontal stripes due to some irregular beats and from the angle of the beater hitting the fell. My loom is a fairly small table loom, with a larger one this might be less of an issue.
Soaking the cloth after weaving helped to lessen some of this as the release colour overdyed the fabric. I may experiment with this in the future with piece dying fabric that is woven with yarn
The “horn” on the hood does keep the hood more open and creates a visor like effect. This is similar to what I had found when making a skjoldehamn style hood with the “cockscomb”, a step often left out that greatly improves the function of the hood.
Citations
- Maiwa Guide to Natural Dyes p 7
- Maiwa Guide to Natural Dyes p 9
- Elisabeth Crowfoot, et all Textiles and Clothing, c.1150-1450: Finds from Medieval Excavations in London, Museum of London, Boydell Press 2001 pg 190
- Else Ostergard, Woven into the Earth, Textiles form Norse Greenland, Aarhus University Press, 2004 p 214
- Lilli Fransen, Anna Nargaard and Else Ostergard, Medieval Garments Reconstructed, Norse Clothing Patterns, Aarhus University Press, 2011, pg 123
- Geoff Egan and Frances Pritchard , Dress Accessories 1150-1450. Medieval Finds from Excavations In London, The Boydell Press, 1991 pg 275
Bibliography
Pepper, Gwendoline, Time looms over us: Observations from an experimental comparison of medieval English loom-types, Archaeological Textiles Review, No 61, (2019) pg 71-87
Elisabeth Crowfoot, Frances Pritchard & Kay Staniland, Textiles and Clothing, c.1150-1450: Finds from Medieval Excavations in London, Museum of London, Boydell Press 2001
Lilli Fransen, Anna Nargaard and Else Ostergard, Medieval Garments Reconstructed, Norse Clothing Patterns, Aarhus University Press, 2011
Else Ostergard, Woven into the Earth, Textiles form Norse Greenland, Aarhus University Press, 2004
Geoff Egan and Frances Pritchard , Dress Accessories 1150-1450. Medieval Finds from Excavations In London, The Boydell Press, 1991
Hoogt, M. van der. (2016, January 5). Ask Madelyn: Jack Looms. Handwoven. https://handwovenmagazine.com/jack-looms/.Â
The Maiwa Guide to Natural Dyes. © Maiwa Handprints Ltd. 2020.
Wren Digital Library – O.9.34, Romance of Alexander, f032v
https://mss-cat.trin.cam.ac.uk/manuscripts/uv/view.php?n=O.9.34&n=O.9.34#?c=0&m=0&s=0&cv=0&xywh=-3284%2C-452%2C11846%2C9013
Websites for further reading
https://drifasweaving.wordpress.com/2017/09/15/broken-diamond-twill-fabric-as-found-in-sweden-from-the-10th-century/
https://swanrivercrafts.com/2014/01/27/melkein-valmiit-saarisiteet-leg-wraps-almost-done/
Okay I have tried twice to leave a long winded reply, I give up, but I will talk to you about it 😉
LOVE LOVE LOVE this presentation
Inspired!
Tanikh
I think the bottom line on these was I set a goal, I took small systematic steps to the goal and here ya go.
In the real world I do software support so systematic testing is a part of every day life – and I have trained to run marathons – its the same process, set end goal, plan incremental goals – go!
Also – Im doing a “group” presentation sunday at 1 – pop in!
Stunning work! I love seeing all of your weaving – it’s gorgeous!
For your woad – can I ask why you specifically aerated the liquid? I know you did it before removing the oxygen, but everything I’ve seen for woad/indigo has explicitly stated do not add oxygen at any point in the process (though that really only makes sense once you reach the oxygen-removal stage). Was there a specific purpose beyond just mixing the solution?
Also, between dips, did you rinse and dip? Or let it dry in between? While it’s possible your batch may not have had enough pigment (did you use fresh or dried leaves?), I’m just curious as to your method since that (I’ve found) can affect the level of dye as well.
Overall really well done! I need to try woad myself one of these days, though I tend to stick with indigo (and growing my own Japanese indigo). Thanks for a great exhibit!
Hi
The woad leaves were fresh and I needed to precipitate the pigment from the solution – the steps I used took from this website
http://www.woad.org.uk/html/woad_extraction.html
The plant I used on this project was “Chinese woad” and I didn’t get a large a harvest as I had hoped – lots of reasons, it was at a friends place, shade, BUTTERCUPS!
This year I have a much larger crop of dyers woad growing in a large (2.5 foot diameter planter) and I should get a much better dye yield
I plan on repeating dying the unbleached linen yarn and seeing if it is more light fast.
For the dips – and forgive me this was a project done a couple years ago and I forget things 😉 , I believe I dried the yarn between dips, the second dip should have been longer
Fascinating! Like I said, I haven’t done much with woad specifically – all my experiments have been with indigo, and for everything after the plant it’s the same process – but I’ve always done dried leaves and/or sukumo (Japanese technique if you, or others reading this, didn’t know), and most of the texts I’ve read on fresh leaves talks about actually dyeing with the fresh leaves, not gathering the precipitate (something I should definitely look into!).
For my unsolicited opinion (feel free to disregard as necessary!): I think both dips could theoretically be longer, and if you know you want dark you can rinse and dip again immediately. In my own work, I found that linen dyed *light* with indigo – but I’ve always found my protein fibers react better than my cellulose fibers (whereas a lot of people find the opposite due to the pH differences), so you may have a different experience. I also got darker colours from an organic vat rather than a chemical one (but possibly because I was also using madder as the food source ^_^).
Anyway, best of luck with your future experiments! I hope to see more 🙂
It would be interesting to compare the techniques between indigo and woad. The base chemical reaction is the same, but brought about in different ways
In the medieval period in Europe woad was (on the industrial not home crafter level) made into balls and partially fermented and that is how it was stored and traded
Different techiques were used in different time periods
https://www.sciencedirect.com/science/article/pii/S2352409X14000273
That’s what sukumo is in Japan too – leaves piled in giant heaps, composted and fermented over the winter, formed into balls and dried for transport and trade. And actually, in reading a paper (http://fibershed.org/wp-content/uploads/2018/08/production-of-Indigo-dye-aug2018-update.pdf) I saw they were comparing the fermentation extraction process with a water extraction process that sounds a lot like what you used for your woad. It’s neat to see the similarities across cultures and time periods.
Really enjoyed both your tablet weaving project and your adventures into weaving yardage. I have spun and dyed flax tow with indigo, madder and onion skin. I did an inkle woven belt with it, which I still use. I would love to try the pattern and technique you diagram so well…. my more recent flax spinning is too fine I think for tablet weaving however. I’m impressed with the redness of your madder dye. I have had some trouble getting madder to dye red rather than orange, and have only sometimes succeeded in getting as red a tone as I wanted. I did a sample of rose path twill yardage some years back as my project in a beginner weaving class with my own wheel spun yarns dyed with cochineal, (the warp) or undyed or dyed with other dyes (the various weft fibres). Unfortunately the fulling shrank the different wools unevently, and the finished scarp or stole has distinctly wavy selvedges (merino lamb shrank in a lot while Icelandic with both down and hair didn’t pull in at all). Inspiring projects!
Hello and thanks for reading
Im not sure where you are but the water in lower BC and ,most of the Pacific Coast is “soft” , which make it taste nice and not scale our appliances
But madder, weld, logwood and brazilwood all will have a much stronger colour if the water is harder.
I added ground chalk to bring up the red. Some folks use tums or soda ash to change the PH
Right. I’ve used ground chalk as well. Recently learned that chalk is no longer really chalk….sigh. Our water is relatively hard in Edmonton AB. May need to use ground egg shells instead to make sure I’m really adding calcium. Good t remind me that weld and brazilwood also want highter pH.
Edmontons water “should” be hard enough
hmm I know that water temp can also play a part – as well as WOF
I use a high WOF for saturated colour and added a little cram of tartar to the mordant bath
Sorry to barge in on this conversation, but I wanted to point out a good SCAdian resource for dyestuffs – her blog is here https://renaissancecanuck.ca/ and she’s done a lot of research into the chemistry behind dyes as well as experimentation, so you may be able to find something in her work about madder (I haven’t played with it much myself, so I unfortunately don’t have anything to add beyond what has already been said) or any of the others.
Additionally, be careful with the pH of brazilwood – it changes REAL quick. I got a 90s lilac-ish purple from it by complete accident (it’s lovely, but I *wanted* red). Red has always been a struggle for me, likely due to the minerals + pH issues, so best of luck!
Thank you for making your presentation informative for those of use who do not do fibre! I am super impressed that you grew your own woad. Well done!
You should see this years crop!
This is an amazing confluence of history, science, and art. Your observations about how labor-intensive all aspects of a given project were is thought-provoking in the era of fast fashion and buy, not make. Thank you for sharing the breadth and depth of your weaving projects with us!
Thanks for reading!
it certainly re-enforced teh value of material and how different things were done compared to now where time is everything and material is less valued