An unexpected rabbit-hole
If you asked me a year ago what I would do for Athenaeum this year, I would have told you I was going to build on last year’s project (his-and-hers Italian and French garb for the year 1385). I barely had enough time to get the clothing assembled and ready to wear, but I didn’t get to the fancy bits: embroidery, applique, trim…. Then I realized there was one huge problem with my plan.
The late-medieval fancy embellishments I wanted to create would take mad skills — skills I didn’t have. So, I needed to create a project that would allow me to learn and grow!
I wanted something simple to practice on. I also imagined how great it would be to have a “roll out of bed and pull it on” set of garb, because… we all have those days, right?! After much browsing on Pinterest, I was most inspired by the early medieval Slavic styles. And, thus, I journeyed down the rabbit-hole.
How do you research that?
Researching everyday dress from over 1000 years ago was surprisingly hard. There are some great Central/Eastern European reenactors focusing on the medieval Slavic era, and the internet is awesome for image searches, museum resources, etc. — but I don’t speak the language(s)! Google translate helped, and there were some really great Russian articles that have been translated/shared by SCA’ers. It turns out that very little fabric has survived the ravages of time. Slavic craftsmen were excellent woodworkers, but wood doesn’t survive much better than fabric. There aren’t a lot of grave finds, either, because Slavic peoples practiced cremation burials for much of their early history.

I finally approached the problem by following the migration path of the Slavic peoples, looking at which cultures they traveled through, who they traded with, and who their neighbors were. I looked for trends that spanned across these borders, to try to identify unique and enduring elements of “Slavic” costume. I learned that the early Slavic peoples diversified after the 6-7th c., into Eastern, Western, and Southern groups, as they interacted with different external cultural influences, but this process was gradual.
I chose South Slavic dress, during the height of the First Bulgarian Empire (9-10th c.). This means Slavic roots influenced by elements of Byzantine dress and, to a lesser degree, that of the Turkic Bulgars.
I decided to portray a well-to-do village woman, perhaps a farmwife, rather than nobility. By this time, Slavs were starting to break into the nobility in the Bulgar-dominated empire, but “casual wear” appealed to me.


Specifications I settled on (aka TL;DR geekery)
| Costume element | Research / construction notes |
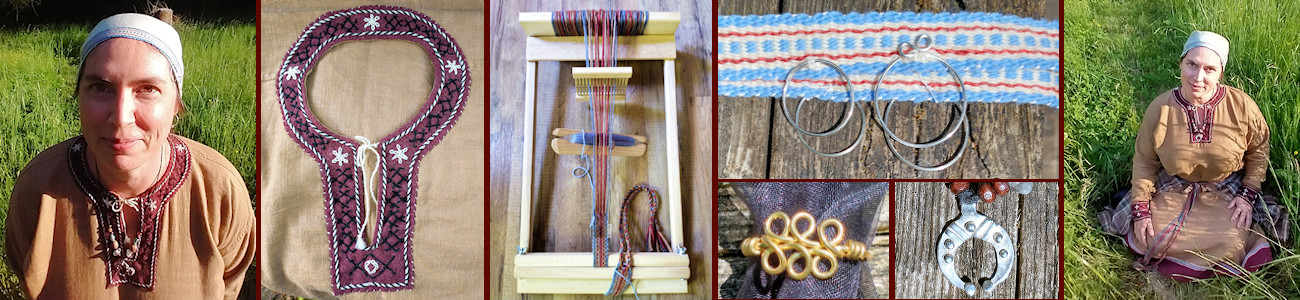
| Headdress | A long rectangle, silk or linen, wrapped around the head and hair, topped with a headband decorated with temple rings. The multiple layers of head covering worn by later medieval Rus have no evidence in this warmer place and earlier time. Headbands were woven in wool, or used ribbons of silk samite, leather, or silk cording. Temple rings in the 9-10th century were typically simple loops with an S-hook, butted, or overlapping end, 1-4 pairs per headdress. Usually bronze or silver, 2-3 cm across. Not much evidence in this place/time for the regional diversity of shapes and sizes that we see in high medieval Russia. |
| Main tunic/dress | About ankle-length, close-fitting at the neck, with wide Byzantine-inspired contrast borders at neck, wrist, and lower hem. Slavic sleeves were sometimes extra-long (a status symbol?) and, if long, held in place with bracelets. Often dyed if used as the primary / outer garment: evidence for red, brown, green, white, blue, orange, yellow. Detailed images are lacking, but this region of the world was known for embroidery, using remarkably well-conserved motifs, from antiquity until the early modern age. We expect the wealthy also had access to Byzantine/patterned textiles through trade. |
| Belt | Without any metal hardware found in female graves, belts were likely tied in place, woven in wool or possibly worked in leather. Tablet weaving seems much less present here than it was among northern Slavs who interacted with the Finn / Baltic / Scandinavian cultures. Plain weaves, balanced or warp-weighted, may be more location-neutral. |
| Overskirt/ apron | An awesome overview of the different overtunic options, through a medieval Russian lens, can be found here. I decided on the combination overskirt-and-apron, called something like a “panova” or “pan’eva”. It was probably cut in 3 panels of equal width of checked wool, held on a drawstring, with the opening in center front. The style might have first been adopted from steppe peoples, but it held on among southern Slavs until nearly the modern era. The pattern of the woven checks later became a regional signature, but no one knows what the 9-10th century practice in Bulgaria was. |
| Lower leg cover | Museum images mostly show women in leg-wraps, cross-gartered, but there is evidence among the Rus for woolen stockings as well. Men wore loose pants with leg-wraps over the lower leg and we cannot be certain that women did not do the same, as seen among steppe peoples. Some speculate that peasants may have simply gone barefoot in the summer, and many modern reenactor women are bare-legged at summer events. |
| Shoes | Evidence for leather or bast (woven plant-fiber) shoes. The bast shoes were a peasant’s shoe common in the wooded North. Leather shoes were common in the Byzantine empire and may have been more likely in the South. Slavic leather shoes are often shown with very long laces, to help hold the lower leg wraps in place. |
| Jewelry | Almost all portrayals of Slavic women in museums and reenactments include a necklace. I decided on a lunitsa/lunula pendant (recorded in Ancient Rome, 8-13th century Rus, and Western Slavic locations), and beads — glass as seen in Scandinavian cultures, wood, or semiprecious stones (rock crystal, chalcedony, etc.) from Byzantine trade. Bracelets to go over the slightly-overlong sleeves would be a nice touch. Perhaps earrings were worn; with the current archeologic evidence, it is difficult to discriminate “temple rings” from “earrings.” |
Construction of my main tunic

Did I mention I seriously overthought the tunic design? I scrounged museums online for any extant garments I could find and doodled the seam placements.

You made WHAT? out of WHAT?
- Fabric: found in my stash, originally from a thrift store. I’m pretty sure it’s mostly linen, but there is a slight stretch on the horizontal grain that makes me think there’s other fibers in there. It passed the burn test, and it sure likes to wrinkle. Close enough for a COVID year! I gave it a hot bath and a trip through the dryer, just to make sure there would be no surprises later on.
- Contrast fabric: reddish-brown wool leftover from another project.
- Pattern: after spending way too much time going down the rabbit-hole on this (see figure, right), I settled on rectangular construction. I did elongate the lower sleeves, Slavic-style, but just to the fingertips.
- Long seams that you can’t see: sewing machine.
- Finishing: Everything had to be rolled over and finished by hand, to seal any interior threads so the seams will wear well. I found some cotton quilter’s thread in my stash.


Expanding my horizons: embellishing the tunic
Neckline embroidery


I wanted to do some embroidery on the contrast facing, but the only stitches I could definitely confirm for this place/time were chain stitch and running / double running stitches. So those are what I used! I did deviate in one way: the chain stitch looked plain, so I later wrapped it with black wool; I don’t know exactly when people started wrapping stitches.
The geometric pattern I designed was inspired by motifs that seemed to be conserved from Thracian tattoos until modern Ukrainian embroidery, interspersed by small “roundels” after the style of the Slavic flower of Perun.
Lessons I learned the hard way
- I think that most people embroider the facing before they attach it, so they can use a hoop. There was no way I could get all these seams and allowances and curves into a hoop.
- My wool wouldn’t hold chalk markings long enough to embroider it — I finally had to thread-mark the critical points in the pattern, then pull the thread when I was done.
- Embroidering with fingering-weight wool, without a hoop, was an adventure in thread tension control. ’nuff said!
Sleeve cuff embroidery
I tried to learn from my neckline mistakes and embroider the geometric pattern BEFORE I sewed the contrasting wool onto the sleeve. It was a little bit easier this way. I like how the chain stitch borders help to manage seam allowances and bind all the layers together, so I again sewed this through all layers, after attaching the cuffs to the sleeves with regular thread.


Lessons learned from this second attempt
- I’m still not a big fan of embroidery hoops. I kept getting my thread tangled up around it. But it was easier to handle the embroidery when the fabric wasn’t attached to an entire garment.
- The back of the pieces is tidier-looking if you embroider before you attach the cuff. As a bonus, less work is needed to hide the knots and ends.
- I suck at long, straight, lines. This will get better with practice, I suppose!
Learning to weave: a narrow band to decorate the lower hem
I added a strip of the same wool to extend the length of the tunic. A wool hem seemed terribly practical, because it’s so easy to get dust and dried mud out of wool with a brush.


The woven band trim was 100% new to me. I received a starter loom as a gift from my gentleman, who is always supportive of my rabbit-holes, and set about learning how to use it. (I have a 10″ rigid heddle loom, rather like a simplified box loom; product link here.) An online heddle pattern editor really helped me visualize how this would look (link here).
Lessons learned
- It is possible to make a narrow band using a wide or oversized heddle. You just need more (linear) space to give the threads room to narrow in.
- Learning how to work with wool’s slight stretchiness wasn’t easy. I started with cotton and worked my way up. I had to practice how to get a consistent width (weft tension) and warp tension. I also kept getting surprised by starting vs. finished length and ending up with shorter-than-expected pieces.
- I learned about wash-and-dry finishing. Wool shrinks, whether it’s a band or a fabric, so the same rules apply — pre-wash all the parts before assembling them together, so nothing shrinks later!
- Figuring out how to finish the ends so they would look tidy…. I chose to unravel enough of the end to stitch the weft thread back through the band, then used my cotton thread to overcast the ends of the warp so they couldn’t come undone. It’s not as neat as I would like, but at least it isn’t bulky. This strategy needs improvement.
A fairly simple overskirt/apron

Panova = combination overskirt/apron

I think it’s practical to have wool as the overskirt (aka wrap-around apron), for the dusty and sometimes grimy parts of life, but this particular style has the bonus that you can fold up the corners of any panel to make a “pocket” to help carry things. Win!
The archeological evidence is too fragmentary to know exactly what these looked like in period, so most reenactors are using a combination of early-modern Ukrainian panova structure + hints from period artwork.
I cut mine in three panels of the same width, lining up the pattern and hand-hemming so they would at least have the appearance of having been pieces cut from a single woven width of wool. I pulled threads to get a short decorative fringe on the lower edge, then rolled over the top edges and deliberately overlapped the panels a little bit, sewing it all together to make a tube for the cord. Voila!
More weaving practice: headband and belt
I wove the headband using my new 4″ wide heddle and opted for a warp-weighted design in the same colors of wool that I used for the lower hem decoration. I got smart, though, and left 18″ of exposed warp threads, on each end, that I twisted into cords to make an easy-to-use tie.
WARNING, not all yarns are created equal!

The brown and blue yarns were not good choices for a warp 
Belt woven in plain weave


I decided to try a balanced weave for the belt, an excuse to practice a different technique. I had various thrift-store wool yarns that looked perfect for the project. The second time that one of my warp yarns stretched out and then pulled apart, requiring emergency splicing and leaving a funny lump in my weave, I stopped to look up why!
It turns out that this failure is called “drift” and that you are supposed to test yarn before trying to use it for warp. Both the brown and blue yarns I selected are low-twist, single ply (possibly handspun?), wool yarns, weak under tension. They also like to cling together, so I’d been separating them rather roughly with my shuttle. I was able to finish weaving the belt by using my fingers to gently open the shed and beating as little as possible.
On the up side — since the yarn likes to cling so much, I figured I might as well wet-finish it with hot water and rough handling, and use a bit of felting behavior to help bind all the wool together into a sturdier band.
Metalwork accessories
Wirework: temple rings, earrings, and a ring
I’ve done a lot of basic wire shaping in the past, for modern jewelry, so I already had some equipment and wire on hand. I used some silver-plated 18 gauge wire for the temple rings, then made a matched set of earrings using 20-gauge silver-plated wire. Using a mixed metal like this was cost-effective, even though it meant I couldn’t hammer the ends flat for shaping, like so many of the archeological finds did.


I also practiced in 20- and 22-gauge gold-tone brass wire, making some rings and earrings that aren’t Slavic, but were available in the Roman empire. I was having fun and just wanted some extra bling!
Pendant: an introduction to precious metal clay

Historical pendants (link to source)

I took a class at Tacoma Metal Arts Center on precious metal clay — basically, a polymer-and-silver blend that allows you to work it like clay and then fire it into pure silver.
Pros and cons of using PMC
Pros: You don’t need a lot of supplies or soldering skills to get started with PMC. It is very well-suited to pendants and other pieces based mostly on flat shapes.
Cons: Obviously, this material is far from period. It’s spendy stuff! It also shrinks when you fire it, so using it for rings would be tricky. But I only wanted a few pieces, and I have experience working with clay, so this was a good choice for me.
Putting it all together
The headdress is probably one of the most distinctive elements of female Slavic dress, so I wanted to get this right! I had purchased a rectangular veil of appropriate size at JuneFaire (2019! wow!), giving me an easy foundation. My hair is very fine and slippery, so I was worried if this headdress would stay on all day, but it wears surprisingly well.


This should be a comfy, fun, outfit for running around summertime events!
Where now? the next step
Lower leg covers and shoes
I’ve almost got a full outfit, except for the lower legs and shoes. I don’t know whether I want to weave, buy, cut from wool fabric, or omit the lower leg wraps. I’ll probably make some simple shoes, whenever the time comes to drag my leatherworking supplies out of the closet. Until then, my late-medieval slippers will do in a pinch.
The 14th century project that started it all
I finally feel ready to tackle the embroidery and trim on the 14th century clothing that started this whole journey! I played around, testing some different stitches and patterns, then found a historical inspiration and generated an embroidery pattern from it. And I figured out how to transfer that pattern to my hood….


Resources
- Alchermes, John D. 1997. “The Bulgarians” in The Glory of Byzantium, eds. Helen C. Evans and William D. Wixom, 320-335. New York: The Metropolitan Museum of Art.
- Asrun. “Slawischer Trachtbestandteil – Panova,” Viking Handcraft (blog). Last modified 19 June 2012. http://vikinghandcraft.blogspot.com/2012/06/slawischer-trachtbestandteil-panova.html
- Atanasova, Kalina. “Bulgarian Medieval Costumes: Materials.” Accessed 12 May 2021. http://badamba.info/BySource/materials.html
- Barford, Paul M. 2001. The Early Slavs: Culture and Society in Early Medieval Eastern Europe. Ithaca, NY: Cornell University Press.
- Beebe, John. “Medieval Russian Garb,” Ivan Rezansky’s SCA Adventures (blog). Last modified 21 April 2021. https://rezansky.com/medieval-russian-garb/
- Filow, Bogdan D. 1919. “The First Kingdom of Bulgaria” in Early Bulgarian Art, pp 1-15. Berne: Buhler and Werder.
- Jaromira and Dalebora. “Western Slavic garment from X c.” Medieval Crafts by Jaromira and Dalebora (blog). Last modified 14 Aug 2013. http://jaromira-dalebora.blogspot.com/2013/08/sowianka-zachodnia.html
- Marya Kargashina (SCA name) “Ways to Wear Temple Rings,” Novgorod to Three Mountains (blog). Last modified 14 Dec 2014. https://kargashina.wordpress.com/2017/12/14/ways-to-wear-temple-rings/
- Kazanski, Michel. 2020. “Archaeology of the Slavic Migrations” in Encyclopedia of Slavic Languages and Linguistics Online. https://hal.archives-ouvertes.fr/hal-02902087
- Schmudlach, Dieter. “Slawische Schläfenringe (Slavic Temple Rings).” Last modified 12/9/2010. http://www.landschaftsmuseum.de/Seiten/Lexikon/SR-slaw.htm
- Kies, Lisa. “Clothing in Early Rus,” Sofya la Rus Medieval Russian Life (website). Last modified 7 April 2007. http://sofyalarus.info/russia/Garb/KRC.html
- Scylitza, John. 12th century. Historia Bizantina (History of Byzantium 811-1057). Held at the National LIbrary of Spain. Available online via https://www.wdl.org/en/item/10625/
- Stamerov, K.K. 1978. Translated by Tatiana Nikolaevna Tumanova. An Illustrated History of Costume. Kiev: Avenger.
- Váňa, Zdeněk. 1983. Translated by Till Gottheiner. The World of the Ancient Slavs. London: Orbis Publishing. Online at http://macedonia.kroraina.com/en/zvwas/index.htm
- West Slavs in Archeology (blog). Accessed 23 May 2021. https://west-slavs.tumblr.com/
We use an embroidery frame instead of a hoop to stretch the fabric. Also the embroidery threads were sometimes silk, cotton, or flax, the trim itself is brocade. The beaded headdress morphed into the kokoshnik, continues to be a Russian staple. The embroidery is done in cross stitch and always red, green or black threads. Slavic tunics were embroidered with intricate patterns by hand and then sewn together with several lines of backstitching by hand alongside each other to secure the seam. Often, the women’s tunic had the entire sleeve and upper shoulder covered in stitching. As to how long it took, possibly years to make one tunic/blouse for a girl on her wedding day.
Your research into the topic is fantastic! I’ve been looking into South Slavic (Balkan) dress of the migration era, 700-900 CE, but I’m coming at it from a male commoner side. I will definitely be taking a look at the items you cited, but was there any particular item in there that you feel might help? I’ve been looking through a lot of articles and archives from the museums of that area, but clothing doesn’t tend to be focused on for that time period.
I enjoyed your article.
FYI.
I am not sure about the differences between early Bulgarians and early Ukrainians, but here are a few tidbits to share on Ukrainian clothing:
– For Ukrainians, the “plahkta” (or panova as you call it) is not actually an apron. It’s an over-skirt.
It should come together at the front centre. An apron would be worn over that for work. But, you are very correct that the skirt and or apron could be folded at the sides to use as big pockets to carry things. My Baba (grandma) would do this on the farm!
– In later periods of Ukrainian history, the traditional “plahkta” is made of one piece of material, slit in middle and half way up, and then folded over on itself to create a look of 3 panels. (I have several of these plahktas in my dance costume bank). I cannot say if this was done in the time of the Kyevan-Rus period or not. Modernly, we rarely flip the material over and normally just sew the two sides together at the back, and over top of the middle panel.
– Ukrainians are pretty superstitious. Traditionally, the sleeves, necklines, and the bottoms of the sorochka (dress) are done with red embroidery to ward off evil.
– As well, they never go without their “poyas” or sash tied at their waist, as it also prevents evil from coming up. How far that tradition goes back, I do not know.
This is great! Your work is fantastic. I’m not well-versed in embellishments, and applaud your courage in diving in – well done!
Thank you. Diving in has been a little scary (what if I mess up on an important part?) and a lot of slow practicing. But it’s also very rewarding! Lots of patience. Lots of willingness to make mistakes and stop everything to look things up. Everything else can be learned, I think.
Enjoyed your thought process on determining plausible designs. There was a lot more movement between cultures than we have given credit for.
I’ve been using chain stitch for my Song dynasty wallet project and it is fun how versatile it is. Have you tried experimenting with stitch size?
Very much an interesting project. Thank you!
Diving into the history of this place and time was fascinating — I went really far down the rabbit-hole! I started to play with chain stitch size a bit, but honestly for this learning-level project, my biggest goal was simply being able to make any size consistently. 🙂 I am getting better with shorter stitches on my other practice pieces, though.
I appreciate the information on the basic forms of dress. Though I have a Russian name, I only played Russian in my early SCA time. It’s time for me to be my multi-times great grandmother and work on being a Russian again. New tourney clothes!
I love how you processed your information. Looking at trade and what the neighbors are doing (as long as they aren’t doing the “I hate those people so I’m going to do things very differently”) is a good way to handle things. Also looking at what went on right before and right after (as long as there wasn’t a political thing that made something common or uncommon for a very short time) is also helpful. It also makes the time come more alive to know things like trade, politics, religion and the like!
And for those who don’t weave, pointing out about the different diameters of the weaving fibres you found is very good information. Too many people don’t take that sort of thing into consideration.
I loved how you put it all together!
Thank you for your kind comments! I really loved the opportunity to learn about the place and time in such detail. Lifelong learning for the win! As for yarn… these were my first weaving projects, begun in isolation during COVID, and I learned a lot by trial-and-error that probably would have been better covered in a very basic class. If I can spare anyone else those same hard lessons, then I’m happy.
Lovely work! The ensemble looks comfortable and well put together (huzzah for accessorizing!)
Thank you so much — you’re always an inspiration to me! Now it’s time to start a matching set for the gentleman. I’m always amazed how much easier it is to find resources for women’s garb construction!
Have you come across any information about Ashkanazi Jews and their style of dress?
I haven’t, yet — but I struggled so much to find good historical sources with any level of detail, for this time and place. I didn’t really find much information about the dress of any specific group of people; even my choice to present as more “Slavic” than “Bulgarian” or “Byzantine” is somewhat speculative. But now I have a new rabbit-hole to go down! Thank you 🙂