Table of Contents
2020 in Review
Last Time on…
My exhibit for Athenaeum 2020 was a display of my varied interests within the arts and sciences. While I had wanted to participate in-person last year, the decision to build a virtual exhibit was a last minute one, designed to give me a goal to work towards. At the time I couldn’t decide on a singular focus, as I tend to explore a wide breadth of topics, rather than delving into the depths of a singular one, so I opted to display the several projects I was working on including indigo dye, alchemy, and shibori.

The past year has been a difficult one personally, as it has been for many of us, and I have felt little to no desire to participate in my usual passions. I decided to use Athenaeum 2021 as an external motivation to get back into the things I used to love doing.
So, for Athenaeum 2021 I am taking a closer look at some aspects of indigo and its various uses, to explore a little more of the depth of the topic as well as answer some questions that had come up during conversations at last year’s event. Below is a sample of my 2020 exhibit. For the full exhibit, click here.
While ink and scribal work isn’t my usual focus, I did enjoy exploring this aspect of indigo. I will also admit that I did minimal research into pertinent aspects of ink-making due to a general lack of motivation (thank you pandemic); however, if there is research you would like to share with me, resources that you think I would find interesting, or if you would like to talk more about this or any of my work, please feel free to leave a comment, set up a zoom meeting during Athenaeum 2021, or find me on Facebook. I’m always happy to talk about my work.
The Chemistry of Indigo
*This section is repeated in full from Athenaeum 2020 as it is the work I am the most proud of.*
While indigo’s chemistry is known and utilized today, it is unknown whether dyers in pre-17th century Europe and Asia knew exactly why indigo acted the way it does. It is more likely they learned how a dye vat was ‘supposed’ to look, feel, or smell, passing traditions down for hundreds of years after many trials and mistakes were made. However, as the science behind it is fascinating, and explains why dyeing with indigo can be difficult, I opted to include it here.
Indigo begins as a molecule known as ‘indican’ (in Indigofera tinctoria and Persicaria tinctoria, but the indigo precursor in woad is isatan B);[1] however, it is actually the molecule ‘indoxyl’ that is able to penetrate the fiber within the indigo vat. When the indoxyl is exposed to oxygen outside of the vat, whether or not it is attached to a fiber, it forms bonds and becomes indigo.
Below are the skeletal formulae of these molecules. Skeletal formulae are common in organic chemistry and look quite bare as they simply show the carbon ‘skeleton’ without the requisite hydrogen atoms attached. However, they enable us to briefly glance at multiple molecular structures and see how they are similar. I have also included each molecule’s molecular structure.

Indican (C14H17NO6) is what is called a glucoside,[2] or a glucose molecule that is bound to another molecule, in this case, indoxyl.
Isatan B (C14H15NO6) is also a glucoside, just with a slightly different molecular composition. It has the exact same indoxyl molecule attached to a different sugar molecule.[3]
When starting with fresh indigo or woad leaves, obtaining indoxyl is easy: just remove the glucose molecule. This is done through a process called hydrolysis,[4] and can be done naturally or chemically. While there are a variety of ways to achieve this chemically, it can be done organically in a fermentation vat, where the yeasts from the fermentation will eat the sugar molecules, leaving behind the indoxyl dissolved in water. Then the indoxyl can be used to dye fibers or precipitated[5] out to form powdered indigo.

Once indigo is in its powdered form, it is stable and can be traded or shipped, but it is no longer water-soluble. The indigo must be converted back into a water-soluble form in order to use it as a dye.

This is where the dyeing process can get tricky. In order to achieve this reduction, an alkaline vat and a reducing agent are needed. The reducing agent provides electrons that are able to bond with the excess oxygen to form alcohols, which are water-soluble. This also leads to an excess of hydrogen ions.[8] When there is an excess of these ions in a solution, that solution is said to be acidic. By providing an alkaline solution to begin with, one that has an excess of OH ions,[9] the solution will balance out through the production of sodium salts and water.

Alternatively, the indoxyl can become isatin[12] and indirubin[13] through a slightly different reaction[14]
For example (using urine):
(12 C16H10N2O2(s) + (C6H12O6(aq)) + 9H2O(l) + (CH4N2O(aq)) = (12 C16H10N2(OH)2(aq)) + (7 CO2(g)) + (2 NH4+) + (2 OH–)[15]
Indigo (solid), plus glucose (aqueous), plus water (liquid), plus urea (aqueous) equals leuco-indigo (aqueous) plus carbon dioxide (gas) plus ammonium hydroxide (the NH4+ + OH–)
To break it down into its component parts:
C6H12O6(aq) + 6 H2O(l) = 6 CO2(g) + 24 H+ + 24 e–
Glucose is oxidized into carbon dioxide and hydrogen ions with free electrons
12 C16H10N2O2(s) + 2 H+ + 2 e– = 12 C16H10N2(OH)2(aq)
Indigo takes some of those hydrogen ions and free electrons and becomes leuco-indigo
CH4N2O(aq) + H2O(l) = CO2(g) + 2 NH3(g)
Urea plus water is converted by the bacteria into carbon dioxide and ammonia
2 NH3(g) + 2 H2O(l) = 2 NH4+(aq) + 2 OH–(aq)
Ammonia is soluble in water and deprotonates[16] a small amount of the water to obtain ammonium and hydroxide
While the above equation is balanced, it is not perfect, as the amount of ammonia that converts into ammonium (NH4+) and hydroxide (OH–) depends on the Ph of the solution, which is also dependent on how much ammonium (acidic) versus hydroxide (alkaline) there is. If another alkaline ingredient, such as sodium hydroxide or washing soda, were used, the by-products of that reaction would be different. Not only that, but fermentation itself can create by-products that alter the equation. So this particular version is not as important as the basic idea behind the equation: that combining these ingredients causes a chemical reaction to occur, and that due to this reaction, hydroxide and hydrogen ions will form and solid indigo will be changed to leuco-indigo.
Eventually, the reducing agent gets used up and the sugar gets turned into an acid, therefore no longer reducing the oxygen in the vat and changing the overall Ph back towards neutral and halting the fermentation. This is part of why it is so difficult and exacting to create and maintain a fermentation indigo vat, and why it is so impressive that peoples from pre-17th century societies figured it out. Everything needs to remain in balance so that the correct chemical reactions can occur.
Footnotes
[1] “Indigo: Recreating Pharaoh’s Dye,” Science in School, accessed September 06, 2018, https://www.scienceinschool.org/2012/issue24/indigo.
[2] Glucosides are subsets of glycosides. A glycoside is a molecule in which a sugar is bound to another functional group via a glycosidic bond. A glucoside is when that sugar is specifically glucose.
[3] K. G. Gilbert et al., “Qualitative Analysis of Indigo Precursors from Woad by HPLC and HPLC-MS,” Phytochemical Analysis 11, no. 1 (2000): 18, doi:10.1002/(sici)1099-1565(200001/02)11:13.0.co;2-x.
[4] The chemical breakdown of a compound due to reaction with water.
[5] To create a solid from a solution.
[6] “Indigo-a-go-go: Better Dyeing through Chemistry,” Sheep Cabana, accessed September 06, 2018, http://www.sheepcabana.com/?p=1180.
[7] “Indigo-a-go-go: Better Dyeing through Chemistry,” Sheep Cabana, accessed September 06, 2018, http://www.sheepcabana.com/?p=1180.
[8] H+ ions, or simply just the hydrogen nucleus with no electron.
[9] OH– or hydroxide, an oxygen and hydrogen atom held together by a covalent bond that carries a negative electric charge.
[10] AKA indigo white – for the fact that it is colourless in an alkaline solution.
[11] The chemical in indigo that produces the blue colour.
[12] A reddish-orange crystalline compound made by oxidzing indigo.
[13] A chemical compound most often produced as a byproduct of bacterial metabolism.
[14] “Unit – Chemistry of Textiles: Dyeing Fibres,” accessed September 06, 2018, http://wwwchem.uwimona.edu.jm/courses/CHEM2402/Textiles/Dyeing_FibresJ.html.
[15] Extrapolated from “Chapter 12: Dyes,” Caveman Chemistry : Hands-on Projects in Chemical Technology, 12.2, accessed September 06, 2018, https://www.cavemanchemistry.com/cavebook/chdye2.html.
[16] The removal (transfer) of a proton.
Here is the unedited documentation that accompanied my indigo project. The full works cited list is included.
Indigo Ink
Inspiration
At Athenaeum 2020, one of the conversations I had was with Alicia du Bois and I credit her with giving me my main topic for this year’s display. She had been looking at creating blue ink for calligraphy and had been having difficulty with a recipe that used indigo as a replacement for azurite. She wanted to know if I had any insight into where she had gone wrong. At the time I didn’t have much to add, as I was unfamiliar with ink-making techniques, but I decided to look into it further for my Athenaeum exhibit as it would have the added benefit of helping her with her own experiments.
I started with her documentation to see how she approached the process and to find the recipe that she used:
Take one ounce of white lead, nine ounces of Indicum, pour good vinegar unto it, put them in a leaded dish, let them seeth well, and that which swimmith on the top is the colour
Phillips, William (Trans.). A Booke of Secrets, 1596.

For reference, this is the ‘sludge’ that Alicia included in her documentation “The Alchemy of Azurite.”
Process
First I decided to parse the recipe myself and see what sections might have caused issues. Here were my base assumptions and questions:
- Alkaline vs Acidity
- Alkaline for dye, but acid for ink?
- Translation/Definition of ‘seeth well’
- Is heat required?
- Materials
- Lead
- Does the type of lead matter?
- Indicum
- What kind did Alicia use?
- Good Vinegar
- Is store-bought vinegar strong enough?
- Leaded Dish
- Was the material important?
- Alicia mentioned the possibility of a copper dish?
- Lead
Now, based on my conversation with Alicia, I knew that even though indigo needs an alkaline base to dye fabric, it needs an acidic base to make ink as the acid helps it bind to the paper much like a mordant for dyes. Additionally, both our conversation and the translation of the recipe in her documentation gave me the line “put them in a crucible and let them bubble well,” leading me to set aside (though not completely rule out) both ‘seeth well’ and ‘leaded dish’ as possible explanations.
This left me mostly with whether material choices were responsible for the issue. I didn’t have a lot of specifics based off Alicia’s photos, so it was time to experiment.


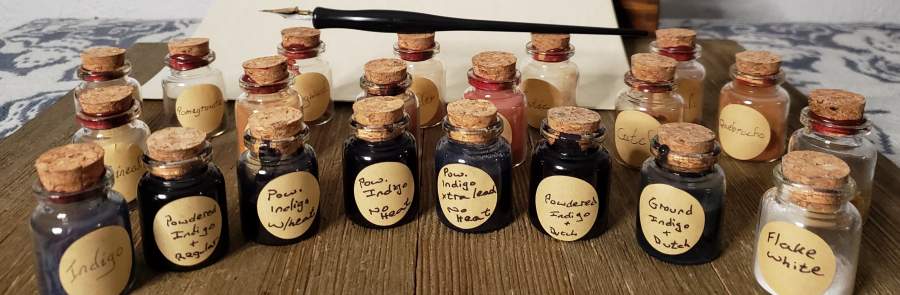
Experiment 1
For my first experiment I started with the base recipe. I researched what kind of lead would likely have been used, and used indigo from my dye stash and basic white vinegar from the store. I chose to keep my tools modern for this experiment so that I could focus on the process. I also ended up cutting the recipe in half because my pot was smaller than I had anticipated.
Tools and Materials
- Powdered indigo
- White vinegar
- Basic lead carbonate
- Small pot, stove, wooden spoon
- Mask, gloves, protective gear


Results


My process was very basic: Combine lead, indigo, and vinegar and mix.
Immediately I knew I’d had more success than Alicia. My solution was blue instantly. This made me think that the problem lay with Alicia’s choice of indigo powder, but I wanted to look into that later.
I still wanted to make sure this created ink and that I hadn’t made some other mistake due to my inexperience with ink-making.
I also noticed that once the vinegar and lead had interacted, the mixture bubbled (created carbon dioxide) much like if it had been a vinegar and baking soda (sodium bicarbonate) science experiment, except less violently. I wondered, even with Alicia’s knowledge of ink recipes, whether ‘seeth well’ actually involved heat, or if it was just about mixing the vinegar with the other ingredients.
At this point I separated my solution into two parts and saved some that hadn’t been boiled to test against the rest. Then I boiled the rest of the mixture until I felt it had ‘seethed well’ enough, and then separated it into two parts once again.
I had realized that it was a very dark colour and wondered if adding more lead would lighten it, so I added additional lead to the still bubbling mixture until I realized it was only getting a little bit lighter and maybe that wasn’t going to work. I took the ink off the heat and poured it into a jar like the other parts and left them to cool and settle.


After letting the ink cool, I tested the different versions with a dip pen and found that while it was very dark, almost black, it did write on both paper and parchment. However, when I tested its staying power, I found it smeared very easily and felt quite gritty to the touch.
Here I realized my knowledge of dyes vs inks was getting me in trouble: as a dye, indigo is very fixative and provided the dye vat is crafted correctly, the dye will stay within the fibers with little trouble. For any other sort of liquid, particularly one with an acidic base that would keep the indigo suspended rather than dissolved, the indigo particles would need to be filtered out.
So I strained the mixtures through cheesecloth and tried again. This time they smeared far less readily and were not nearly as gritty as the initial test. However, the ‘light blue’ version I had tried to create was only somewhat lighter than the original, and the heat factor seemed to play no part at all.
Experiment 2: The Failure
It honestly wouldn’t be an experiment without some sort of failure.
My second attempt I wanted to try the recipe at full strength and then also experiment a bit more with trying to lighten the colour so it actually looked blue instead of black.
I also was running low on powdered indigo and wanted to make sure I saved some for my hopeful third experiment and for one of the dye experiments I was working on. I wouldn’t be able to purchase more indigo in time, but I did have indigo chunks that I could grind down. I figured the chunks of indigo was the closest to what would’ve been used in period anyway, and spent an evening grinding the indigo with a mortar and pestle.
Tools and Materials
- Indigo chunks, ground to coarse powder
- White vinegar
- Basic lead carbonate
- Small pot, stove, wooden spoon
- Mask, gloves, protective gear


Results
I used the same process as before:
- Combine 1 oz basic lead carbonate and 9 oz of powdered indigo
- Add vinegar until liquid
- Add more vinegar in an attempt to make it more liquid
I think my biggest issue with this particular experiment was that I expected the ground indigo to impart more colour to the vinegar; however, what I found was that I added too much vinegar in that third step and ended up with nothing more than slightly green-brown vinegar.
Experiment 3-5
Since I was running out of material components, I decided to skip my additional practice runs and move onto my main experiments.
Tools and Materials
These three experiments were all done in small batches in a small clay crucible and I used a small butane stove to provide the heat source in lieu of an actual fire or wood-burning stove. I kept the ingredient amounts to approximately one tenth of the amount listed in the recipe, due to both lack of supplies as well as the size of the crucible, which was smaller than I anticipated, so it worked out.
Experiment 3
- Powdered indigo
- Basic lead white
- Vinegar
Experiment 4
- Powdered indigo
- Flake white
- Vinegar
Experiment 5
- Ground indigo
- Flake white
- Vinegar
What is Flake White?
Flake white (also known as stack process lead white, or old Dutch process lead white) is lead carbonate made in the same (or similar) method as it would’ve been made historically. I believe that Alicia used flake white in her experiment as well, but from a different supplier than I did; however, the basic product remained the same. The process by which it is made creates particles that are not uniform in size or shape and ultimately affects the behaviour of the pigment (read more here).
Results
Experiment 3 went well, though it was harder than I expected to mix in the crucible itself. The solution was dark, but seethed well when heated.

Measuring ingredients 
Vinegar reacts with lead 
Mixing the solution 
Beginning to heat up 
Carbon dioxide forming 
More bubbles
Experiment 4 was when I opted to use the flake white, to see if it worked any differently than the basic lead white. This part of the experiment went much the same way as Experiment 3.

Flake white 
Indigo powder 
Mixing the solution 
Less of a reaction with the vinegar 
Starting to heat and bubble 
More bubbles!
I decided to have a little fun with Experiment 5. I actually wasn’t planning on doing a fifth experiment, but had some time and since all of my tools were already out (and I was already up to my elbows in indigo) I decided to try the ground indigo with the flake white in a small amount to see how that reacted vs. Experiment 2.

Measuring ingredients 
Neat pattern when the vinegar gets added 
Mixing ingredients – not a lot of vinegar reaction 
Seething well 
Beautiful blue bubbles
The Real Test
So all of these experiments are all well and good, but the true test of ink making is, well, whether it writes! I have excluded Experiment 2 from this section since it very obviously wouldn’t make anything except wet acidic marks on paper. For each test, I tried writing on modernly manufactured parchment with a dip pen after I had strained the ink through cheesecloth to remove as much of the solid material as I could.

Control
I wanted to have an example of how this pen wrote with modernly manufactured ink so I had an idea of both how good I was at writing with a dip pen (spoiler alert: I’m terrible at it), as well as how well a properly manufactured ink would write. I have included reminders on which experiment was which.
Experiment 1

Powdered Indigo, basic lead, with heat 
Powdered indigo, basic lead, no heat 
Powdered indigo, extra lead, no heat
Half-batch, on a regular stove
Separated into ‘regular,’ ‘without heat,’ and ‘attempt at making it lighter’
These are the tests I did after straining the mixture through a cheesecloth

Experiment 3
- Basic lead white/powdered indigo
- Small batch, over a flame

Experiment 4
- Flake white/powdered indigo
- Small batch, over a flame
Experiment 5

First attempt was a little weak, remixed and tried again 
Third attempt after significant mixing
Small batch, over a flame
Of the different batches, the ones that felt like they wrote the best were (going by image numbers, not experiment numbers) 3, 4, and 5. I then did some smear testing, shortly after writing an initial sample, and then again after letting a second sample dry for a significant amount of time.

Please ignore the extra 3 
Smear test after significant drying time.
Conclusion
So back to the initial question: Why had Alicia’s experiment originally failed?
It turns out it was an issue with the materials she had used. Historically, indigo would’ve been sold in chunks (good for travel) and then ground by the recipient. In fact, there were many people who believed that indigo was a mineral that was mined as opposed to a plant that was grown because they were so far removed from the hotter climates that produced indigo.
Modernly, indigo is sold several ways: in chunks and powdered, both of which I’ve shown here, but also as a hair dye. Unfortunately, the hair dye version is NOT suitable for ink making. It’s dried and ground plant leaves, which makes the powder green instead of blue, and would need an alkaline base (among other things) in order to turn blue. Since, in this case, we had an acidic medium, her experiment was doomed to failure.
Ultimately, while I think that there is a lot of room to improve in my ink making – learning how to lighten colours, or how to keep them from smearing so badly for instance – I am very pleased with how this experiment turned out.
Citations
“Artists Materials – Stack Process White Lead: Historical Method of Manufacture.” Natural Pigments. Accessed June 6, 2021. https://www.naturalpigments.com/artist-materials/white-lead-historical/.
du Bois, Alicia. “The Alchemy of Azurite,” n.d. Accessed June 6, 2021.
Phillip, William, and W. P. A Booke of Secrets: Shewing Diuers Waies to Make and Prepare All Sorts of Inke, and Colours: as Blacke, White, Blew, Greene, Red, Yellow, and Other Colours. Also to Write with Gold and Siluer, or Any Kind of Mettall out of the Pen: with Many Other Profitable Secrets, as to Colour Quils and Parchment of Any Colour: and to Graue with Strong Water in Steele and Iron. … Translated out of Dutch into English, by W.P. Hereunto Is Annexed a Little Treatise, Intituled, Instructions for Ordering of Wines: Shewing How to Make Wine, That It May Continue Good and Faint Not … Written First in Italian, and Now Newly Translated into English, by W.P. London: Printed by Adam Islip for Edward White, and are to be sold at his shop at the little north dore of Pouls, at the signe of the Gun, 1596.
Other Adventures in Dyeing
I wanted to include a section with all of the other dye projects I’ve been working on. Most of them have zero purpose aside from “let’s see what colours I can make,” but they were fun.

Indigo of course – silk on the left, wool on the right 
Osage orange – cotton and wool 
Sequoia – slightly disappointing – in wool, cotton, and linen 
How henna affects different fibers – protein fibers like wool (top) turns brown, while cellulose fibers like linen (left) and cotton (right) are kind of yellow or green depending on the amount used/dye pot conditions 
Close up of the henna wool 
Close up of the henna linen 
I was so excited to achieve an actual red colour using brazilwood! 
Brazilwood linen and cotton (wool above) 
Had some really good luck with marigold as well 
Marigold on all sorts of fibers – wool, linen, and cotton 
Close up of wool dyed with marigold 
Close up of linen dyed with marigold
“At Athenaeum 2020, one of the conversations I had was with Alicia du Bois and I credit her with giving me my main topic for this year’s display. She had been looking at creating blue ink for calligraphy and had been having difficulty with a recipe that used indigo as a replacement for azurite.”
WAIT, WHAT!? SQUEEEEEEE!
I am SO EXCITED that this is your project this year!
Booking a 1:1 with you right now!
Huzzah! *laughs* I’m glad you’re excited – I enjoyed working on it and I look forward to talking with you 🙂
I loved all of this!
And I really appreciate your bibliography for the dye paper. While I didn’t glean anything new (as this is an interest of mine as well), it’s an excellent list.
While you don’t need to go “further”, if you should wish to, you might look into how they identify pigments for archeology (both for textiles but also for paintings and paper). Academia is dangerous for that because once you start, they can inundate you about it. But looking at it from that direction can really help in understanding parts that can elude us easily.
This is one article that can “release the Kraken” at Academia. I don’t have a URL however. But since High Performance Liquid Chromatography (HPLC) is commonly used it will bring up all sorts of things once you start out: IDENTIFICATION OF COCHINEAL AND OTHER DYES
IN BYZANTINE TEXTILES OF THE 14TH CENTURY
FROM MOUNT ATHOS by Dimitrios Mantzouris, Ioannis Karapanagiotis, and Christos Karydis
Or this one:
Identification of Indigo and its Degradation Products on a Silk Textile
Fragment Using Gas Chromatography-Mass Spectrometry by Jennifer Poulin
I thought I’d put them in my Dyes and Dyestuff folder, but I can’t find the ones related to paintings (as opposed to textiles.) Hopefully “releasing the Kraken” will help you find them on Academia.edu.
Thank you! I originally wasn’t really into pigments, and had no intention of looking into things beyond answering Alicia’s question. However, I found it a rather interesting exploration, so I may look at continuing in the future, so I greatly appreciate the sources!
Very interesting seeing your work on making ink from Indigo. And love your dyed fibre samples.
Thank you!
So much progress from your beginnings.
Loved seeing the other dye project photos as well. Good for reference.
Thank you! I really enjoyed this project.