A Bycocket Fit For A Queen
My Vision

In mid 2019 (AS 54) I was honored to be included in the creation of the step-down garb for King Morgan and Queen Livia. I worked on multiple parts of the garb, but I was incredibly excited when I was asked to make a peacock feather bycocket with a miniver brim for Queen Livia. I’d made a bycocket once before and had learned how to work with fur from Master Charles de Bourbon, but I had never sewn with peacock feathers before. This promised to be an exciting learning opportunity.
Inspiration
Though the design for the hat was already designed, I was still very curious about the historic background of bycockets. I had only ever known them within the SCA.
The bycocket hat, or chapeau a bec, became fashionable near the end of the 13th century (Amphlett, p. 33). It was worn by men and women, worn with a veil, worn with braids, worn with a crown, and worn with hood. People across the classes wore bycockets. But it was the elite that wore the most lavish and scrumptious hats.
By the 14th century, the chapeau a bec began to be made with the most marvelous designs. “The crown is decorated with either real or embroidered peacock’s feathers, and the upturned brim has a facing of menu-vair (miniver, the hair of a squirrel’s belly).” (Amphlett, p. 87)


Images 2, 3, and 4 show examples of these lavish bycockets from three different sources. Images 3 and 4 clearly show the use of miniver, and I think image 2 also shows the brim decorated with miniver. Image 3 shows an example of a hood worn with a bycocket.


Making the Bycocket
In spring of 2019 I first tried my hand at making a bycocket. I had recently had my heraldry passed and was eager to find ways to wear and present it. I was blessed to be given the opportunity to learn with Master Charles de Burbon. I had worked with fur before but was completely self-taught. It was a wonderful opportunity to be able to learn from a more experienced person. And it prepared me for making the hat for Queen Livia.


When I was commissioned to make Livia’s hat, I was given a freshly blocked bycocket of felted wool and the basic supplies for making the decoration
- Peacock feathers (roughly 50)
- Blue shot silk for the crown and inside of the brim
- Pieces of minivar plate
- Cotton bias tape
There were many steps to the process. First, I needed to finish the shape of the wool hat so I could create patterns for the crown and bill.

This is one of the most critical steps, as everything else depended on the patterns made from the hat. When I recieved the hat, it was still pretty moist from being shaped. I needed to dry the hat (very delicately, so I didn’t shrink the wool), define the upturn location for the brim, and trim the edges of the brim.
After accomplishing this, I went about making patterns. I made one pattern for the upturned brim, and one pattern of the entire hat with the brim turned down. The first pattern would dictate the needed amount of fur, and the second would be used for making the cover of the crown out of the blue shot silk.
I next created the cover for the hat out of the silk and hand stitched it together. With this done, I could move forward on the peacock feathers.
The feathers came to me at roughly 10 inches length. I needed just the eye of the feather, so I had to trim and size the feathers. I also wanted to reduce the amount of excess feather around the eye for a cleaner look. This was a very messy process!

I grouped the feathers into sizes, as I wanted to be able to control the coverage and not have to shift through the feathers and potentially damage them. This was a huge help, and I felt the benefit of this work all during the attachment of the feathers.
I also needed to prepare my fur for the brim. The pieces of fur I received were inconsistent, and I needed to cut and combine them in order to have pieces big enough. I wanted one solid piece for each side of the brim, connecting at the center back and center front. Identifying these connection points was an important part of making the brim pattern.


After preparing the fur, it was time to cut the pattern. I don’t recall the last time my hands shook so hard!

After cutting out the fur, I then lined it with linen and attached the bias tape. I combined these three pieces at the same time to reduce the amount of puncturing of the fur. I would be attaching the fur to the silk and to the hat via the bias tape.
With all my prep work complete it was time to assemble. I started with attaching the feathers to the silk lining. As I mentioned, I’d never sewn with feathers before. I had an idea of how to go about it, and it turned out to be quite successful. I put the hat with the lining over it onto a hood stand I happened to have, and started at it.
- First, I inserted the needle and thread through the back of the lining.
- I pierced the hollow of the feather in parallel to the face of the feather. (see image 16)
- I passed the needle back into the silk lining.
- I then used a pin to hold the feather in place so I could finish attaching the feather without it moving. (see image 19)
- With the thread now secured, I brought up the needle close to the hollow tube shaft of the feather, then looped the thread over and inserted the needle on the other side, tight next to the hollow shaft.
- I repeated this last step moving up the length of the feather, even sometimes gently separating the close “hairs” of the feather in order to add enough stitches. (see image 17)


Using this method I was able to fairly securely attach the peacock feathers. I ended up clipping the shaft close to where the stitches begin so it wasn’t as clunky and gave me a little more room. I started with the large feathers, and used the medium and small feathers to fill in spaces so that the appearance is more bountiful looking.


I completed one side of the hat before turning and starting on the other side. As I got close to the crease for the brim I began using the smaller feathers to fill in the spaces.


Before adding the fur, I first secured the silk to the hat, stitching it down along the crease of the brim (see image #).
Master Charles also wanted me to add a tubing of silk at the top edge of the brim. I covered some braided chord with the shot silk fabric, being sure to stitch close to the cord for a tight fit and leaving a half inch of extra silk as a “tail” to sew to the hat. I first attached the twill tape to the hat using a whip stitch. When that was complete I pinned the chord in place and added some anchor stitches. I then pulled over the silk that covered the inside brim up to the inside edge of the chord and stitched that down, making for a finished look.


All that was left was to flip up the brim and stitch down the other edge of the fur’s bias tape to the inside of the hat.
Reflections
I am very happy with how this hat turned out. It was really exciting to make this, and even more exciting to give it to Livia and see her joy at getting it.
A lot of making this hat was experimentation and exploration. I had plenty of time to make the hat, and the lack of pressure let me make diligent and deliberate work.
If I were to do this again, I would like to work with a solid piece of miniver plate. The most stressful part of making the hat was piecing the fur to try to have a symmetrical appearance. I had to do some crafty scheming to make it work. But you can’t tell when looking at it how much piecing went into the fur brim. I think the fact that minivar plate is itself a lot of piecing worked in my favor in this instance!
I want to make more hats like this. And I especially want to do more work with fur.
A Honeycomb Smocked Apron
My Vision
Recently, I changed my persona from mid-twelfth century Aquitaine to early fifteenth-century Florence, and I wanted to have a better understanding of the clothing women wore, and how to also add some variety to my wardrobe. In looking through portraits of women in Florence, I noticed that aprons were sometimes part of the lady’s wardrobe, even women of the non-working class. I decided to make this my next project. As I had recently changed time periods, I still had a lot of imagery of the smocking used in the twelfth century rolling around in my head. I had never made honeycomb smocking before, so the idea of a honeycomb smocked apron was born!
Inspiration
I was initially attracted to this time period when I came across a pair of women in the painting of The Preaching of Saint John the Baptist by Francesco Bacchiacca.
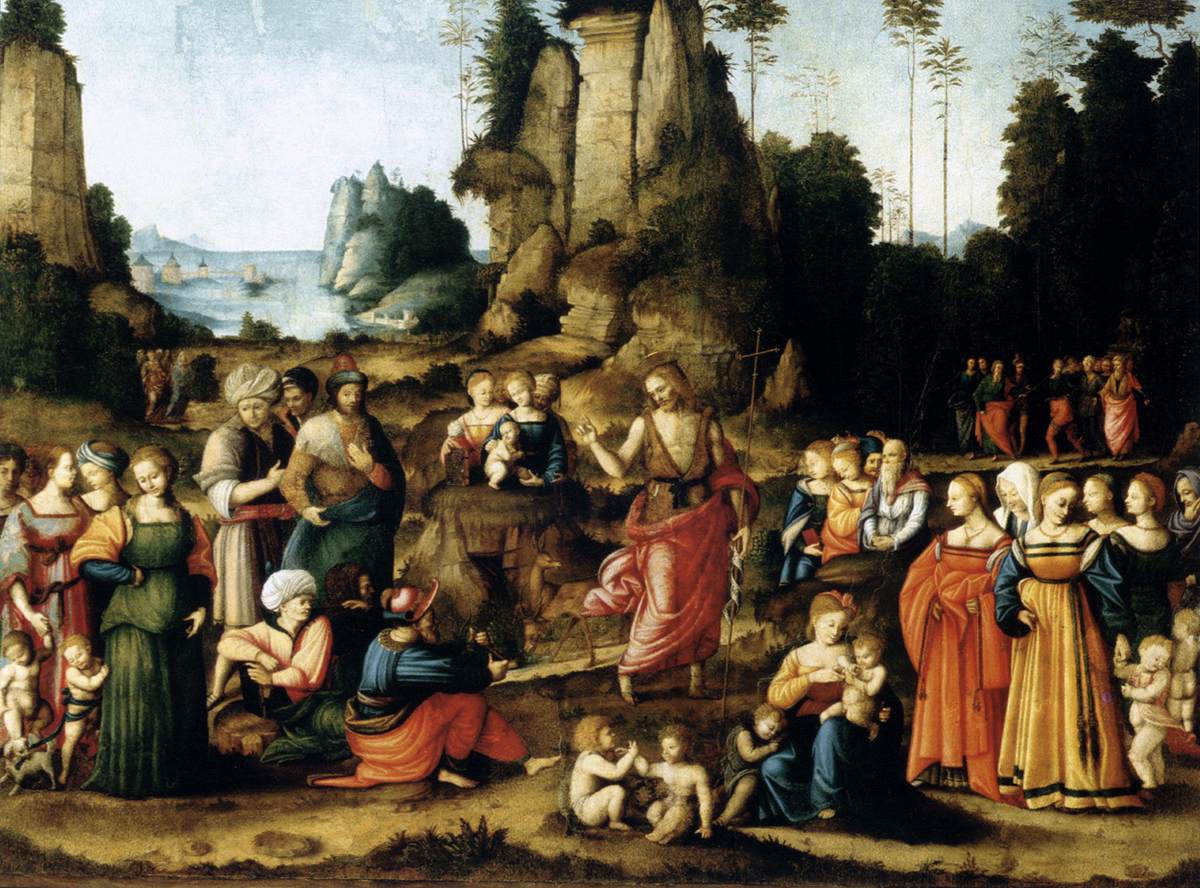
In the bottom right corner of the painting are a woman in yellow and a woman in orange. After identifying this style I began to research the design to identify the “where” and “when” it came from. I identified it as very early 1500’s Florence (1500-1510), and I was then able to further research it.
In examining the portraits of women, even those of higher classes, I saw aprons were sometimes worn as part of the ensemble.


In looking at portraits past this small time period, I saw that aprons continued to be an item worn as an accessory by those of higher classes. One amazing example is seen in a painting by Girolamo Francesco Maria Mazzola (also known as Parmigianino) titled “Painting of a Young Woman”.
At this point in my creation of garments for myself, I had only two versions of the simple gamurra dress. Adding an apron seemed the logical next aspect of my wardrobe. So I began to think of a design.

I knew from my research of women’s garments of twelfth century France that honeycomb smocking had been used, as can be seen in many statues from this time, making my use of it in a sixteenth-century garment rational.
I love the look of honeycomb smocking. I had never tried making it before so I wanted to make this apron with it. I chose the color of thread to pinch the pleats to be a golden yellow, as it reminded me of An Tir.
Making The Apron
I began making my apron by first grabbing a length of linen. I knew I wanted some tight pleats many smocking gathers. I used a medium weight white linen, and began by first measuring in from the side edges by an inch, and from the top by an inch. This would be the frame for the pleats. I then began creating a dot matrix for the gathers. Each dot was a quarter inch apart side-to-side, and a half inch apart from top to bottom (see image 7). I ended up creating a grid 5 inches long and 52 1/2 inches wide.


Next was time to create the pleats. I used a heavy duty upholstery thread, as this was a large piece of fabric and a snapped thread would feel devastating. I had originally learned to make pleats via the method of “in one dot, out the next”. This results in a deep pleat, and frankly, fewer pleats. I wanted a pleat extravaganza, so I used the “pinch” method of picking up a small pinch of fabric at each dot. This made for some really sexy pleats!


I secured the ends of the ends of the threads after pulling them to make the pleats and began the hard work: making the honeycomb gathers. I used the diamond stitch (Wolff, p. 127) which creates a gather and hides the moved thread within the “tube” of the pleat. This makes for a lovely honeycomb on the front, but frankly, a messy looking back.
After finishing all the smocking stitches, I removed the heavy-duty pleating thread. I used a length of linen I had put aside at the beginning and made a waistband. I attached the right sides together on the front of the apron, stitched it down, and then flipped the waistband over (making a lovely front) and whip-stitched the back of the waistband down.

I was now done with all the critical parts. I just needed to hem the edges and remove the blue tailor’s ink. This is where my life got complicated.
Half way through the project, the tailor’s pen I was using died. I had another in my sewing kit, so I grabbed it and kept on working. Unfortunately, this pen must have felt left out and didn’t want to leave the project, as when I rinsed the apron…it didn’t budge. It took a lot of experimentation, begging, bribery, and prayers before the ink finally released its grasp from the fabric and my nerves.
After a time to rest my nerves from the ordeal, I was able to hem the sides and bottom of the apron. And it was complete!

Next Steps & Reflections
I love how this apron looks. I’m quite pleased with my first attempting at not just smocking but making an apron. But I really want to add some detail (and flair!) to the bottom of the apron. I’ve never done drawn thread embroidery, and I think it would look amazing. I’m next going to experiment with a scrap fabric to play around with the technique, and will do a detailed plan before I start modifying the apron. Drawn thread involves counting threads, which will be minute and detailed work.

There are a few things I would change if I were to do this apron over.
First – I would use an entirely different washable tailor’s marker. The anxiety and frustration of removing the blue ink is not something I ever want to repeat.
Second – I’m curious about ways to do honeycomb smocking that makes for a less messy back. I tried doing individual stitches for each gather, knotting and cutting the thread each time. That was a lot of work, and didn’t seem to be the most logical method.
Third – I don’t know if I’d do as tight of a grid given the long length of the pleats. It looks wonderful, but I’d like to play with it more.
Citations
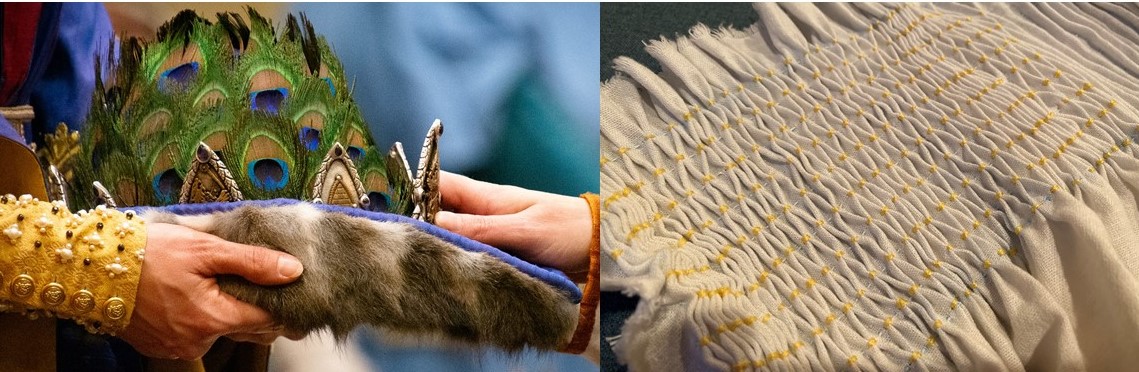
Cover photo from left: Queen Livia presenting the crown for the swearing of an oath. Taken at 12th Night AS 54. Photo by Dachsie Haven Photography. Close-up production photo of the honeycomb smocked apron, taken by Aenor de Pessac
A Bycocket Fit For a Queen
- [1] Dachsie Haven Photography, photo of Queen Livia at 12th Night AS 54.
- [4] Paolo Uccello, Episodes from the Aeneid, 1397-1475. Egg tempera, oil, and gold on wood panel. Photographed by Aenor de Pessac at the Seattle Art Museum, April 2020.
- [5] Ambrogio Lorenzetti, Allegory of Winter from Allegory of Good and Bad Government, 1338-1340. Fresco. Wikipedia. commons.wikimedia.org. July 9, 2020.
- [6] Image from the text Hats: A history of fashion in headwear by Hilda Amphlett, page 93
A Honeycomb Smocked Apron
- [1] Francesco Bacchiacca, The Preaching of Saint John the Baptist, 1520. Oil on wood. Web Gallery of Art. www.wga.hu. July 6, 2020.
- [2]Raffaello Sanzio da Urbino, La Muta, 1507. Oil on wood. Web Gallery of Art. www.wga.hu. July 6, 2020.
- [3] Raffaello Sanzio da Urbino, La Donna Gravida, 1505. Oil on panel. Web Gallery of Art. www.wga.hu. July 6, 2020.
- [4] Ridolfo del Ghirlandaio, Portrait of a Young Lady, 1510. Medium unknown. Wikipedia. en.wikipedia.org. July 6, 2020.
- [5] Girolamo Francesco Maria Mazzola, Portrait of a Young Lady, 1535, Oil on canvas. Web Gallery of Art. www.wga.hu. July 6, 2020.
- [6] Anonymous French Sculptor, The Queen of Sheba, 12th century, Limestone. Dreamstime. dreamstime.com. July 6, 2020.
- [12] Unknown Italian seamstress, Apron 16th Century, 1500’s, Linen. Met Museum online collection. metmuseum.org. July 6, 2020
References
A Bycocket Fit For A Queen
Amphlett, Hilda, Hats: A History of Fashion in Headwear. Dover Publishing. 2012.
A Honeycomb Smocked Apron
Cohen, Elizabeth S. and Thomas V, Daily Life in Renaissance Italy. Greenwood Press, 2001.
Frick, Carole Collier, Dressing Renaissance Florence: Families, Fortunes, and Fine Clothing. The Johns Hopkins University Press, 2002.
Scott, Margaret, Fashion in the Middle Ages. J. Paul Getty Museum, 2011.
Wolff, Colette, The Art of Manipulating Fabric. Krause Publications,1996.
Beautiful! Impressive smocking.
Your work is fantastic. I have dabbled with both types of projects, and this is inspiring me to get back into it all.
~Dame Elizabeth FittzWilliam. OL
Both your pieces turned out beautiful. I have seen the hat in person and was wondering how it was made. Thank you for all the detail as I have been meaning to work with peacock feathers (both my and my husband’s device are peacocks) and I was wondering how to sew them.
Great job on the apron. The amount of attention to detail you gave it really shows.
Two beautiful projects! I would live to hear more about sewing the feathers and piecing the miniver bits.
What lovely projects! I really enjoyed reading about your thought process on sewing with feathers (very well considered!), and your smocked apron is absolutely beautiful. Thank you for sharing! -HL Lantani de Forez
LOVE LOVE LOVE THIS AND YOU!!! You taught me about sewing the feathers, and I am so grateful to have been able to work with you on this>
This is lovely.
These projects are both gorgeous! I love the hat – the colors go so well together!
I have also made a honeycomb smocked apron using pretty much the same method you did and I’d love to do a drawn thread apron as well! Maybe we could coordinate!
I’d love that!