The Loudest Fabric; or How online window shopping got me back into medieval clothing
I joined the SCA for the pretty clothes, and I have spent the past 6 years mainly focussed on 12th century women’s clothing from western Europe. I showed some of the highlights of that work in my 2020 Athenaeum display. My pandemic creativity and skill development has been very sewing-intensive, but most of my work was focused on learning how to make my own modern vintage-inspired wardrobe. I didn’t make any medieval clothing in 2020 after finishing a green and yellow checked bliaut before the pandemic started. I suppose that with no in-person events to wear them to, I had a lot less motivation to make garb. But that all changed in February 2021, when I spotted an orange silk taffeta with gold brocade stripes in one of my favourite online fabric stores.

I loved the bright color and the changeability of the silk (the orange is shot with fuchsia), but the aspect of this fabric that called out to me from the 12th century was the gold stripes. When a trim color is evident in 12thcentury artwork, it is more often than not yellow or gold against a contrasting background. Brocaded silks were popular among the wealthy at that time, and I find that texture and pattern of this nature greatly enriches the look of a garment. I haven’t done any research on the popularity of stripes in the 12th century, but our dragon-slaying friends pictured in about 1111 both wear a striped layer in their outfits. That was enough information to order the fabric and start designing the bliaut.

Orange is not a color that I use often, so I was a bit surprised that I fell in love with that fabric. One problem that comes with using a new-to-me color is that I didn’t have any even remotely matching thread in stock. I found a relatively local supplier of silk thread, and placed my order for a few different weights of it. It took a surprisingly long time for the shop that I ordered the thread from to source it from their suppliers, so I needed to come up with another 12th century project to satisfy my hankering for having my hands on silk taffeta.
A Cloak that is Not a Blanket
The first outdoor SCA event that I attended was Avacal’s first Crown Tournament in May of 2015. But as those familiar with Avacal weather know, May in Alberta often involves snow. True to form, there was indeed a chill in the air and a few snowflakes. That was when I learned that cold weather garb is essential to full participation in the SCA. That summer, I ordered some wool melton cloth, and made myself 3 layers of decorated insulation. One of those layers was a half-circle cloak with some modern trim that, luckily, doesn’t look too modern. I wear that cloak a lot, because mantles are an important part of a fancy 12th century outfit, and because it is often necessary to wear a blanket-esque garment in An Tir weather.
As useful as that wool cloak is in my wardrobe, it became apparent to me over the years that sometimes I wanted to look fancy at times when I did not want to be wearing a blanket. So I started looking into what mantles could be made of in the 12th century.
Materials and Supplies
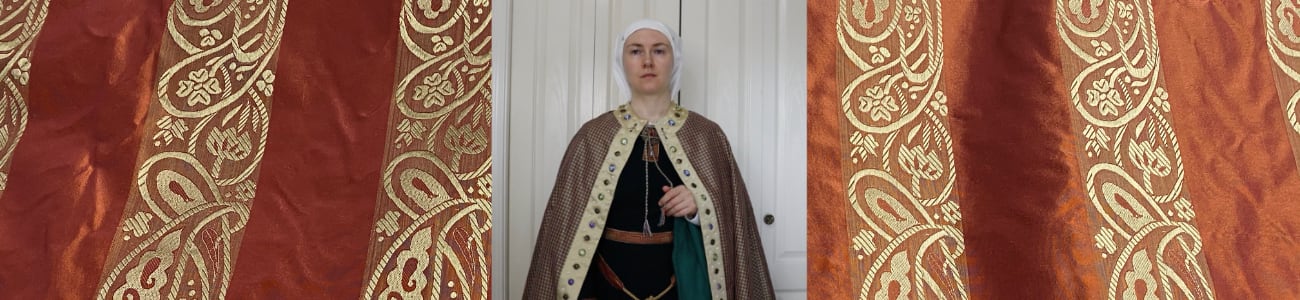
Silk was a common outer fabric for 12th century mantles according to Eunice Rathbone Goddard’s PhD thesis on descriptions of clothing in 12th century French literature. Mantles were usually lined with fur, but were sometimes lined with silk fabric instead. Because I wanted a lighter weight garment, I went with the idea of silk on the inside. I decided not to use a separate piece to line it, but left the silk unlined because the reverse side looked just as nice as the outside. The fabric is a blue, red, and yellow checked and figured silk taffeta that I got a few years ago from the same fabric shop as the orange striped silk that started this whole process.

The trim on the front edge is a gold-coloured silk charmeuse. It looks really nice on a finished garment, but it’s a huge pain to work with. It behaves more like a liquid than a fabric, so I needed to sew lightweight linen onto the back of it to get it to cooperate.

The trim around the bottom edge is a white silk organza that is woven with gold brocade stripes. I got it from the same marvelous fabric shop several years ago, but I suspect that I bought all of it that they ever stocked. I cut it into stripes and fold over the edges to make very nice period-looking trim. I have sewn it onto enough of my stuff that it could almost work as my heraldry to mark things as being mine.
The shiny hardware decorating the front edge is a mixture of beads and jewellery findings that I have accumulated over the years. I have tried to familiarize myself with a 12th century aesthetic and the types of decorative hardware that were used by looking at extant objects. There are the well-known super fancy garments from Sicily that made it into the Holy Roman Empire’s state possessions, like the Blue Dalmatic and the Coronation Mantle of Roger II. I also looked at lots of enamel objects like chests. Once I was familiar with the look of 12th century decoration, I looked on modern jewellery supply stores for pieces that had the right aesthetic. I found some fantastic, really accurate-looking pieces. But I also found things that were kinda close but not quite right. This mantle is where I put these not-quite-right looking pieces so that they can shine in their close-enough splendour.

The enamelled pieces have the right colour scheme, and most of them have flowers on them (which were big in 12thcentury enamel work), but the flowers are not the right shape or distribution. The things that look like pearls are really mother-of-pearl beads that I bought before I found a good source for tiny, lumpy freshwater pearls. I paid good money to learn that those bling pieces didn’t quite have the right look, and I’m damn well going to show them off.
Design and Construction
Fancy 11th and 12th century mantles were usually half-circles with a cut-out in the straight edge for the neck. Extant examples include the 11th century Star Mantle of Heinrich II, Great Mantle of St. Kunegunde, and Hungarian Coronation Mantle, as well as the better-known 12th century Mantle of Roger II of Sicily from 1133-1134.
I’m happy with my wool mantle, so I stuck with a radius of 50” which hits me at the low mid-calf area. I couldn’t get the whole shape out of my fabric in one piece, so I cut it in quarter-circle pieces. Since I wanted to sew each bias edge to a straight-grain edge, I needed to insert a narrow rectangle at the centre back.
I used the selvedge as the front straight edge. I used a narrow strip of the same fabric to bind the curved edge. Bindings and facings in period were usually narrow straight-grain strips or ribbons according to Textiles and Clothing 1150-1450 (page 158). Due to some flaws in the fabric, I had to arrange the pieces so that there was a gap between two quarter-circles oriented along the bias. I decided to follow a period-esque attitude of not wasting a good strip of fabric and cut the binding on the bias from that gap.
I sewed the half-circle pieces together so that the straight-grain edge extended out a bit farther than the bias edge. I was going to fell the seams to finish them, so I thought I should save some fabric and effort by offsetting the pieces instead of trimming one of them after sewing them like I usually do. I would also like to note that stripes make it very easy to sew in a straight line without having to mark one on the fabric.

Once I had the big pieces sewn together, I sewed the bias binding onto the curved edge. I used running stitch (probably stab stich, now that I think about it) to sew both sides on at once. That hem is 4 meters (13’) long, so I was only going to sew it once. The binding looked really narrow, so I was a bit nervous about whether the fabric I was sewing it onto was stable and not frayed. But narrower seam allowances are part of improving my period practice, so I went for it. I won’t be putting any strain on the bottom edge anyway. Then I sewed the silk organza/brocade strip on a few inches above the curved edge with whip stitch.

The next step was to build the front edge trim. It’s really common to see a wide band of trim on the front edge of 12thcentury mantles, as you can see on my style icon Matilda of Tuscany in about 1106. I made mine 6.5 cm (2.5”) wide, because that seemed to give the right visual impact. It had one layer of silk charmeuse on the outside, and 2 layers of lightweight natural-coloured linen under that for stability.

I sewed the jewellery hardware and ‘pearls’ (actually mother-of-pearl beads, but real pearls seem to be what was often used in period) on before I sewed the trim onto the mantle. I arranged the decorations so that the enamelled pieces were evenly spaced along the length of the trim, separated by a pair of ‘pearls’. This decorative arrangement seems to be pretty common in the 11th and 12th centuries. I got my aesthetic inspiration by looking at a couple of fantastic image-heavy books: English Romanesque Art 1066-1200 and The Medieval Treasury: The Art of the Middle Ages in the Victoria and Albert Museum. When the trim was fully decorated, I sewed it onto the front edge of the mantle with whip stitch.

Closure
I left space at the top of the trim to add two vertical pairs of eyelets. Once the trim was sewn onto the mantle, I made eyelets with blue silk buttonhole twist. I made a finger loop braided silk cord using this 7-loop square braid method. The silk yarn was mostly 20/2 spun silk. The cord goes through the eyelets in a rectangle, such that the short sides are in front of the mantle trim and the long sides go behind the front edge of the mantle and across the wearer’s upper chest. This closure method is modelled nicely by the mid-12th century Chartres Cathedral lady shown below.

I tied my cord in a knot at centre front instead of on the side like the Chartres lady. A knot in the centre seems to happen much more often in 12th century artwork, because there are usually plaques covering the eyelets.

I was nervous about the shape of the neck cut-out the whole time I was making the mantle. I used a roughly semi-circular shape that had about the same dimensions that I use for a close-fitting keyhole neckline. I thought it would be too wide or too deep or that it wouldn’t sit right. But this is an entirely non-fitted garment. If I don’t like how it looks, I can just shift how it sits on my shoulders, and it will look different but still hang just fine.
I took the final modelling pictures wearing it over my Matilda’s Wedding outfit, and I think they work well together. Overall, I’m really glad that I made this. I got back into 12th century costuming after a year, I have a Garment of Instant Fanciness that will work with lots of outfits, and my close-enough shiny hardware gets to go forth into the world.


The Self-Decorating Bliaut
Materials
I’ve already told you about the orange striped silk taffeta that started this whole business, and the silk thread that was holding up production. I also lined the sleeve inserts with a solid gold-colored silk taffeta, which I will also use for the few embellishment pieces that I will make for this project. I lined the bodice from the shoulder to mid-thigh with a medium-weight white linen. I also have several colors of 20/2 spun silk yarn to make lacing cords.
Even though this project comes mostly pre-decorated with brocade stripes, I couldn’t resist adding some shiny hardware. I have 2 different sizes of freshwater cultured pearls, which are appropriately weird and lumpy. Pearls on extant 12thcentury clothing like the Blue Dalmatic cuff shown below aren’t the perfectly smooth spheres we’re used to seeing today.


Design and Construction
I have made a lot of bliauts over the years, so I know what design elements I consistently like. I decided to use my default bliaut pattern that has always served me well, so that I could let the fabric shine without having to worry about whether the design elements would work out. My default bliaut has simple geometric shaping on the torso, 6 gores in the skirt, and big square gussets to form the sleeve extensions.

I use fixed dimensions for the parts of the garment that are important to fit me (my height and width and arm length and such), but a lot of the pieces can be any width that fits onto the fabric. I never decide in advance how wide my gores or sleeve extension squares will be, I just draft them onto the fabric wherever they will fit and make them as wide as the space allows. I decided that I wanted vertical stripes, and that I wanted to insert the gores into a solid orange stripe. Beyond that, I would make design decisions when I had the fabric laid out in front of me.
I sewed this garment entirely by hand. In general, I sewed structural seams with running stitch using doubled thread, and finished the seams with whip stich using a single, lighter-weight thread.
I first pieced together the side gores, and I really enjoyed how the stripes interacted with each other. Then I constructed the sleeves, with the intension of having trim at both the cuffs and the biceps. But when they were put together, the stripes surprised me again with the way they interacted with the edge of the sleeve. One edge has the stripes parallel to it, and the other edge has them perpendicular. It’s a bit disorienting in a geometry-magic-trick kind of a way, so I decided to leave the sleeve cuff unadorned and let the stripes show as their own decoration. I’m still planning to put on bicep bands, because they’re the most distinctively 12th century decorative element to my eye, and I just like them.


I finished the functional aspect of the keyhole neckline with a linen facing on the inside. The neckline is finished cleanly as it is, but I am still planning to make a decorative neckline with pearls on it. These decorated neckline facings were very common on fancy clothing in the 12th century, but they were not always used. My style icon Matilda of Tuscany didn’t have any neckline or hem decoration even when she was hosting the Pope and the Emperor, so I might decide to leave out the neckline trim if I have a time crunch or a bought of laziness. I have already decided not to use any trim at the hem, because I like how the stripes interact with the edge.

Once the neckline was finished, I sewed the sleeves onto the garment. The dimensions worked out for the flat pieces of fabric, but once seam allowance were used, the nice edges didn’t quite match up with each other. With some creative narrowing of hems and stretching of bias edges, I made it work. I’ll have to widen my sleeve pattern a bit for future bliauts.
Edge Finishing & Closure Plans
I am re-enforcing the edges of the side opening with narrow ¼” linen tape. Various configurations of tapes and facings are found on closure edges in extant fragments from the 13th and 14th centuries (Crowfoot et al., pp. 164-167). These tapes and facings were generally made of silk. I am using linen because I already had it in stock.

For the lacing closure, I am planning to use a cord tacked down along the edges, rather than eyelets. This closure method is shown in period artwork, such as the Angers Cathedral statue below.

I have used this closure method on several garments, and it works quite well. I use the same type of 7-loop square finger-loop braid that I made for the closure of the mantle. The intervals between the tacks needs to be fairly narrow, I like to do 1 to 2 cm. This closure method is inherently stretchy, so the edges of the garment will never meet. In order to achieve the necessary snugness for this type of dress, I have found that the garment needs to be at least 2” smaller than the body at the waist. This means that the garment will still be tight across the torso, even with a 1” gap in the lacing on each side. Below is a picture of this lacing method that I used on a bliaut that I made in early 2020.

Skirt Gores
When I’m making a bliaut with a full, gored skirt, I like to use 6 gores. I find that provides a suitable level of dramatic fullness that I can’t quite get with 4 gores. There are 2 front gores and 2 back gores that are set into slits in the fabric about 1/3 of the width from the edge. For this garment, I cut the front and back gores with an orange stripe in the middle, and set them into orange stripes in the front and back panels.

The final step for the skirt was to sew the side gores into the side seams. The edges of the body panel had gold stripes at nearly their full width, so the finished side gores have four stripes on each side radiating toward the central stripe. It makes for quite a dramatic effect.

Closing Thoughts
And that, dear reader, is as far as this garment has progressed as I reach my publication deadline. The next step is to make the lacing cord, then sew it onto the garment so that it can be cinched up as intended.
Once the garment fits properly, I can mark and finish the hem. I like to put something stiff and protective in my bliaut hems. In the past, I have usually made wide bias tape from a heavy linen fabric that matches the skirt color and used that as a binding for the hem. I find that the weight and stiffness added by the binding makes the hem drape in wide, rolling folds that hang very nicely.
I have been trying to keep bias strips to a minimum, since period facings were usually cut on the straight grain or were made from narrow ribbons or tapes (Crowfoot et al., 2001, p. 158). This time, I decided to use a ¾” wide natural-colored linen tabby-woven tape. This is a wider version of the tape that I used to re-enforce the lacing edges. Extant tabby-woven bands from England in the 10th, 11th, and 14th centuries were used by themselves, or as bindings or facings to finish edges (Crowfoot et al., pp. 141-142, pp. 156-163). All of these extant bands were made of silk. I chose to use a linen band mostly because I had it in stock, but given the widespread use of linen in period, a tabby-woven linen band seems at least plausible.
I am planning to use the band as a facing on the inside of the hem. I’m going to let the linen band extend a few millimetres below the edge of the silk, so that when the skirt touches the ground, it will be the linen making contact rather than the silk.
The last step will be to make the embellished trim. I will make this from the solid gold-colored silk taffeta that I used to line the sleeves, and I will decorate it with the pearls I showed above. I will at least make bicep bands, since that is the decorative element that is the most distinctively 12th century to my eye. I will probably make a matching pearl-decorated neckline facing, but I might decide to leave the neckline plain and wear a large circular brooch to close the keyhole.
With that, I must leave you with The Self-Decorating Bliaut in her not-yet finished state. I am very happy with how it has progressed thus far. The colour, the shine and changeability of the silk, and the decadence and visual interest of the stripes make her a treat to look at. So here she is, in the shape of a bliaut at last, but not quite in a state that I can model effectively. When she is complete, I will post pictures on my Instagram and my costuming blog.

Citations
- Arts Council of Great Britain. English Romaneque Art 1066-1200. Eds. Zarnecki, G., Holt, J., and Holland, T. London, BAS Printers Limited. 1984.
- Crowfoot, E., Pritchard, F., and Staniland, K. Textiles and Clothing 1150-1450. Boydell Press & Museum of London. 2001.
- Goddard, E. R. Women’s Costume in French Texts of the Eleventh and Twelfth Centuries. The Johns Hopkins Studies in Romance Literatures and Languages Volume VII. Baltimore: The Johns Hopkins Press. 1933. Accessed online at http://goddard.1186-583.org
- Victoria and Albert Museum. The Medieval Treasury. Ed.. Paul Williamson. V&A Publications. 1986.
Beautiful. I have been wanting a way to do fancy for 12th century. You have inspired me.
Dearest Lady,
This is not an easy style to interpret, with many variables and regional ideas. And no really clear “portraits like a good Holbein to sort through the details. Not to mention some emotionally charged theories of construction. You have done a lovely interpretation here, and you have been really resourceful in understanding the design elements such as the side lacing and the decorative metal work on you cloak to enhance your status. I look forward to chatting with you in the future
Duchessa Tangwystl
I really enjoyed seeing your process for both garments. I have a half finished bliaut that has been in the punishment pile since the beginning of the pandemic. I’ve never made a mantle. I’m going to now!
That fabric is absolutely stunning. I’m not usually one for orange either, but I can see why it called to you. And I loved learning about your process – I often wish I had the ability to draft and sew (or the inclination to learn/practice, though I suspect some of it would always remain foreign to me), especially since I *often* see fabric that is just begging to be made into….something. I hope the rest of the project goes swimmingly and I hope to see these pieces at an event sometime in the future!
Interesting presentation. Gorgeous fabrics. I appreciate seeing how you fit your bliauts. One comment regarding dyeing flax with period dyes: madder and indigo (presumably and woad) dye flax quite well. I dyed handspun flax tow with madder, indigo and onionskin which I used together with undyed flax threads in weaving a patterned belt on an inkle loom. WE also dyed some linen yardage which came out an orange that would complement your fabric, though it is paler, in a mixed fibre dye experiment in summer 2019.
Thank you for sharing your experience with dying flax. I have removed the sentence referring to linen and period dyes from my display. I was not fully comfortable with it anyway, since I am not very knowledgable about dyes myself.
We should talk about woad and linen types fibres – I have quite a crop coming up!