Food represents culture and creates connections from the modern to the past. Culinary demonstrations provide an opportunity to engage with the modern audience and involve multiple senses for lasting impact in a short amount of time.
The Barony of Dragon’s Laire holds an annual event and demonstration in June and has for more than 30 years. In 2013, the Washington State Health Department visited the culinary demonstration and required that all edible foods be moved out of the reach of modern attendees. Prior to that change, no moderns were deliberately fed, but no attempts were made to prevent them from eating the food on display. Modern visitors to the culinary demonstration were not directly participating in the preparation or cooking of the ingredients and now the finished products could only be viewed on a display set up on the other side of prep tables and attended workstations.
Cooking in front of and interacting with guests continues at the annual demonstration: a brazier with baking breads, grilling meats, and simmering pots accompanied by cooks willing to talk about period methods, recipes, and ingredients.
But were there things we could do to engage visitors more directly, to allow a hands-on component without over-stepping health department or SCA participation guidelines? Were there demonstrations we could put together to take to smaller demonstration sites or to areas where fire is not allowed?
Almond Milk – A Display and Demonstration: Youth and Travel Friendly

The first recorded nut milk recipes appear in the 1300s and are used to create dishes for the ill and for observance of fasting or lean days, days where meat or other proscribed foods were to be avoided rather than no food at all.
Nut milks, primarily from almonds but also walnuts, are high in fat, making them an acceptable substitute for custards, sauces, and butter and could be prepared fresh or easily stored for later use.
Almond milk was prepared by finely grinding almonds, steeping the mash in water, and then straining out the pulp. It is likely that the almond skins were removed prior to grinding so that the finished product will have a lighter color and better taste.

This demonstration appeals to both youth and adults! Many stages appeal to multiple sense interactions – visual, smell, and feel. There are options for youth who do not mind or even want to get their hands dirty. Youth that DO NOT should be encouraged to grind the nuts or gently stir the steeping nut water mix.
From the modern guests’ point of view, the process should look relatively simple and streamlined, even at a demonstration with no access to fire or running water.
Recipe?
The period recipes are vague, and proportions are frequently not provided. Modern recipes are frequently entwined with questionable science, dubious health claims, or both.
Many modern recipes recommend that the almonds soak for eight (8) to twelve (12) hour, pat the nuts dry, optionally dry in a low temperature oven, peel the almonds, optionally dry in a low temperature oven or allow to air dry, blend with water in a 1 part almonds to 3 or 4 parts water ratio, and then strain.
But what works best for a demonstration?
Testing – Soaking and grinding
When we first started doing an almond milk demonstration, we did a quick blanch or started the almonds soaking overnight and then pulled from the water as we needed to use them. Since one of the goals is to have a demonstration that travels easily and can be used for a shorter display time, is there an optimal setup?
The following table provides a visual comparison of the almonds tested at various stages of soaking in comparison with raw and blanched almonds. Peels are included to show ease of removal. There is a noticeable plumping of almonds with the longer soak, which leads to a noticeable decrease in flavor, a softer texture, and a more difficult grind.
| Almond Soak Time | peeled almonds, peels, soaked almonds |
| No soak, 30 second blanch in boiling water |  |
| From bottom to top: raw almonds 30 minute soak, pat dry, peel |  |
| From bottom to top: raw almonds 30 minute soak, pat dry, peel 2 Hour soak and then peel |  |
| From left to right: raw almonds 30 minute soak, pat dry, peel 2 hour soak 6 hour soak |  |
| From bottom to top: raw almonds 30 minute soak, pat dry, peel 2 hour soak 6 hour soak 8 hour soak 30 second blanch |  |
| From bottom to top: raw almonds 30 minute soak, pat dry, peel 2 hour soak 6 hour soak 8 hour soak 12 hour soak 30 second blanch |  |

The grinds on the almonds were significantly different. The 30 minute soak was the easiest to grind into finer particulate. Is this because it has an eleven and a half hour (11.5) drying time?
Further testing was conducted to compare a thirty (30) minute soak and the twelve (12) hour soak each with a 2 hour dry time.

Testing – Steeping
Next on the testing, did the length of dry time and effectiveness of the grind effect the almond milk produced in a noticeable manner?

Almonds soaked for 30 minutes, peeled, left to dry for 2 hours and then ground. 
Almonds left to soak for 12 hours, peeled, and then left to dry for 2 hours prior to grinding
To test this, one ounce (1) of each almond type was prepared for steeping. One ounce of ground almonds, soaked for thirty (30) minutes and allowed to dry for two (2) hours versus one ounce of ground almonds soaked for twelve (12) hours, peeled, and dried for two (2) hours prior to grinding. Both samples then had boiling water added to them and were allowed to steep untouched for two (2) hours.


Once steeped the visual difference between the two steeps is fairly minimal. Taste-wise, the longer soaked grind had a very faint almond flavor. The short soaked almond had a more upfront almond flavor but tasted more like unpeeled almonds.

Recommended recipe for the demonstration

Optimally, a thirty (30) to sixty (60) minute soak followed by immediate peeling and then allow to dry for at least two hours, over night is better.
You can grind peeled almonds immediately. They do not make as nice of a ‘fine’ ground but that does not interfere with the demonstration.
Any temperature of water will work for the steep, although hotter is better. Use a one to six (1:6) part ratio, which will maximize your almond use while still giving you a product that looks like almond milk.

Equipment and layout for the demonstration
What equipment you will need will depend heavily on how long your demo time slot is, your work surface and space, your available dishes, and whether you have access to fire.
As this is a demonstration, you will need to have almonds prepared for each stage of the demonstration: dried, soaked, peeled, starting to grind in the mortar, ground, and then depending on your setup, ready to steep, steeping, and already strained almond milk.
The minimal demonstration:

- Work surface covering. Paper, plastic, cloth, or linen will all work and should be based on your audience and what you have available.
- Cloth for straining the almond milk through. It looks nice if this is linen, but cheesecloth works just as well.
- 2 bowls: You will need a bowl for ready to peel almonds and a bowl with your straining cloth and ground almonds. You can then add water to it for steeping and straining back into.
- Mortar and pestle: Necessary for grinding down the almonds. (Certain wholesale stores frequently have a nice set on sale that they market for guacamole.)
- Hand towels to dry your assistant’s hands on, these can be kitchen towel, linen, or other fabric pieces that absorb water.

The slightly nicer demonstration:
- Add a pitcher for water
- Have 3 additional bowls, one for holding dry almonds, one to collect almond skins, and one to hold ground almonds.
- Add a second pitcher to hold the strained and ready to use almond milk
- A bowl with rinse water next to the towels for cleaning hands
Setup with fire
- Fire preparation and maintenance
- One or two pots or pipkins to heat water for steeping, hand-rinsing, or for later cooking-in
- Optional: A recipe or two that uses almond milk and the other ingredients.
- A simple breakfast would be almond milk, barley, and honey
- There are a variety of ‘white dish’ dishes using almond milk, chicken, and warming spices. Originally intended for those of delicate stomach or during illness they are quite tasty, frequently use one pot, and have a relatively short cook time.

Cautions
Check with parents about almond and tree nut allergies!
Do not use the almond milk made in the demonstration for cooking. I know we all want to reduce waste BUT food safety is key and even if you get everyone’s hands washed, you will not necessarily see if they touch faces, hairs, clothes, etc. If you want connect the process or production to use in a tasty dish, use almond milk made on a previous day or by a different cook.
Citations and Recognitions
Scully, Terence. 1995. The Art of Cookery. Boydell Press, Woodbridge, Suffolk, UK. Pgs 15 and 54.
The Dragon’s Laire Culinary Guild but especially Lady Margret ‘Morte’ Elwald, Noble Zii, and THL Rycheza z Polska.
Spices and Herbs Display and Book – work in progress

We first visited June Faire as modern attendees in 2013. One of the demonstrations that was most memorable was THL Rycheza z Polska’s spice box. A small wooden box with an array of spices for visitors to smell and poke at while discussing what was familiar and what was new. We had just discovered long pepper at the local market but the brightly colored mace was a new find with an intriguing smell!
When I started participating at the demonstrations for SCA branches and civic groups, I wanted to be able to recreate that spice box experience.
The spice and herbs discussion display works well for people conducting a demo who want to chat with modern visitors, who may not want to be actively cooking, or need a rest from being around the fire. But if they are newer to culinary history or are only familiar with a specific culture’s food, they may not have the background to answer visitor questions.
Additionally, your demonstration area may only have one or two volunteers. A spice and herb display can still be explored by visitors with casual oversight from a volunteer at a different demo or working at a prep station.
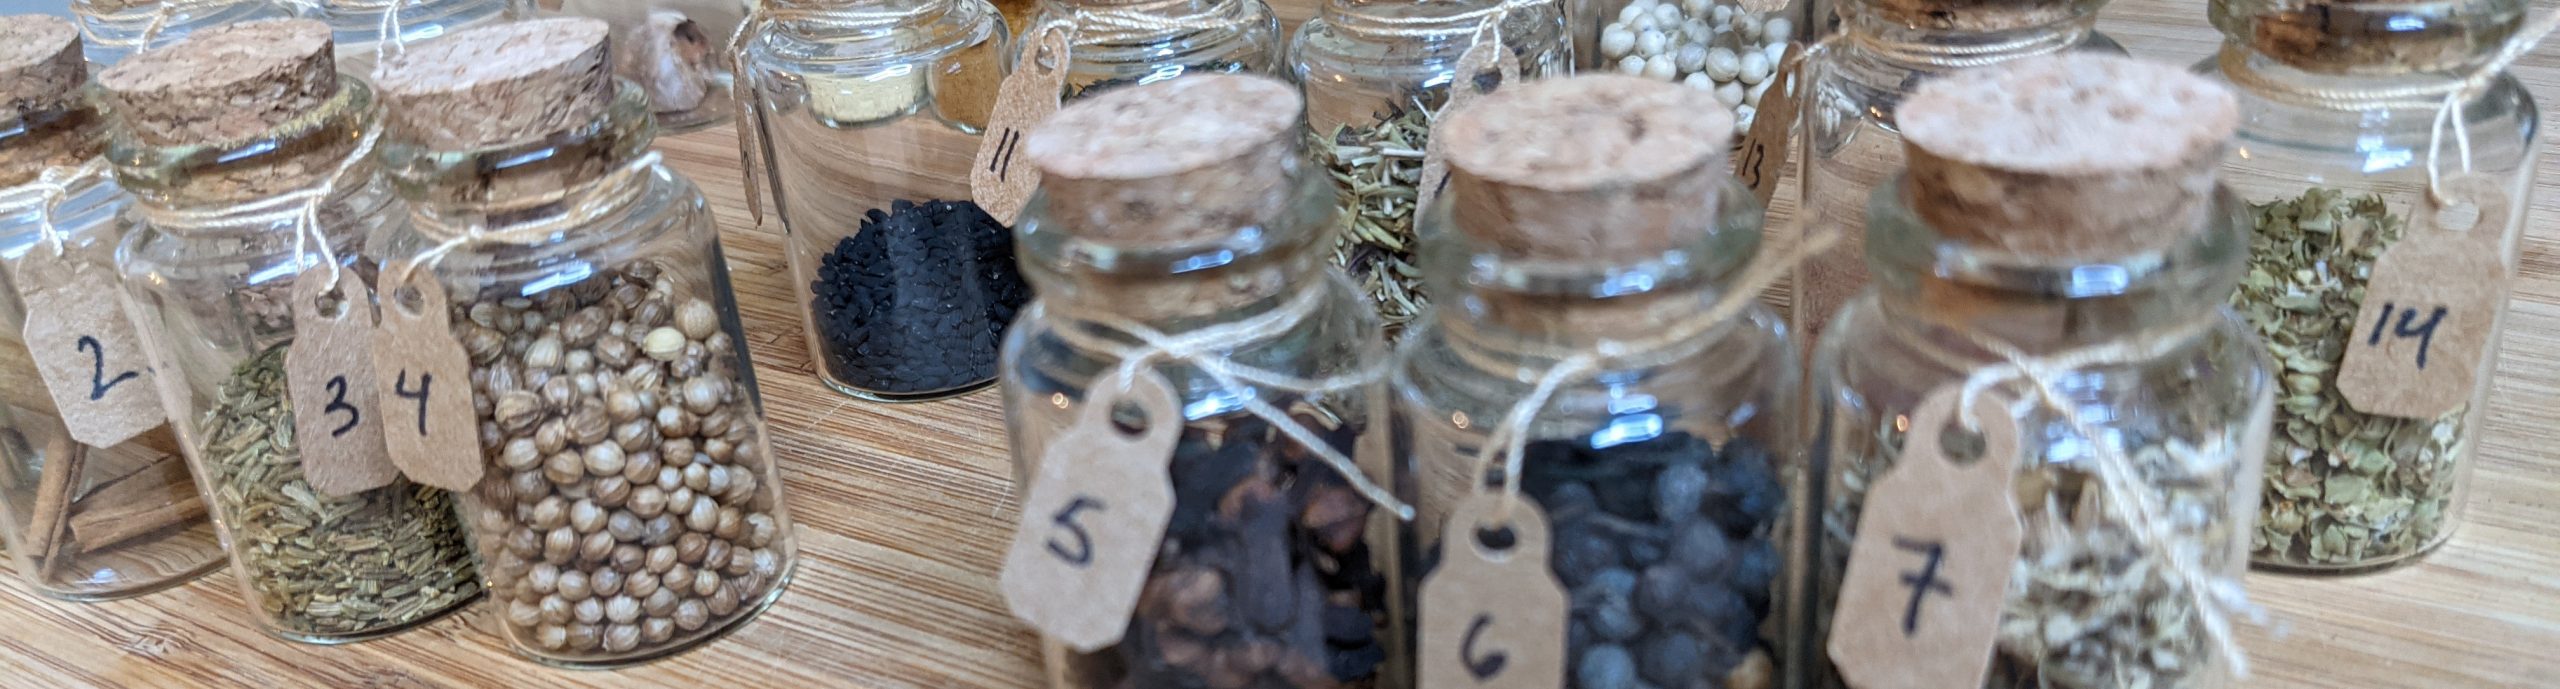
Containers and Labeling
Spices were stored and transported overland and by sea but descriptions of the actual methods used are rare; they were likely to include pouches or jars sealed with wax. Merchants, or households in the care of the steward or apothecary, kept a ready supply of spices stored in small leather pouches or bentwood boxes.

Apothecary shop from the Chirurgia – 14th Century French Illuminated Manuscript. Sloane 1977 ff 49v-50. 
2 Medicine phials found in an apothecary shop midden in Dublin, Ireland. 
7 glass medicine vials excavated from a Dublin apothecary shop 
Bentwood boxes shown in ‘Canon of Medicine: scene of pharmacy’


Setups from members of the SCA vary: wooden boxes and chests, make-up samplers, and even one marvelous display where everything traveled packaged carefully in resealable bags and jars and was then displayed in small pieces of pottery and seashells across two (2) tables.

Set out display 
Spice and dried herb display using make-up containers 
Small make-up sampler containers that could be used for spices 
Spice display jars, one with a small segment of cassia in it


Labeling your contents can be tricky. The size of your container and your own comfort with the contents dictates the size of the label. Displays set up in pottery may not have labels at all. Displays in small jars may not have enough surface area to write ‘grains of paradise’ and still have it be legible.

An alternate method is to use tags or to label them with numbers that correspond to a reference grid or sheet. The benefit with movable tags is that if your order is alphabetical, a tag can be easily moved. For example, if you have labeled cloves (6), cubebs (7), and cumin (8) and then discover you misplaced coriander, it can be easily shuffled into place cloves (6), coriander (7), cubebs (8), and cumin (9). Wet erase or whiteboard markers can also be used to write on glass or plastic and be easily cleaned.
Contents and Information
What will your display contain? The benefit to this type of display is the flexibility it brings. You can limit it to items that are easy to obtain in your area or, conversely, those that are difficult to obtain.

Season also has a role in the setup: fresh herbs are more abundant, and cheaper, in the growing season versus deep winter. Summer displays set with pots of herbs or freshly trimmed bunches hanging from a line strung between pavilion poles are eye-catching and bring pleasant scents to the air. Meanwhile, a winter display set up near a bubbling pot of spiced wine or juice draws attention through warm scents that remind most of delicious treats.
Persona or theme based setups are flexible in size and can be easily linked to items being cooked; spices used to create hippocras or herbs and spices purchased by the local monastery.
A Roman culinary set up could include samples of anise seed, asafetida, bay (laurel) leaf, black peppercorns, cassia, Ceylon cinnamon, cardamom, clove, coriander, cumin, dill, mustard seed (not black), ginger, and oregano. And then, if available, plants or bundles of fresh cilantro, dill, lovage, mint, oregano or marjoram, and fronds of celery or fennel. Note, this is a subset of the herbs and spices used in Roman cooking, medicines, and aromatics. You could narrow your focus to only the herbs and spices used for one or two recipes that you are demonstrating.
Information
Expect visitors to ask questions! If you are a fan of spices in your everyday kitchen and/or a historical culinary researcher, you may be well educated on all of the spices in your display, where they could be found, and how they were used in what parts the pre-17th century world.
But maybe your volunteer is not. Perhaps they are new to the SCA, have a growing interest in culinary history, or are a spouse volunteering to be put to work. Or, as described above, the demo area does not have the volunteers to have someone at each station but an empty table is equally unappealing.
Index cards are a tried and true method. They are easy to handle, durable, and can hold a surprising amount of information. They can be hidden behind displays or laid out on a table. A particularly breezy day can be disruptive but is easy to handle by weighing them down or using a hole punch and a key ring.
A more period method would be a time-period-appropriate bound book! Many of the book styles in period can be crafted and An Tir has a number of people who can and have taught classes on how. They can also be purchased. Ideally, when creating this book, all of the herbs and spices that you want to put into it would have been identified and all of the information about location, cultures, and uses would be known and your organization method decided on. This can make things difficult if there is new research.
An in-between step would be to create information pages in the desired layout, potentially printed on cardstock, and then stored in page protectors. They could then be placed in a 3-ring binder or cleverly hidden with a faux leather cover or even a faux medieval text.

Information page about coriander 
Information page about coriander
Ways To Use Your Display
The first and easiest method is to put the spices and herbs out and encourage discussion about them. But really your options are limited only by your space and imagination.
One benefit of numbering each container and maintaining a separate list is setting up a matching game. Can they match a ground or whole spice to a list? Can they match the spice and herb or plant together: celery, coriander, fennel, lovage, mustard?
What are your visitors familiar with? Which are new and what current dishes might they be?
Citations and Recognitions
Faas, P. 2005. Around the Roman Table. Translated by Shaun Whiteside and edited by Patrick Faas. Chicago: University of Chicago Press. Pg 151-163
Hayden, A. R. Pots, phials, and potions. Archaeology Ireland, Vol. 31, No. 2 (Summer 2018), pg. 15-18.
Hayden, A. R. Excavating a 17th century Dublin apothecary shop: archaeology and art history combined. youtube.com/watch?v-QjCmKcXyy-w. Accessed 6/4/2021.
Maxwell, N. Apothecary shop found in London. Archaeology Ireland. archaeologyireland.ie/2018/03/19/apothecary-shop-found-in-dublin/. Accessed 6/4/2021.
Scully, T. 1995. The Art of Cookery. Boydell Press, Woodbridge, Suffolk, UK. Pg 30.
Wow! Thank you so much for this exhibit as now it’s given me display ideas 🙂 I don’t do culinary things (though sometimes work with herbs for alchemy), but I have been wanting to develop my natural dyes display and I’m definitely going to take some of your herbs/spices ideas and run with them – especially the book idea! I love it! And I definitely need some sort of box that has all the little compartments….Anyway, well done!
Thank you so much for sharing your insights in presenting culinary demonstrations to the public. I am in the Madrone Culinary Guild and we have brainstormed demo ideas multiple times, and here is a good idea! Your article gives advice as well as recommenced methodologies. Visitors to demos can get disenchanted when they want to touch and interact and sometimes get told they must look only. Thank you so much for sharing your work.
Thank-you so much for creating this exhibit! I love spices, but never really thought about them as being demo fodder. You mentioned a “medieval” book on the spices being displayed, so that ties in with another of my interests. You have inspired me to create a little something for demos! Maybe two or three culture-specific spice boxes… with accompanying “receipt boke” for each. Beauty!
Thank you for commenting!
Highly encourage! And the box + receipt boke is a great idea!
This is brilliant! I have done a number of herbal and medicinal displays, and come up with some similar ideas, but you have so many more, thank you!
Very detailed, and I am impressed by the almond experiment. I once came across a Middle Eastern (Persian?) reference to eating ‘soaked almonds’, and did a similar experiment (though not nearly as detailed!) and determined that soaking almonds for eating. It was determined that soaking 45ish min to up to 1.5 hours made them softer and sweeter, but much after that they did begin to lose some taste.
Thank You So Much For This Presentation!
Tanikh
Thank you for giving it a read!
I definitely agree, I found the hourish give or take to be quite tasty but with less of the ‘raw’ edge to them.
What do you do for your displays? Especially the medicinal ones? We have some very interested sort of early period apothecary types that I’d like to tempt 🙂